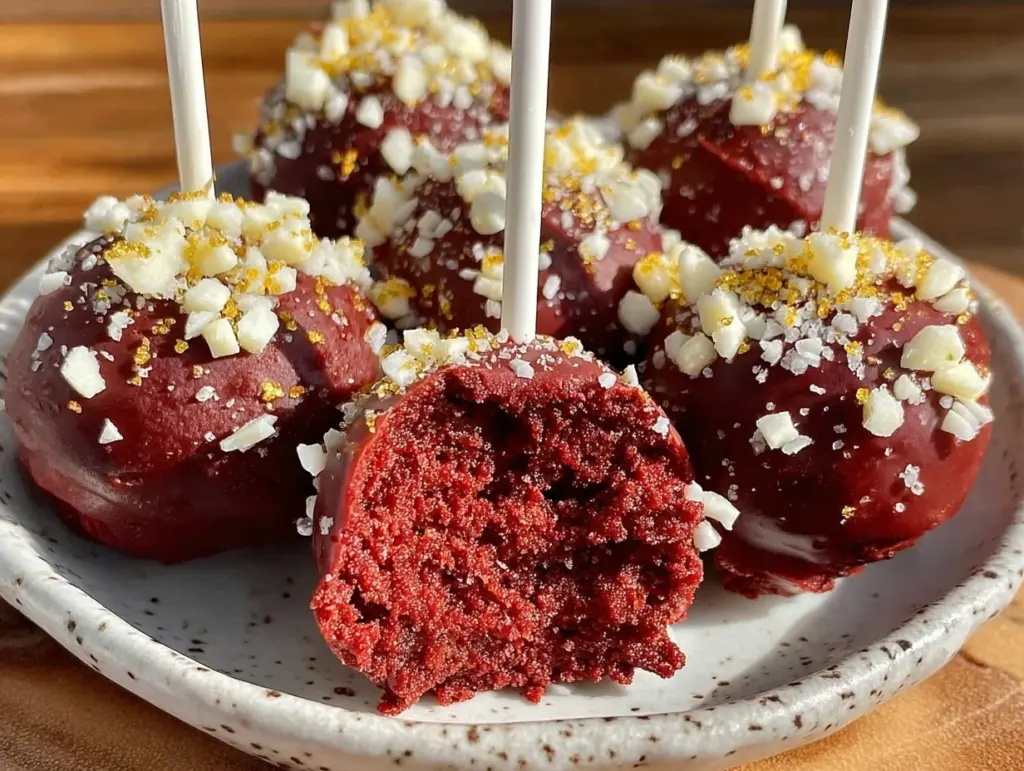
There was this one chilly evening when I found myself staring at a half-baked red velvet cake that hadn’t quite turned out as planned. Honestly, I was a bit bummed, thinking the whole batch was a lost cause. But instead of tossing it, I crumbled the cake into tiny bits, added a little cream cheese frosting, and rolled them into bite-sized balls. I dipped those into melted white chocolate, sprinkled a few delicate gold flakes on top, and suddenly, what started as a kitchen mishap turned into a little party on a stick.
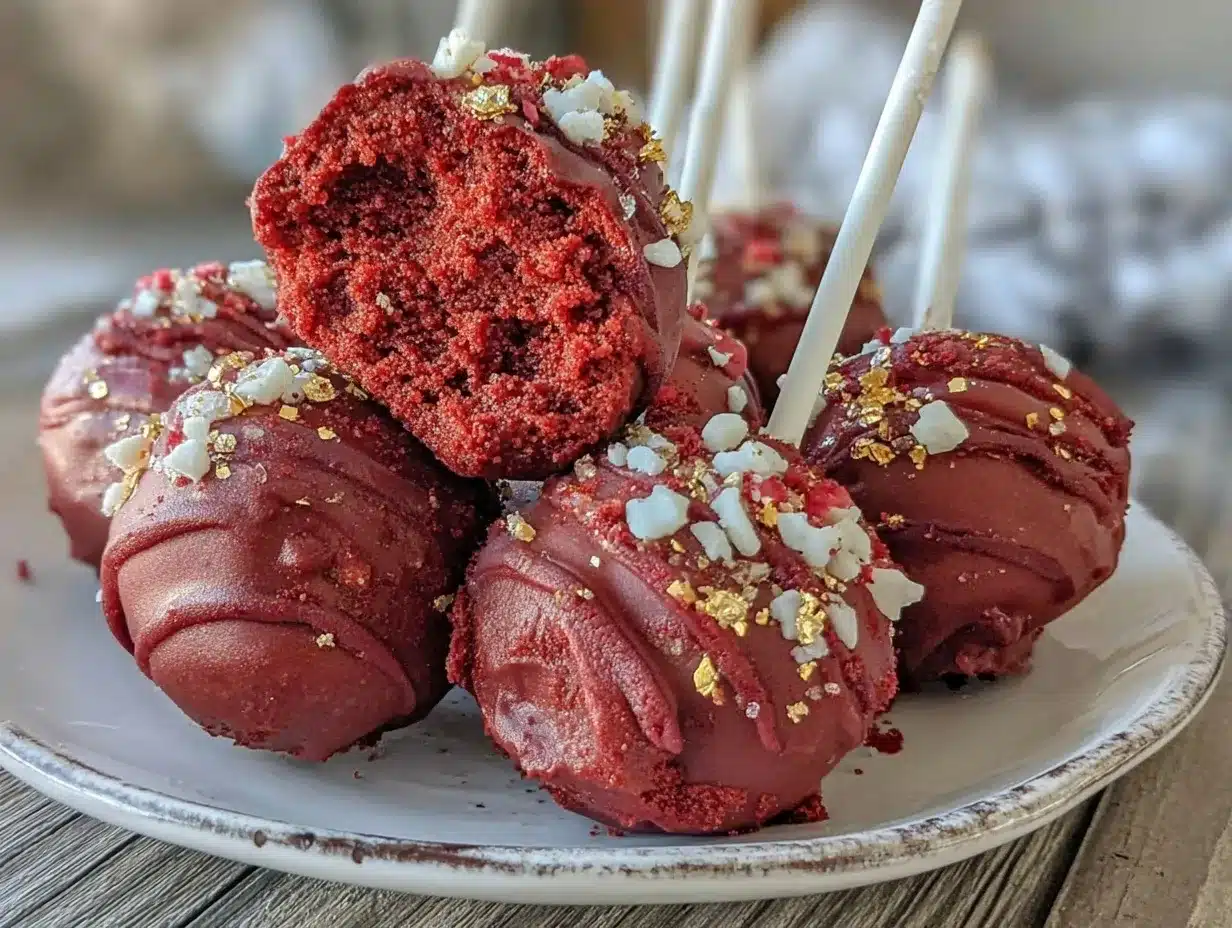
These decadent red velvet cake pops with white chocolate and gold flakes quickly became my secret weapon for impressing guests without the stress of slicing and plating a whole cake. They’re fancy enough to bring out when you want to celebrate something special, yet surprisingly simple to whip up on a whim. The smooth, velvety crumb combined with the creamy coating and that subtle shimmer of gold? Honestly, it’s a little moment of magic in every bite.
And what’s funny is that the recipe stuck around because it’s just so versatile — perfect for last-minute hosting or gifting (yes, they make gorgeous edible presents). I love how the white chocolate adds this delicate sweetness that balances the classic red velvet flavor, while the gold flakes give a luxe touch without feeling over the top. It’s comfort food with a twist, and after making these pops a few times a week recently, I can say they’re anything but ordinary.
So, if you’re ready to turn a simple cake into something truly show-stopping, let’s get into how you can make these decadent red velvet cake pops with white chocolate and gold flakes a new favorite in your baking repertoire.
Why You’ll Love This Recipe
- Quick & Easy: Comes together in under 45 minutes, perfect for busy days or last-minute celebrations.
- Simple Ingredients: Uses pantry staples and common baking basics — no need for specialty shops.
- Perfect for Parties: Ideal for birthdays, bridal showers, holiday gatherings, or just because moments.
- Crowd-Pleaser: Kids and adults alike can’t resist these bite-sized delights.
- Unbelievably Delicious: The moist red velvet crumbs blended with cream cheese frosting coated in smooth white chocolate create a melt-in-your-mouth experience.
- Elegant Presentation: The touch of edible gold flakes elevates these cake pops from simple treats to stunning little works of art.
This recipe isn’t just another cake pop version you’ve seen before. The secret lies in balancing the classic red velvet flavor with the creamy richness of white chocolate and the subtle crunch and glamor of gold flakes. I’ve spent a good while tweaking the ratios, especially the frosting-to-cake blend, to get that perfect pop texture that’s moist but holds together beautifully.
The white chocolate coating, too, is a deliberate choice — it adds a smooth sweetness that complements rather than overwhelms, unlike traditional milk chocolate. And the gold flakes? Well, they’re the kind of detail that makes you pause and smile because, let’s face it, sometimes we just want our desserts to look as good as they taste.
What Ingredients You Will Need
This recipe uses simple, wholesome ingredients to deliver bold flavor and satisfying texture without the fuss. Most of the ingredients are pantry staples, so you likely have everything on hand or can easily pick them up next time you’re at the store.
- Red Velvet Cake:
- All-purpose flour (2 cups / 250g) — I prefer King Arthur for consistent results
- Cocoa powder (2 tbsp / 15g), unsweetened
- Baking soda (1 tsp / 5g)
- Salt (½ tsp / 3g)
- Granulated sugar (1½ cups / 300g)
- Vegetable oil (1 cup / 240ml) — neutral flavor oils work best
- Large eggs (2), room temperature
- Buttermilk (1 cup / 240ml) — for tangy moisture; substitute with milk + 1 tbsp lemon juice if needed
- Red food coloring (2 tbsp) — gel colors give the best vibrancy
- Vanilla extract (1 tsp / 5ml)
- White vinegar (1 tsp / 5ml)
- Cream Cheese Frosting:
- Cream cheese (8 oz / 225g), softened — I trust Philadelphia brand for smoothness
- Unsalted butter (½ cup / 115g), softened
- Powdered sugar (2 cups / 240g), sifted
- Vanilla extract (1 tsp / 5ml)
- Coating & Decoration:
- White chocolate chips or melting wafers (12 oz / 340g) — Guittard or Ghirardelli work great
- Edible gold flakes — available online or in specialty baking stores
- Optional: Sprinkles or crushed nuts for added texture
Feel free to swap all-purpose flour for gluten-free flour blends if necessary, though texture might vary slightly. Also, the edible gold flakes are completely optional but add a lovely festive touch perfect for special occasions.
Equipment Needed
- Mixing bowls: One large for cake batter, another medium for frosting.
- Electric mixer: Handheld or stand mixer works well for smooth frosting and batter mixing.
- Baking pans: Two 9-inch round cake pans or one 9×13-inch pan (adjust baking time accordingly).
- Baking sheet: For chilling cake pops before dipping.
- Parchment paper: To line pans and sheets for easy cleanup.
- Cake pop sticks: Essential for holding the pops; wooden or plastic sticks both work.
- Microwave-safe bowl or double boiler: For melting white chocolate.
- Styrofoam block or cake pop stand: To hold pops upright while coating sets; if you don’t have one, a shallow box with holes poked in the lid can do the trick.
- Spatula and spoon: For mixing and scooping.
On a budget? No worries. You can skip the cake pop stand and use a glass or a mug to hold the sticks while the chocolate hardens. For melting chocolate, a microwave in short bursts with stirring between works just as well as a double boiler.
Preparation Method
- Prepare the cake batter (15 minutes prep, 30-35 minutes baking):
- Preheat your oven to 350°F (175°C). Grease and line your cake pans with parchment paper.
- In a medium bowl, sift together 2 cups (250g) flour, 2 tbsp (15g) cocoa powder, 1 tsp (5g) baking soda, and ½ tsp (3g) salt.
- In a large bowl, whisk 1½ cups (300g) granulated sugar and 1 cup (240ml) vegetable oil until combined.
- Add 2 large eggs, one at a time, beating well after each addition.
- Mix in 1 tbsp (5ml) vanilla extract, 2 tbsp (30ml) red food coloring, and 1 tsp (5ml) white vinegar.
- Alternately add the dry ingredients and 1 cup (240ml) buttermilk to the wet mixture, beginning and ending with dry ingredients. Mix until just combined — don’t overmix.
- Pour the batter evenly into pans and bake for 30-35 minutes or until a toothpick inserted in the center comes out clean.
- Allow cakes to cool completely on a wire rack.
- Make the cream cheese frosting (10 minutes):
- Using an electric mixer, beat 8 oz (225g) softened cream cheese and ½ cup (115g) softened unsalted butter until smooth and creamy.
- Gradually add 2 cups (240g) powdered sugar, mixing well after each addition.
- Stir in 1 tsp (5ml) vanilla extract.
- Chill the frosting in the fridge if it feels too soft for mixing with cake crumbs.
- Form the cake pops (15-20 minutes):
- Crumble the cooled red velvet cake into a large bowl, breaking it down into fine crumbs.
- Add about ¾ cup (180ml) cream cheese frosting and mix thoroughly with your hands or a spoon until the mixture holds together when pressed.
- Roll the mixture into 1-inch (2.5cm) balls and place them on a parchment-lined baking sheet.
- Freeze the cake balls for at least 15 minutes to firm up (this helps the coating stick better).
- Coat with white chocolate and decorate (20-30 minutes):
- Melt 12 oz (340g) white chocolate chips or melting wafers in a microwave-safe bowl in 30-second increments, stirring until smooth.
- Dip the tip of a cake pop stick into the melted chocolate, then insert halfway into a cake ball (this acts as glue).
- Dip the entire cake pop into the melted chocolate, letting the excess drip off.
- Immediately sprinkle edible gold flakes gently on the coating before it sets.
- Place the cake pop upright in a styrofoam block or pop stand to dry completely (about 15-20 minutes).
Pro tip: If your chocolate thickens during dipping, gently reheat in short bursts to keep it fluid. Also, chilling the pops in the freezer before coating helps prevent cracking.
Cooking Tips & Techniques
One thing I learned after a few failed attempts is that the texture of the cake-to-frosting ratio is everything. Too much frosting, and your pops feel greasy; too little, and they crumble apart. I found about ¾ cup of frosting to 1 batch of cake crumbs keeps them moist but firm enough to hold their shape.
When melting white chocolate, patience is key. Heat it slowly and stir often — white chocolate burns easily and becomes grainy if overheated. If you don’t have a microwave, a double boiler is your best friend here.
Another trick is dipping the sticks in melted chocolate before poking into the cake balls — it acts like glue, keeping the pops intact throughout the coating and drying process.
Multitasking helps: while the cake is baking and cooling, whip up the frosting and prep your dipping station. This way, you’re not scrambling at the end and can enjoy the process.
Lastly, work in batches when dipping. If you dip too many at once, the chocolate cools and thickens, making covers uneven or cracked. Keep your chocolate warm and smooth for the best finish.
Variations & Adaptations
- Dietary swaps: Substitute all-purpose flour with gluten-free blends to make gluten-free cake pops. Use dairy-free cream cheese and coconut-based white chocolate for a vegan-friendly version.
- Flavor twists: Add a teaspoon of espresso powder to the cake batter for a mocha red velvet variation. Or swap white chocolate for dark chocolate and sprinkle crushed pistachios instead of gold flakes.
- Seasonal adaptations: For holidays, swap gold flakes with red and green sprinkles or edible silver stars. In summer, fold in finely chopped fresh strawberries into the cake crumbs for a fruity surprise.
- Cooking method tweaks: Instead of baking, you can use store-bought red velvet cake or cupcakes to speed up the process. Just crumble, mix with frosting, and proceed as usual.
I once tried rolling the cake pops in crushed freeze-dried raspberries for an extra tangy crunch, and honestly, it was a game-changer — highly recommend if you want a burst of fruitiness with that creamy coating.
Serving & Storage Suggestions
Serve these decadent red velvet cake pops chilled or at room temperature. They look beautiful arranged on a platter, especially when the gold flakes catch the light. For presentation, try placing them in a decorative jar filled with colored sugar or edible glitter to hold the sticks upright.
Pair these pops with a cup of rich coffee, a glass of sparkling wine, or even a creamy hot chocolate for a cozy treat. They’re perfect finger food for parties, easy to grab and enjoy without utensils.
To store, keep the cake pops in an airtight container in the refrigerator for up to 4 days. If you want to keep them longer, freeze them on a tray first, then transfer to a freezer-safe container for up to 2 months. Thaw in the fridge overnight before serving.
When reheating, avoid microwaving directly — instead, let them come to room temperature slowly to prevent the white chocolate from sweating or melting unevenly. The flavors actually mellow and deepen after a day, so if you can wait, it’s worth it.
Nutritional Information & Benefits
Each red velvet cake pop (about 1.5 oz / 42g) contains approximately 180 calories, with 9g of fat, 23g of carbohydrates, and 2g of protein. The cream cheese adds a touch of calcium and some vitamin A, while the white chocolate contributes to the sweetness and smooth texture.
This recipe is gluten-free adaptable and can be made dairy-free with simple swaps, making it accessible for various dietary needs. While these pops are definitely a treat, the portion size keeps indulgence in check, perfect for those balancing taste and wellness.
From a personal standpoint, I appreciate that this recipe lets me satisfy my sweet tooth without the guilt of a giant slice of cake. It’s just enough to feel festive and indulgent, but not so much that I’m stuck with leftovers for days.
Conclusion
These decadent red velvet cake pops with white chocolate and gold flakes have become one of those recipes I turn to when I want something special but fuss-free. They blend classic flavors with a touch of glamor, making them perfect for everything from casual get-togethers to fancy celebrations.
What I love most is how customizable they are — you can tweak the coating, decoration, or even flavor to fit your mood or occasion. Plus, they’re a fun project that doesn’t require hours in the kitchen, which is always a win in my book.
If you try these cake pops, I’d love to hear how you make them your own or any tips you pick up along the way. Baking should be as joyful as eating, and these pops have brought me plenty of moments like that.
Here’s to sweet little bites of happiness that look as good as they taste!
FAQs
Can I make the cake pops ahead of time?
Absolutely! You can prepare the cake balls and store them in the freezer for up to a week before dipping and decorating.
What if I don’t have edible gold flakes?
No problem! You can use colored sprinkles, edible glitter, or even crushed nuts for decoration.
How do I prevent the cake pops from falling off the sticks?
Dipping the stick tip in melted chocolate before inserting it into the cake ball helps “glue” them together for better stability.
Can I use store-bought cake instead of baking from scratch?
Yes, using store-bought red velvet cake or cupcakes works fine and cuts down prep time.
How should I store leftover cake pops?
Store them in an airtight container in the fridge for up to 4 days or freeze for longer storage.
Pin This Recipe!

Decadent Red Velvet Cake Pops Recipe Easy Homemade with White Chocolate and Gold Flakes
These decadent red velvet cake pops combine moist red velvet crumbs with cream cheese frosting, coated in smooth white chocolate and topped with edible gold flakes for an elegant treat perfect for parties and special occasions.
- Prep Time: 25 minutes
- Cook Time: 30-35 minutes
- Total Time: 55-60 minutes
- Yield: 24 servings 1x
- Category: Dessert
- Cuisine: American
Ingredients
- 2 cups (250g) all-purpose flour
- 2 tbsp (15g) unsweetened cocoa powder
- 1 tsp (5g) baking soda
- ½ tsp (3g) salt
- 1½ cups (300g) granulated sugar
- 1 cup (240ml) vegetable oil
- 2 large eggs, room temperature
- 1 cup (240ml) buttermilk (or milk + 1 tbsp lemon juice)
- 2 tbsp red food coloring (gel preferred)
- 1 tsp vanilla extract
- 1 tsp white vinegar
- 8 oz (225g) cream cheese, softened
- ½ cup (115g) unsalted butter, softened
- 2 cups (240g) powdered sugar, sifted
- 1 tsp vanilla extract
- 12 oz (340g) white chocolate chips or melting wafers
- Edible gold flakes
- Optional: Sprinkles or crushed nuts for decoration
Instructions
- Preheat oven to 350°F (175°C). Grease and line cake pans with parchment paper.
- In a medium bowl, sift together flour, cocoa powder, baking soda, and salt.
- In a large bowl, whisk sugar and vegetable oil until combined.
- Add eggs one at a time, beating well after each addition.
- Mix in vanilla extract, red food coloring, and white vinegar.
- Alternately add dry ingredients and buttermilk to wet mixture, starting and ending with dry ingredients. Mix until just combined.
- Pour batter evenly into pans and bake 30-35 minutes or until a toothpick comes out clean.
- Cool cakes completely on a wire rack.
- Beat cream cheese and butter until smooth using an electric mixer.
- Gradually add powdered sugar, mixing well after each addition.
- Stir in vanilla extract. Chill frosting if too soft.
- Crumble cooled cake into fine crumbs in a large bowl.
- Add about ¾ cup cream cheese frosting and mix until mixture holds together when pressed.
- Roll mixture into 1-inch balls and place on parchment-lined baking sheet.
- Freeze cake balls for at least 15 minutes to firm up.
- Melt white chocolate in microwave-safe bowl in 30-second increments, stirring until smooth.
- Dip tip of cake pop stick into melted chocolate, then insert halfway into cake ball.
- Dip entire cake pop into melted chocolate, letting excess drip off.
- Sprinkle edible gold flakes immediately before coating sets.
- Place cake pops upright in styrofoam block or stand to dry completely (15-20 minutes).
Notes
If chocolate thickens during dipping, gently reheat in short bursts to keep fluid. Chilling cake balls before coating helps prevent cracking. Dipping stick tip in melted chocolate before inserting into cake ball acts as glue for stability. Work in batches when dipping to keep chocolate smooth. Store cake pops in airtight container in fridge up to 4 days or freeze up to 2 months.
Nutrition
- Serving Size: 1 cake pop (about 1.
- Calories: 180
- Fat: 9
- Carbohydrates: 23
- Protein: 2
Keywords: red velvet cake pops, white chocolate, gold flakes, cake pops recipe, easy dessert, party treats, homemade cake pops


