
There’s something quietly satisfying about late Sunday afternoons when the kitchen smells like something sweet but not overwhelming. I remember the first time I made these creamy mini cheesecakes with fresh fruit topping—it was one of those rare quiet moments where I just wanted a simple dessert that felt special without demanding too much effort. Honestly, I was skeptical at first. Mini cheesecakes? Would they even hold together? But I had some cream cheese sitting in the fridge begging to be used, and a basket of fresh strawberries and blueberries was calling my name from the counter. So I gave it a shot.
The texture surprised me right away—silky, dense yet airy at the same time—and the fresh fruit topping added that perfect burst of brightness. I made a batch, then another, and before I knew it, these little beauties became my go-to dessert for when friends dropped by unexpectedly or when I needed a sweet pick-me-up without the fuss. What stuck with me is how these mini cheesecakes feel like a little celebration, a sweet pause in the day, without pretending to be anything complicated.
Now, whenever I make these, I think about that quiet kitchen moment and how a simple recipe turned into something I keep coming back to. It’s not just about dessert—it’s about the comfort of knowing you’ve got a reliable, delicious treat waiting in the fridge, ready to brighten almost any day.
Why You’ll Love This Recipe
- Quick & Easy: Takes less than 30 minutes prep time, perfect for busy afternoons or last-minute guests.
- Simple Ingredients: Uses pantry staples like cream cheese, sugar, and eggs, plus whatever fresh fruit you have on hand.
- Perfect for Any Occasion: Great for potlucks, brunches, or even just a cozy weeknight dessert.
- Crowd-Pleaser: These mini cheesecakes always vanish fast—the balance of creamy base and tangy fruit is irresistible.
- Unbelievably Delicious: The texture is creamy without being heavy, and the fresh fruit topping adds a lively contrast that feels light and fresh.
This recipe stands out because it skips complex crusts or fancy toppings yet delivers on richness and flavor. The secret? Whipping the cream cheese to just the right smoothness and folding in a touch of sour cream to add tang and silkiness. Then topping with fresh fruit that you customize—whether it’s juicy blueberries, ripe mango, or classic strawberries. It’s a little twist that makes each bite feel like a mini celebration. Honestly, it’s the kind of dessert that makes you close your eyes and savor every bite.
What Ingredients You Will Need
This recipe uses simple, wholesome ingredients to create a rich, creamy cheesecake base topped with fresh fruit that adds brightness and color. Most of these ingredients are pantry staples, and the fresh fruit can be swapped based on the season or your preference.
- Cream Cheese, softened (8 oz / 225 g) – I recommend using a full-fat brand like Philadelphia for the best texture and flavor.
- Granulated Sugar (1/2 cup / 100 g) – balances the tanginess of the cheese and sour cream.
- Egg, large, room temperature (1) – helps bind the cheesecake filling.
- Sour Cream (1/4 cup / 60 ml) – adds creaminess and subtle tartness, making the texture silky.
- Vanilla Extract (1 tsp) – enhances the overall flavor without overpowering.
- All-Purpose Flour (1 tbsp / 8 g) – a bit of structure without making it dense.
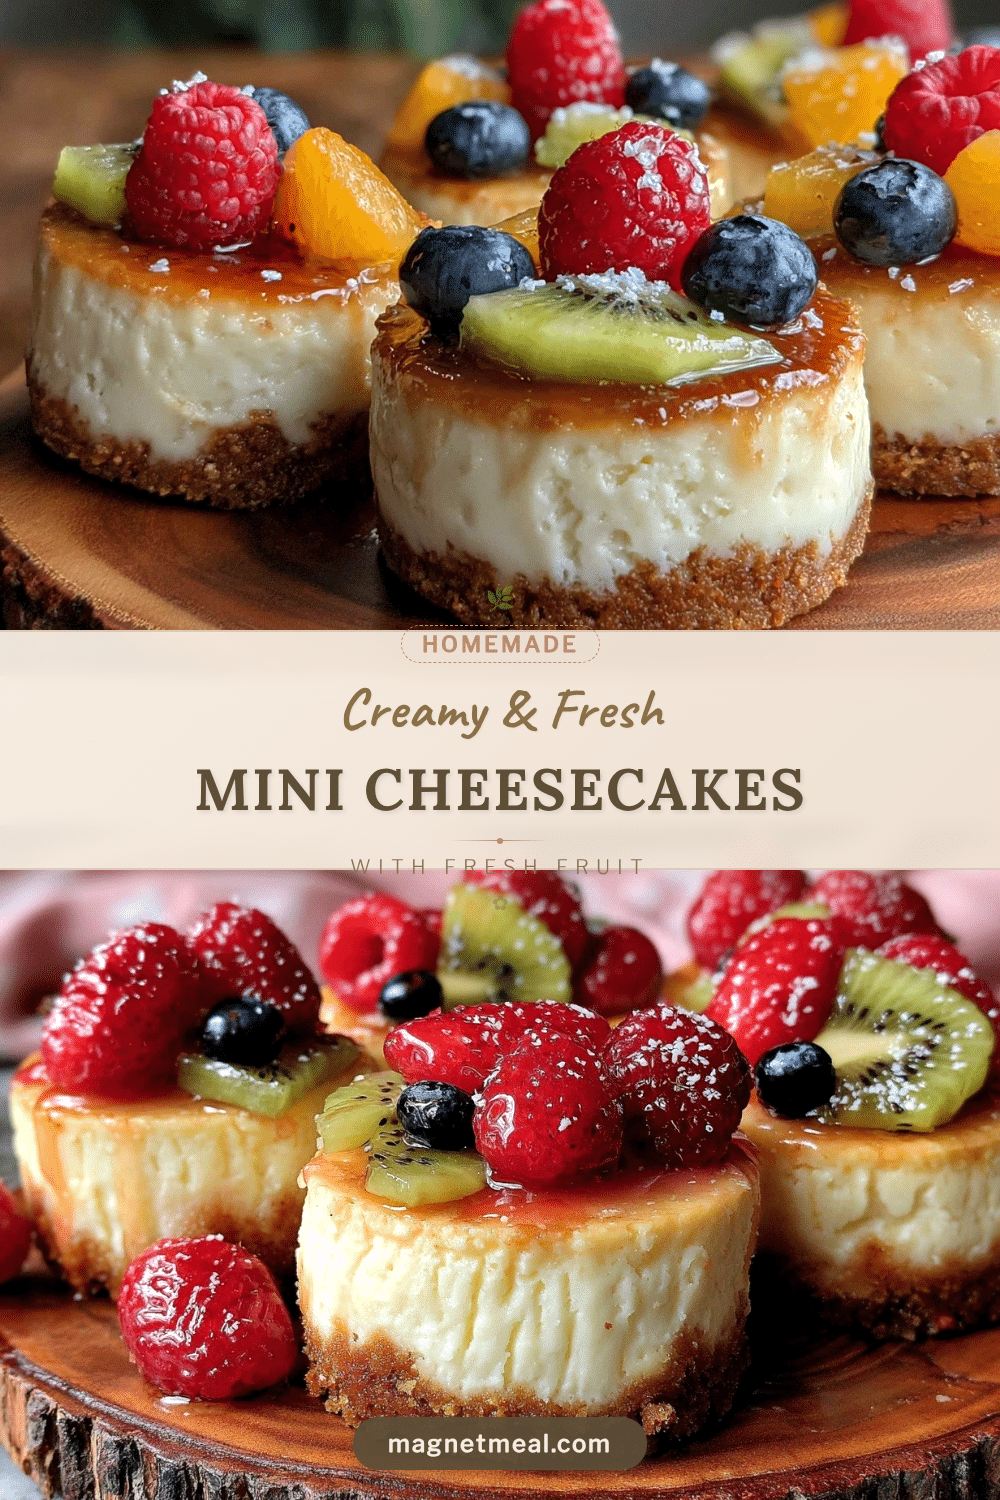
- Fresh Fruit for topping (about 1 cup / 150 g) – I love mixing strawberries, blueberries, and kiwi for a colorful finish.
- Lemon Zest (optional, 1 tsp) – adds a fresh citrus note, great if you’re using sweeter fruits.
If you want a gluten-free version, you can swap the all-purpose flour with almond flour or a gluten-free blend. For dairy-free, try replacing cream cheese and sour cream with coconut-based alternatives, but note the texture will be slightly different. Using seasonal fruit keeps this dessert feeling fresh year-round, so swap in peaches or raspberries in warmer months.
Equipment Needed
- Standard mixer (stand or handheld) to cream the cheese smoothly—this really helps avoid lumps.
- Mixing bowls for combining ingredients.
- Mini muffin pan or silicone molds (24-cup capacity) to hold each cheesecake.
- Parchment paper liners or silicone cups to make removal easy and keep cheesecakes intact.
- Measuring cups and spoons for precision.
- Optional: zester if you’re adding lemon zest for brightness.
If you don’t have a mini muffin pan, silicone molds work wonderfully because they’re flexible and make releasing the cheesecakes a breeze. I’ve tried both, and honestly, silicone molds reduce the chance of cracking or sticking, especially if you don’t grease the pan thoroughly. For budget-friendly baking, reusable silicone liners save waste and clean up quickly. Just a simple mixer makes the texture smooth, but you can also whisk by hand if you have the patience!
Preparation Method
- Preheat your oven to 325°F (160°C). This moderate temperature helps cook the cheesecakes gently without cracking. Prepare your mini muffin pan by lining it with parchment or silicone liners.
- Beat the cream cheese until smooth. Place the softened cream cheese (8 oz / 225 g) in your mixing bowl and beat on medium speed for about 2-3 minutes. You want it silky and lump-free. Scrape down the sides as needed.
- Add sugar gradually. Slowly add 1/2 cup (100 g) of granulated sugar while beating to keep the mixture creamy and smooth. This usually takes around 1 minute.
- Incorporate the egg and vanilla. Crack in 1 large egg (room temp) and add 1 teaspoon vanilla extract. Beat just until combined—over-mixing can trap air and cause cracks.
- Mix in sour cream and flour. Add 1/4 cup (60 ml) sour cream and 1 tablespoon (8 g) all-purpose flour. Fold gently or beat on low speed until just combined. This creates the creamy texture and slight structure.
- Optional: Add lemon zest. If using, fold in 1 teaspoon finely grated lemon zest for a fresh aroma and subtle zing.
- Spoon the batter into the prepared pan. Use a small cookie scoop or spoon about 2 tablespoons (30 g) of batter per mini cheesecake cup. Fill almost to the top but leave a little room for rising.
- Bake for 18-22 minutes. The centers should be set but still have a slight jiggle when you gently shake the pan. This ensures they’ll be creamy, not dry. Avoid opening the oven door early to prevent cracking.
- Cool completely on a wire rack. Let the cheesecakes cool in the pan for 30 minutes, then transfer to the fridge for at least 2 hours to firm up fully.
- Add fresh fruit topping just before serving. Arrange your chosen fresh fruit (about 1 cup / 150 g) on top. You can toss the fruit with a little honey or lemon juice if you want a glossier finish.
A quick tip: if you see any small cracks after baking, don’t worry. Chilling smooths them out, and the fruit topping hides imperfections nicely. I usually prep the cheesecakes the night before for best texture and flavor.
Cooking Tips & Techniques
One of the keys to creamy mini cheesecakes is making sure your cream cheese is softened thoroughly. I’ve learned that trying to beat cold cream cheese leads to lumps and uneven texture. Let it sit on the counter for at least an hour or soften slightly in the microwave (10-15 seconds) if you’re in a rush.
When mixing in the egg, don’t overdo it. Overmixing can incorporate too much air, which often results in cracks during baking. I usually stop as soon as the egg is blended in.
Using sour cream adds moisture and tang, but if you don’t have any, plain Greek yogurt is a decent substitute. The key is to keep the batter smooth and not too runny.
Another tip: baking at a lower temperature (325°F/160°C) helps prevent overcooking the edges while leaving the center creamy. Also, resist the urge to open the oven door too often—temperature changes can make the cheesecakes crack.
Cooling is crucial. Letting them chill for at least 2 hours makes a huge difference in texture. I’ve also found that making these a day ahead lets the flavors meld wonderfully.
Variations & Adaptations
- Seasonal Fruit Toppings: Swap fresh berries for sliced peaches in summer or pomegranate seeds in winter. I once topped mine with roasted figs and a drizzle of honey for a cozy fall twist.
- Crust Option: Though this recipe skips a crust for ease, you can add a simple graham cracker crust at the bottom of each cup if you want extra texture. Just press crushed crackers mixed with melted butter before adding the batter.
- Dairy-Free Version: Use vegan cream cheese and coconut yogurt instead of sour cream. The texture changes slightly but still deliciously creamy.
- Flavor Infusions: Add a tablespoon of orange liqueur or lemon juice to the batter for a citrusy pop. I’ve also tried mixing in a teaspoon of espresso powder for a mocha twist.
For a lighter option, swap half the cream cheese with ricotta cheese. It lightens the texture and adds a subtle graininess that’s surprisingly pleasant. I tried this when I wanted a less rich dessert for a summer picnic, and it was a hit.
Serving & Storage Suggestions
Serve these mini cheesecakes chilled straight from the fridge. The creamy texture and fresh fruit shine brightest when cold. I like to plate them on a simple white dish so the colors pop, maybe with a sprig of fresh mint for garnish.
They pair beautifully with a cup of strong coffee or a glass of sparkling rosé—perfect for brunch or a casual dessert.
Store leftovers covered tightly in the refrigerator for up to 4 days. If you want to keep them longer, you can freeze the cheesecakes (without fruit topping) in an airtight container for up to a month. Thaw overnight in the fridge and add fresh fruit just before serving.
Note that the flavors deepen and the texture firms slightly with refrigeration, so they taste even better the next day.
Nutritional Information & Benefits
Each mini cheesecake (without fruit) is roughly 150 calories, with about 10 grams of fat and 6 grams of protein. The cream cheese provides a good amount of calcium and vitamin A, while the fresh fruit topping adds fiber, vitamin C, and antioxidants.
This dessert can fit into a balanced diet when enjoyed in moderation. Using fresh fruit instead of sugary sauces helps keep sugar levels reasonable. For those watching carbs, swapping all-purpose flour for almond flour reduces carbohydrates and adds healthy fats.
Personally, I appreciate how this recipe combines indulgence with a fresh feel, making it a dessert that doesn’t leave me feeling weighed down or guilty.
Conclusion
This creamy mini cheesecakes recipe with fresh fruit topping is one of those rare finds that feels both simple and special. It’s a recipe I keep coming back to because it delivers creamy, smooth texture with a burst of fresh flavor every time. The ease of making small portions means you can enjoy a little treat without leftovers or fuss.
Feel free to customize the toppings or try the variations mentioned—this recipe is forgiving and flexible. I love knowing that a little batch of these cheesecakes is always ready to turn an ordinary day into something a bit sweeter.
If you give this recipe a try, I’d love to hear how you make it your own. Drop a comment or share your favorite fruit combos—I’m always curious about new twists!
Here’s to many cozy moments with creamy, fruity bites that never disappoint.
FAQs
Can I make these mini cheesecakes ahead of time?
Yes! They actually taste better after chilling for a few hours or overnight, which helps the texture set perfectly.
What’s the best way to remove mini cheesecakes from the pan?
Use parchment liners or silicone cups to prevent sticking. If using a bare pan, run a thin knife around the edges before gently lifting them out.
Can I use frozen fruit for the topping?
Fresh fruit is best for texture and flavor, but if you use frozen, thaw and drain it well to avoid sogginess.
How do I avoid cracks on the cheesecakes?
Don’t overmix the batter and bake at a moderate temperature (325°F/160°C). Also, avoid opening the oven door during baking.
Is it possible to make a crust for these mini cheesecakes?
Absolutely! Press crushed graham crackers mixed with melted butter into the bottom of each cup before adding the batter for a crunchy base.
Pin This Recipe!
Creamy Mini Cheesecakes Recipe Easy Homemade Dessert with Fresh Fruit Topping

These creamy mini cheesecakes feature a silky, dense yet airy texture topped with fresh fruit for a bright, light finish. Perfect for quick, easy desserts that feel special without fuss.
- Prep Time: 15 minutes
- Cook Time: 20 minutes
- Total Time: 2 hours 35 minutes
- Yield: 24 mini cheesecakes 1x
- Category: Dessert
- Cuisine: American
Ingredients
- 8 oz (225 g) cream cheese, softened
- 1/2 cup (100 g) granulated sugar
- 1 large egg, room temperature
- 1/4 cup (60 ml) sour cream
- 1 tsp vanilla extract
- 1 tbsp (8 g) all-purpose flour
- About 1 cup (150 g) fresh fruit for topping (e.g., strawberries, blueberries, kiwi)
- Optional: 1 tsp lemon zest
Instructions
- Preheat your oven to 325°F (160°C). Line a mini muffin pan with parchment paper liners or silicone cups.
- Beat the softened cream cheese on medium speed for 2-3 minutes until smooth and lump-free, scraping down the sides as needed.
- Gradually add the granulated sugar while beating, about 1 minute until creamy and smooth.
- Add the egg and vanilla extract, beating just until combined to avoid overmixing.
- Mix in the sour cream and all-purpose flour, folding gently or beating on low speed until just combined.
- If using, fold in the lemon zest.
- Spoon about 2 tablespoons (30 g) of batter into each prepared mini muffin cup, filling almost to the top.
- Bake for 18-22 minutes until centers are set but still slightly jiggly.
- Cool the cheesecakes in the pan on a wire rack for 30 minutes, then refrigerate for at least 2 hours to firm up.
- Add fresh fruit topping just before serving. Optionally toss fruit with a little honey or lemon juice for gloss.
Notes
Use softened cream cheese to avoid lumps. Do not overmix after adding the egg to prevent cracks. Baking at 325°F helps keep the centers creamy. Chill cheesecakes for at least 2 hours or overnight for best texture. Silicone molds reduce sticking and cracking. Fresh fruit topping can be customized seasonally. For gluten-free, substitute flour with almond or gluten-free flour. For dairy-free, use vegan cream cheese and coconut yogurt.
Nutrition
- Serving Size: 1 mini cheesecake
- Calories: 150
- Fat: 10
- Protein: 6
Keywords: mini cheesecakes, creamy cheesecake, fresh fruit topping, easy dessert, homemade cheesecake, quick dessert, no crust cheesecake


