“You’ve got to try this hummus,” my coworker said, sliding a Tupperware container across the break room table. Honestly, I was skeptical. I mean, hummus? How different could homemade be from the tubs at the grocery store? But, as soon as I scooped a bit with a pita chip, that creamy texture and bold flavor hit me — restaurant-quality, right there in that plastic container. Turns out, a little patience and a few tricks can transform simple chickpeas into something magical. That day, I scribbled down the recipe, and since then, I’ve been making this creamy homemade hummus restaurant style recipe over and over — sometimes multiple times a week. It’s become my go-to for snacks, quick lunches, and even unexpected guests. The way the garlic, tahini, and lemon come together feels like a tiny celebration in every bite. And the best part? It’s ridiculously easy to whip up at home, no fancy equipment or exotic ingredients needed.
What makes this hummus stick with me is how it balances texture and flavor — silky smooth yet rich, with just the right hint of tang and earthiness. It’s that kind of recipe that feels comforting without being heavy, and it pairs effortlessly with everything from crunchy veggies to warm pita, or even a hearty sandwich like the classic tuna melt on sourdough I love making on slow afternoons. Sometimes, I find myself sneaking spoonfuls straight from the bowl — no judgment, right? So, if you’re ready to upgrade your dip game and impress without fuss, this creamy homemade hummus recipe is exactly what you want in your kitchen arsenal. It’s a simple pleasure that never gets old.
Why You’ll Love This Recipe
After testing countless versions, I’ve landed on this creamy homemade hummus recipe because it nails that smooth, restaurant-style texture and deep flavor every time. Seriously, the difference is night and day compared to store-bought. Here’s why this recipe has stuck around in my rotation:
- Quick & Easy: Ready in under 20 minutes, perfect for those busy evenings when you want something tasty without a long prep.
- Simple Ingredients: No rare spices or expensive tahini brands needed; you probably have most of these staples in your pantry already.
- Perfect for Any Occasion: Whether it’s a casual snack, game day dip, or part of a mezze platter, this hummus fits right in.
- Crowd-Pleaser: Always gets compliments from kids and adults alike — creamy, flavorful, and not too garlicky.
- Unbelievably Delicious: The balance of lemon, garlic, and tahini creates a flavor profile that feels both fresh and indulgent.
What sets this apart from other hummus recipes? The secret lies in soaking the chickpeas overnight and the way you blend the tahini with lemon juice first — it creates this ultra-smooth, creamy base that’s silky instead of grainy. Plus, a little ice water added during blending lightens the texture to a fluffy dream. Honestly, it’s the kind of hummus that makes you close your eyes after the first bite because it’s just that satisfying. It’s comfort food, but with a bright, fresh twist that keeps you coming back.
What Ingredients You Will Need
This creamy homemade hummus recipe keeps things straightforward with wholesome ingredients that pack bold flavor and luscious texture. Most items are pantry staples or easy to find at any grocery store.
- Chickpeas (Garbanzo Beans): 1 ½ cups cooked (or 1 can, drained and rinsed) — I always prefer cooking my own for the creamiest texture
- Tahini: ¼ cup (sesame seed paste) — I recommend Soom or Joyva brands for smoothness and flavor
- Fresh Lemon Juice: 3 tablespoons — freshly squeezed gives the best bright, tangy kick
- Garlic: 2 cloves, minced — adjust to taste, but fresh is key for that punch
- Extra Virgin Olive Oil: 3 tablespoons, plus more for drizzling — use a fruity, peppery oil for depth
- Ice Water: 3 to 4 tablespoons — this makes the hummus delightfully fluffy and light
- Salt: 1 teaspoon — sea salt or kosher salt works best
- Cumin: ½ teaspoon (optional) — adds warmth and complexity
Optional toppings to really nail that restaurant vibe:
- Smoked Paprika or sumac for a pop of color and flavor
- Chopped fresh parsley for brightness
- Whole chickpeas for garnish and texture
If chickpeas aren’t your thing, you can swap in white beans or black beans for a twist. And if tahini isn’t handy, almond or cashew butter can be a decent stand-in, though the flavor profile will shift a bit. For a vegan or dairy-free version, all these ingredients are naturally suitable, so it’s an easy plant-based snack. In summer, I sometimes add roasted red peppers or fresh herbs to the mix for a seasonal flair.
Equipment Needed
- Food Processor or High-Speed Blender: Essential for that smooth, creamy texture. A food processor tends to give you more control over blending, but a powerful blender works fine too.
- Citrus Juicer: Optional but handy to get the most juice out of your lemons without seeds.
- Measuring Cups & Spoons: Accurate measurements help keep the balance of flavors just right.
- Spatula: For scraping down the sides to ensure everything blends well.
- Bowl: For soaking chickpeas if you’re using dry beans.
If you don’t have a food processor, a sturdy blender with a tamper can work, but you might need to stop and scrape down the sides more often. Personally, I’ve tried using a mortar and pestle, which is great for small batches but takes quite a bit longer and effort to get that silky finish. For tahini, stirring the jar well before measuring is crucial since it tends to separate. Keeping your equipment clean and dry helps prevent gritty bits from sneaking into the final dip.
Preparation Method
- Soak and Cook Chickpeas (If Using Dry): Rinse ¾ cup dried chickpeas and soak overnight in plenty of water. The next day, drain and rinse again. Place in a pot, cover with fresh water, bring to a boil, then reduce to a simmer. Cook for about 1 to 1.5 hours until tender but not mushy. Drain, reserving some cooking liquid. (If using canned chickpeas, rinse well and skip this step.)
- Prepare the Tahini-Lemon Mixture: In your food processor, combine ¼ cup tahini and 3 tablespoons freshly squeezed lemon juice. Blend for about 1 minute until it thickens and lightens in color. This step is key — it makes the tahini creamy and less bitter.
- Add Garlic and Seasoning: Add 2 cloves minced garlic, 1 teaspoon salt, and ½ teaspoon ground cumin (if using) to the mixture. Blend again for 30 seconds to combine.
- Add Chickpeas: Add 1 ½ cups cooked chickpeas to the food processor. Blend for 1 minute. Then, scrape down the sides with a spatula.
- Adjust Texture with Ice Water and Olive Oil: While blending, slowly drizzle in 3 to 4 tablespoons of ice water to loosen the hummus and create that fluffy texture. Then, add 3 tablespoons extra virgin olive oil and blend until smooth, about 1-2 minutes more.
- Taste and Adjust: Taste the hummus and adjust salt, lemon juice, or garlic as needed. If it feels too thick, add a little more ice water or reserved chickpea cooking liquid.
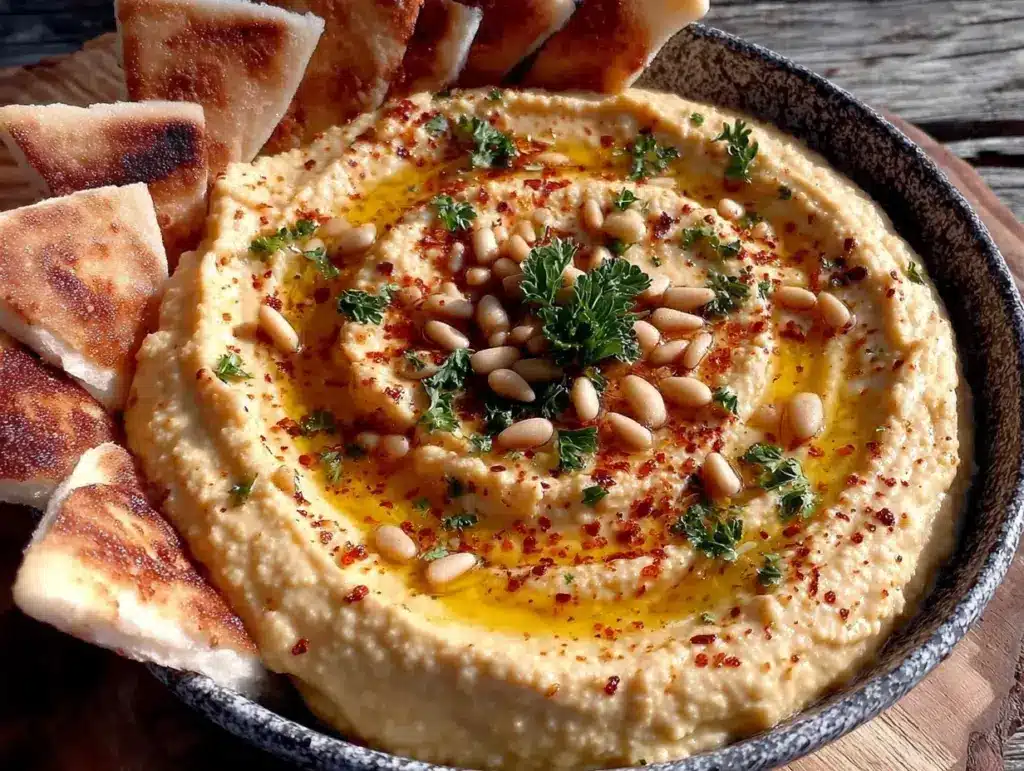
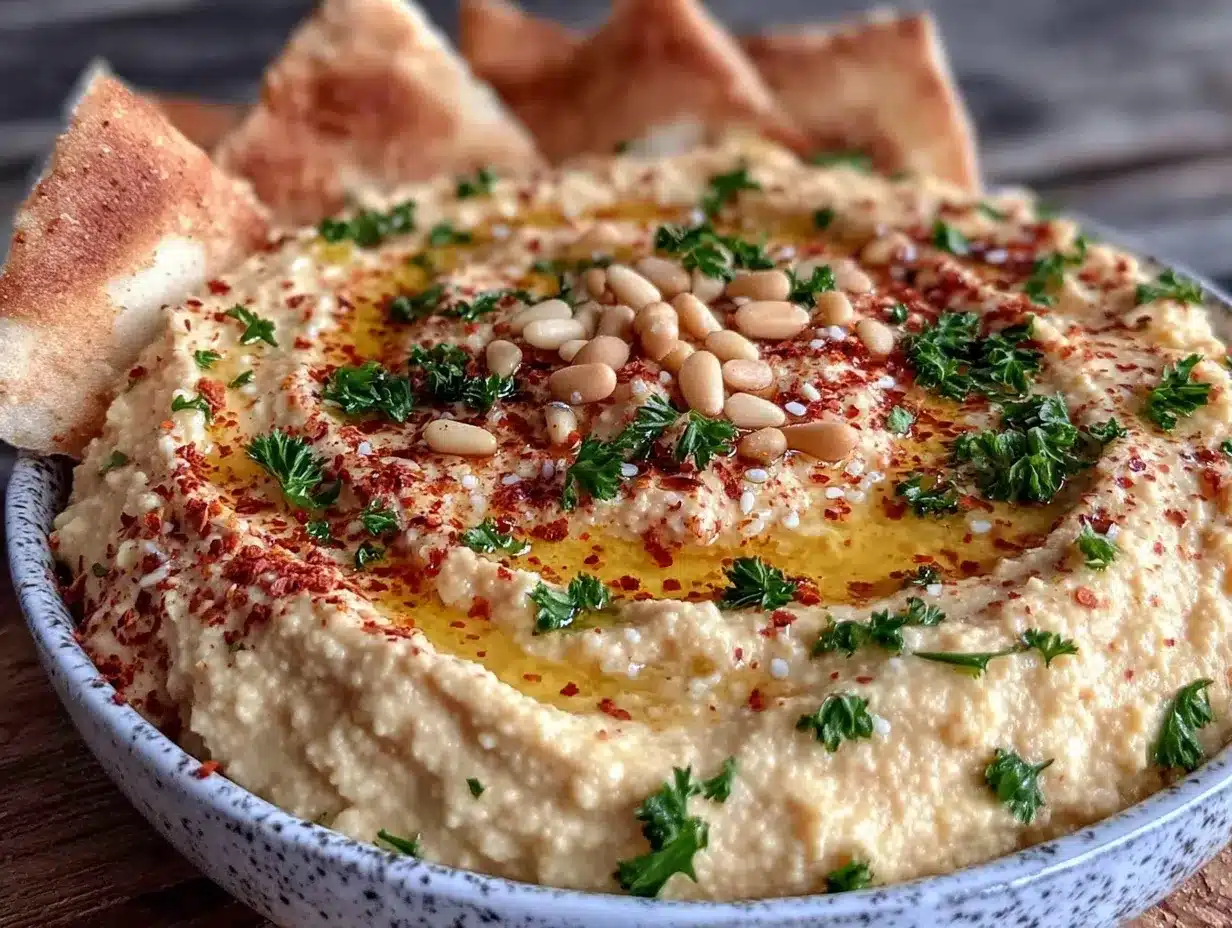
- Serve and Garnish: Transfer to a serving bowl. Drizzle with extra olive oil and sprinkle with smoked paprika, chopped parsley, and a few whole chickpeas if you like. Serve with warm pita, crunchy veggies, or alongside dishes like the vibrant Mediterranean chickpea bowl for a full meal.
Pro tip: If your hummus seems grainy, keep blending! Sometimes it takes a bit longer to get that ultra-smooth finish. Also, letting it rest in the fridge for an hour or two before serving really lets the flavors meld beautifully.
Cooking Tips & Techniques
Getting that perfect restaurant-style creamy hummus isn’t rocket science, but a few tricks can make a world of difference. First, don’t rush the tahini-lemon blend — it’s the magic that smooths out the paste and cuts bitterness. Using ice water instead of regular water to thin the hummus gives it a lighter mouthfeel and fluffiness that’s honestly addictive.
One mistake I made early on was using canned chickpeas straight from the can without rinsing thoroughly — it left a metallic taste that threw off the whole batch. Rinsing or cooking your own chickpeas avoids that. Also, when cooking dried chickpeas, a pinch of baking soda in the boiling water helps soften them faster and yields creamier results.
Blend in bursts rather than continuously to avoid overheating the motor or over-processing. Scraping down the sides helps blend everything evenly — don’t skip this step. If your garlic flavor feels too strong, try roasting the cloves first for a milder, sweeter note. And remember, fresh lemon juice beats bottled every time for brightness!
Timing-wise, it’s great to make hummus a few hours ahead or even the day before — it tastes even better once the flavors marry. Meanwhile, multitasking is easy since you can soak or cook chickpeas while prepping other dishes, like a quick BBQ chicken cheddar wrap or a spicy peanut noodle dinner for the family.
Variations & Adaptations
Switching up the base hummus can keep things exciting and cater to different dietary needs or flavor preferences. Here are a few ideas I’ve enjoyed:
- Roasted Red Pepper Hummus: Blend in ½ cup roasted red peppers for a smoky, sweet twist that’s perfect for summer gatherings.
- Avocado Hummus: Add half a ripe avocado for creaminess and a subtle buttery flavor, plus a boost of healthy fats.
- Spicy Hummus: Toss in a pinch of cayenne pepper or a drizzle of hot sauce to wake up your taste buds. I like this version for game nights with friends.
- Herb-Infused: Mix in fresh basil, cilantro, or parsley for a green, vibrant flavor — great with Mediterranean dishes like the baked salmon with feta and olives.
- Allergen-Friendly: For those sensitive to sesame, try sunflower seed butter instead of tahini. The flavor shifts but the creaminess remains.
Adjust cooking methods for chickpeas too — slow cooker chickpeas develop a softer texture and richer flavor if you want to prep in advance. Sometimes, I swap out lemon juice for lime for a zingier note, especially when pairing hummus with Mexican-inspired dishes.
Serving & Storage Suggestions
Serve your creamy homemade hummus at room temperature or slightly chilled, drizzled with olive oil and your choice of toppings. It pairs beautifully with warm pita bread, crunchy cucumber slices, or carrot sticks. For a heartier snack, try it alongside grilled chicken or as a spread on sandwiches like the classic tuna melt on sourdough.
Store hummus in an airtight container in the refrigerator for up to 5 days. It’s normal for it to thicken in the fridge — simply stir in a splash of water or olive oil before serving to loosen it back up. You can also freeze hummus for up to 3 months, though the texture may change slightly after thawing. I recommend freezing in small portions so you can thaw just what you need.
Flavors deepen over time, so making hummus a day ahead makes a noticeable difference — the garlic mellows and the lemon and tahini blend into a more harmonious profile. Just bring it back to room temperature and give it a stir before serving.
Nutritional Information & Benefits
This creamy homemade hummus is not only delicious but also packs a nutritious punch. A half-cup serving typically contains around 200 calories, 5 grams of protein, and 8 grams of fiber, making it a satisfying and filling snack or appetizer. Chickpeas are rich in plant-based protein and fiber, which support digestion and steady energy levels.
Tahini contributes healthy fats, calcium, and iron, while olive oil adds heart-healthy monounsaturated fats. Fresh garlic offers immune-boosting antioxidants, and lemon juice provides vitamin C. The recipe is naturally gluten-free, dairy-free, and vegan, fitting well into many dietary lifestyles. Just watch the salt level if you’re monitoring sodium intake.
From a wellness standpoint, hummus is a great way to sneak in legumes and healthy fats without feeling heavy or bloated. It’s also a smart alternative to cream-based dips or mayonnaise-heavy spreads, giving you that creamy satisfaction with less guilt.
Conclusion
This creamy homemade hummus restaurant style recipe has become a favorite for good reason — it’s simple, satisfying, and endlessly versatile. Whether you’re whipping up a quick snack or assembling a spread for friends, this dip brings that perfect blend of smooth texture and bright, savory flavor. I love that it’s so easy to tweak to your taste, and it pairs so well with so many dishes.
Try making it your own by experimenting with toppings or mix-ins. I promise, once you get the hang of this recipe, you’ll find yourself reaching for it again and again — just like I do. When you do, I’d love to hear how you customize it or what dishes you serve it alongside. Sharing those little moments is what makes cooking fun and personal.
Here’s to creamy, dreamy hummus — homemade, hearty, and always a hit!
Frequently Asked Questions
Can I use canned chickpeas for this hummus recipe?
Yes, canned chickpeas work fine and save time. Just rinse and drain them well to remove excess sodium or metallic taste. Cooking dried chickpeas yourself can yield creamier results, but canned is a great shortcut.
How do I get really smooth hummus like at restaurants?
Blending tahini with lemon juice first, adding ice water during blending, and soaking or cooking chickpeas until very soft are key steps. Also, blending long enough and scraping down the bowl helps achieve that silky texture.
Is tahini necessary for authentic hummus?
Traditional hummus includes tahini, which adds richness and depth. However, you can substitute with nut butters like almond or sunflower seed butter if you have allergies, but the flavor will differ.
How long does homemade hummus last in the fridge?
Stored in an airtight container, it keeps well for up to 5 days. Flavors improve after resting a few hours, but if you see any mold or off smells, discard it.
Can I freeze hummus?
Yes, hummus freezes well for up to 3 months. Texture may change slightly, so thaw in the fridge and stir well before serving. Freezing in small portions is best for easy use.
Pin This Recipe!

Creamy Homemade Hummus Recipe Easy Restaurant Style Dip at Home

This creamy homemade hummus recipe delivers a smooth, restaurant-style texture and bold flavor with simple ingredients. Perfect for snacks, quick lunches, or entertaining, it’s easy to make and endlessly versatile.
- Prep Time: 10 minutes
- Cook Time: 1 hour 30 minutes
- Total Time: 1 hour 40 minutes
- Yield: 6 servings 1x
- Category: Appetizer
- Cuisine: Mediterranean
Ingredients
- 1 ½ cups cooked chickpeas (or 1 can, drained and rinsed)
- ¼ cup tahini (sesame seed paste)
- 3 tablespoons fresh lemon juice
- 2 cloves garlic, minced
- 3 tablespoons extra virgin olive oil, plus more for drizzling
- 3 to 4 tablespoons ice water
- 1 teaspoon salt (sea salt or kosher salt)
- ½ teaspoon ground cumin (optional)
- Optional toppings: smoked paprika or sumac, chopped fresh parsley, whole chickpeas for garnish
Instructions
- If using dried chickpeas: Rinse ¾ cup dried chickpeas and soak overnight in plenty of water. Drain and rinse again the next day.
- Place soaked chickpeas in a pot, cover with fresh water, bring to a boil, then reduce to a simmer. Cook for 1 to 1.5 hours until tender but not mushy. Drain, reserving some cooking liquid.
- In a food processor, combine ¼ cup tahini and 3 tablespoons freshly squeezed lemon juice. Blend for about 1 minute until thickened and lightened in color.
- Add 2 cloves minced garlic, 1 teaspoon salt, and ½ teaspoon ground cumin (if using). Blend for 30 seconds to combine.
- Add 1 ½ cups cooked chickpeas to the food processor. Blend for 1 minute, then scrape down the sides with a spatula.
- While blending, slowly drizzle in 3 to 4 tablespoons ice water to loosen the hummus and create a fluffy texture.
- Add 3 tablespoons extra virgin olive oil and blend until smooth, about 1-2 minutes more.
- Taste and adjust salt, lemon juice, or garlic as needed. Add more ice water or reserved chickpea cooking liquid if too thick.
- Transfer to a serving bowl. Drizzle with extra olive oil and sprinkle with smoked paprika, chopped parsley, and a few whole chickpeas if desired.
- Serve with warm pita, crunchy veggies, or alongside your favorite dishes.
Notes
Soaking and cooking chickpeas yourself yields the creamiest texture, but canned chickpeas can be used as a shortcut if rinsed well. Blending tahini with lemon juice first is key to a smooth, less bitter base. Adding ice water during blending lightens the texture. Letting hummus rest in the fridge for 1-2 hours enhances flavor. If grainy, keep blending longer. Roasting garlic can mellow its flavor. Store in an airtight container in the fridge up to 5 days or freeze up to 3 months.
Nutrition
- Serving Size: ½ cup
- Calories: 200
- Sugar: 1
- Sodium: 300
- Fat: 14
- Saturated Fat: 2
- Carbohydrates: 18
- Fiber: 8
- Protein: 5
Keywords: hummus, homemade hummus, creamy hummus, restaurant style hummus, easy dip, chickpea dip, tahini, vegan dip, gluten-free dip


