
“You’re joking, right? Homemade potstickers from scratch?” That’s what my friend laughed when I casually mentioned I was making these crispy little pockets one Sunday evening. Honestly, I get it—potstickers feel like something you order from a restaurant or maybe buy frozen for a quick fix. But one night, after a long day juggling work calls and late errands, I found myself staring at a lonely bag of flour and a fridge full of odds and ends, wondering if I could pull off something simple yet satisfying. Spoiler: I ended up making a batch of easy crispy homemade potstickers from scratch that completely flipped my idea of what “quick comfort” means.
What caught me off guard was how doable this recipe really is. No fancy ingredients, no intimidating folds, just straightforward steps that yielded these golden, crunchy bites filled with juicy goodness. I remember the first time I lifted one out of the pan, hearing that satisfying sizzle and seeing the crisp edges with a soft, tender steamed top. It felt like cheating, but it wasn’t.
Since then, potsticker nights have become a thing around here—sometimes I throw in some spicy peanut noodles with chicken on the side, making it an easy, crowd-pleasing dinner. This recipe stuck with me because it’s the kind of dish that’s humble but special, the kind that invites you to slow down a bit, savor the crisp, and maybe dip a few more than you planned. It’s not complicated, but it feels like a small celebration every time.
Why You’ll Love This Recipe
After testing and tweaking this easy crispy homemade potstickers from scratch recipe multiple times (yes, I couldn’t stop making them last week alone), here’s why it stands out:
- Quick & Easy: The dough comes together in under 20 minutes, and the whole batch cooks up in about 30. Perfect for busy weeknights or when you’re craving something warm and crispy without hours in the kitchen.
- Simple Ingredients: Flour, water, ground meat or veggies—you probably have all this in your pantry or fridge. No need for fancy Asian markets.
- Perfect for Casual Dinners: Whether it’s a laid-back meal for two or a small get-together, potstickers always impress without stress.
- Crowd-Pleaser: Kids, adults, picky eaters—these potstickers get rave reviews every time, especially with a dipping sauce that’s just right.
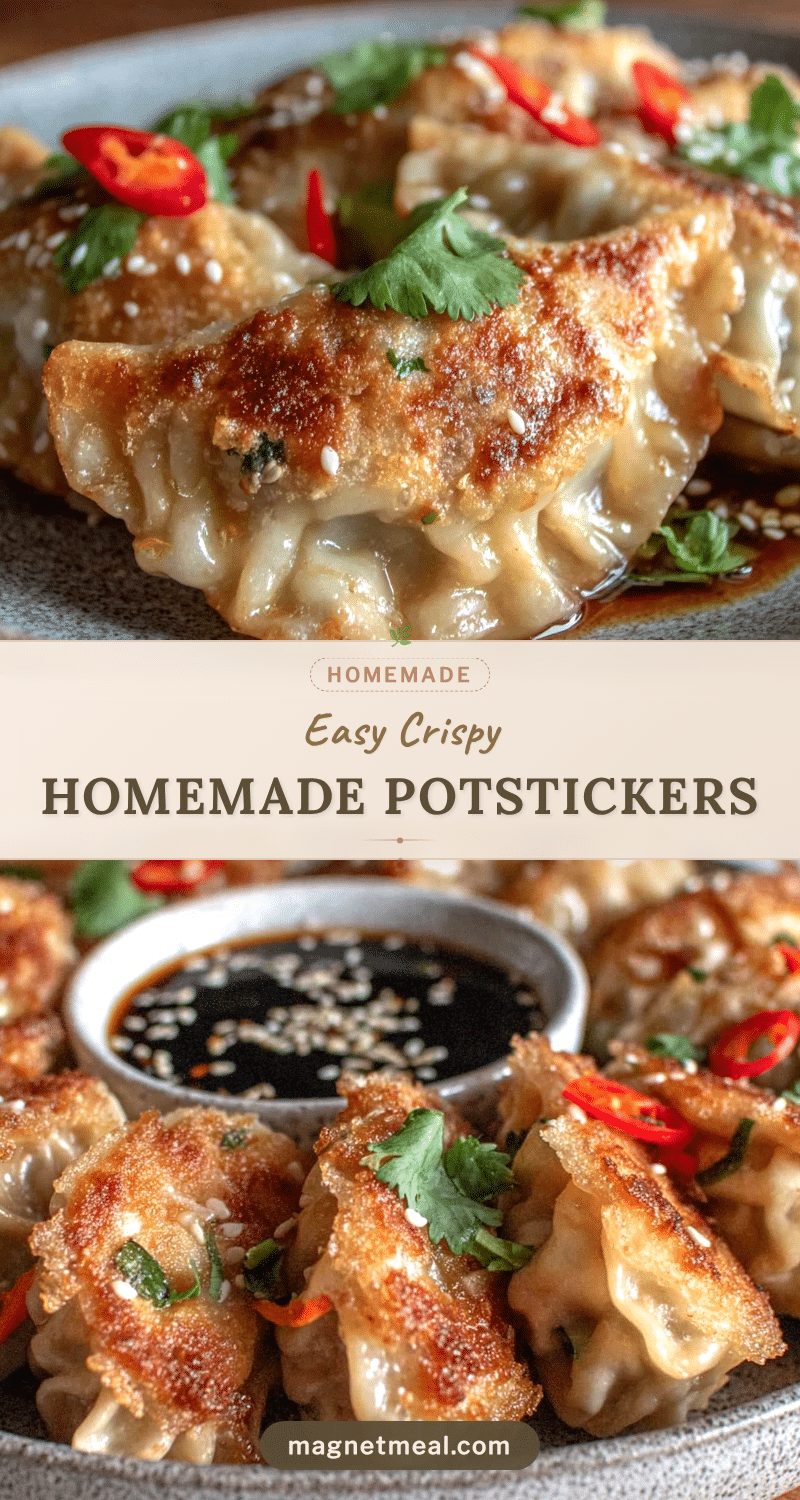
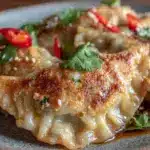
- Unbelievably Delicious: The contrast between the golden, crispy bottom and the tender steamed top with juicy filling is next-level comfort food. Honestly, it’s hard to stop at one.
This isn’t your run-of-the-mill frozen variety reheated and soggy. The dough texture is spot on—thin enough to be delicate but sturdy to hold the filling without bursting. The seasoning in the filling hits a perfect balance, just enough umami and freshness to keep you hooked.
And if you’re wondering what makes this recipe different, it’s the technique I use to get them irresistibly crispy while keeping that soft, steamed layer on top. Plus, making the dough yourself means you control every bit of the texture and flavor—no weird preservatives, just homemade goodness.
So, if you’re ready to have a go at making potstickers that will have everyone asking for seconds (and maybe thirds), you’re in the right place.
What Ingredients You Will Need
This recipe uses simple, wholesome ingredients to deliver bold flavor and satisfying texture without the fuss. Most are pantry staples, and the rest are easy to find in any grocery store. I’ve grouped ingredients by function to keep things clear:
- For the Dough:
- All-purpose flour – 2 cups (240 g), sifted for smooth dough
- Boiling water – about ¾ cup (180 ml), to create a tender but elastic dough
- Salt – a pinch, to enhance flavor
- For the Filling:
- Ground pork or chicken – 1 pound (450 g) (pork is juicier; chicken works for a lighter option)
- Green onions – 3, finely chopped
- Garlic – 2 cloves, minced (fresh is best)
- Ginger – 1 tablespoon, freshly grated (adds bright warmth)
- Napa cabbage – 1 cup, finely shredded (squeeze out excess moisture)
- Soy sauce – 2 tablespoons (I prefer low-sodium to control saltiness)
- Sesame oil – 1 teaspoon (toasty aroma and depth)
- Salt & pepper – to taste
- For Cooking:
- Vegetable oil – 2 tablespoons, for frying
- Water – ½ cup (120 ml), for steaming in the pan
Quick tip: If you want a vegetarian version, substitute the meat with finely chopped mushrooms and firm tofu, and use vegetable broth instead of water for added flavor. Also, look for firm, small-curd cottage cheese if you want to try a fusion twist in the filling (I’ve done it, and it’s surprisingly good!).
Equipment Needed
- Mixing bowls – for dough and filling
- Rolling pin – to roll out thin dumpling wrappers (a small wooden or silicone one works great)
- Sharp knife or bench scraper – for dividing dough and chopping ingredients
- Large non-stick skillet or cast-iron pan with a lid – essential for frying and steaming the potstickers evenly
- Measuring cups and spoons – for precise ingredient amounts
- Optional: Dumpling press or mold – if you want to speed up shaping, but hand-folding is just as satisfying
If you don’t have a rolling pin, a clean wine bottle or smooth glass bottle works just fine (been there, done that!). For the skillet, I personally prefer cast iron because it holds heat evenly, giving that perfect crispy bottom, but a good-quality non-stick pan can also do the job well.
Keep your tools clean and dry—especially the rolling pin—to prevent the dough from sticking. If you’re on a budget, a silicone baking mat can make rolling out dough easier and less messy.
Preparation Method

- Make the dough: In a large bowl, place 2 cups (240 g) of sifted all-purpose flour and a pinch of salt. Slowly pour in about ¾ cup (180 ml) of boiling water while stirring with chopsticks or a fork until the mixture starts to come together. Once cool enough to handle, knead the dough on a lightly floured surface for about 8 minutes until smooth and elastic. Cover with a damp cloth and let it rest for 30 minutes to relax the gluten—that’s key for easy rolling.
- Prepare the filling: While the dough rests, combine 1 pound (450 g) of ground pork (or chicken), 3 finely chopped green onions, 2 minced garlic cloves, 1 tablespoon freshly grated ginger, and 1 cup finely shredded napa cabbage (make sure to squeeze out excess moisture). Add 2 tablespoons soy sauce, 1 teaspoon sesame oil, and salt and pepper to taste. Mix everything thoroughly until well combined. I find using clean hands works best here to really distribute flavors evenly.
- Roll out the wrappers: Divide the dough into two equal portions. Roll each into a log and cut into small pieces about 1 inch (2.5 cm) wide—this should give you roughly 30 wrappers. Flatten each piece into a small disc, then use a rolling pin to roll out thin circles about 3 inches (7.5 cm) in diameter. Keep the edges thinner than the center for easy folding.
- Assemble the potstickers: Place a heaping teaspoon of filling in the center of each wrapper. Wet the edges with a little water and fold in half, pinching the edges to seal. If you like, pleat the edges for that classic look, but a simple seal works just as well. Keep the assembled potstickers covered with a damp towel to prevent drying out.
- Cook the potstickers: Heat 2 tablespoons vegetable oil in a large non-stick or cast-iron skillet over medium-high heat. Arrange potstickers in a single layer, flat side down, being careful not to crowd the pan. Fry for about 2 minutes or until the bottoms turn golden brown and crispy.
- Steam to finish: Carefully pour ½ cup (120 ml) water into the pan and immediately cover with a lid. Let the potstickers steam for 5-6 minutes until the water has evaporated and the wrappers are tender but still hold their shape. Remove the lid and cook for another minute to crisp up the bottoms again if needed.
- Serve warm: Transfer potstickers to a plate and serve with your favorite dipping sauce. I usually mix soy sauce, rice vinegar, and a splash of chili oil for a simple, tasty dip.
Pro tip: If your dough feels sticky while rolling, lightly dust with flour but avoid adding too much or the wrappers will get tough. Also, don’t rush the steaming step—that’s what makes the potstickers tender inside while keeping the crisp outside.
Cooking Tips & Techniques
Getting the potstickers just right takes a bit of practice, but here are some tips I’ve picked up that make a big difference:
- Rest your dough: Allowing the dough to rest for at least 30 minutes relaxes the gluten, making it easier to roll out thin without springing back.
- Don’t overfill: A heaping teaspoon of filling is plenty. Overstuffing makes sealing tricky and causes leaking during cooking.
- Seal with care: Make sure the wrapper edges are damp enough to stick but not soggy. Press firmly to prevent opening during frying and steaming.
- Control your heat: Medium-high heat is perfect for frying the bottoms to golden crispness. Too high and they burn; too low and you lose that satisfying crunch.
- Steam properly: Adding the right amount of water and covering the pan immediately traps steam to cook the filling and dough thoroughly.
- Use a good non-stick or well-seasoned cast iron pan: This prevents sticking and helps get that crispy bottom without breaking the wrappers.
One time, I skipped squeezing the cabbage and ended up with soggy potstickers—lesson learned! Also, folding them by hand is satisfying and lets you control the shape, but if you’re in a rush, a dumpling press works wonders.
Multitasking tip: While the potstickers cook, you can quickly whip up a dipping sauce or prepare a side like classic tuna melt on sourdough bread for a fusion-style meal.
Variations & Adaptations
Once you feel confident with the basic recipe, there’s plenty of room to switch things up:
- Vegetarian version: Swap ground meat for chopped shiitake mushrooms, firm tofu, and shredded carrots. Add a splash of vegetable broth to keep the filling juicy.
- Seafood twist: Try minced shrimp mixed with ginger, garlic, and green onions for a lighter but flavorful filling.
- Spicy kick: Add finely diced chili peppers or a teaspoon of chili garlic sauce to the filling for heat.
- Alternative flours: Use half whole wheat flour or substitute with gluten-free flour blends for different textures and dietary needs.
- Baking method: If you want to skip frying, brush assembled potstickers lightly with oil and bake at 400°F (200°C) for about 15 minutes, flipping halfway for crispness. They won’t have the classic steamed bottom but still delicious.
Personally, I once tried mixing cottage cheese into the filling for a creamy texture and it was surprisingly tasty—kind of a fusion experiment that worked better than expected.
Serving & Storage Suggestions
Serve your easy crispy homemade potstickers hot, straight from the pan, to enjoy the perfect crispy-steamed contrast. They’re great alongside dipping sauces like soy-vinegar with chili oil or even a garlic-sesame blend.
For a full meal, pair potstickers with simple sides such as steamed greens or a fresh cucumber salad. They also go well with noodle dishes like garlic butter shrimp ramen for a cozy dinner fit for any night.
If you have leftovers, store potstickers in an airtight container in the refrigerator for up to 3 days. Reheat by pan-frying again with a splash of water to steam and crisp the bottoms, or microwave covered with a damp paper towel to retain moisture.
To freeze, place uncooked potstickers on a baking sheet in a single layer and freeze until firm. Transfer to a freezer bag and cook from frozen, adding a few extra minutes to the steaming step. Flavors actually develop nicely after resting, so they taste even better the next day.
Nutritional Information & Benefits
Each potsticker (about 30 grams) contains approximately:
| Nutrient | Amount |
|---|---|
| Calories | 60-70 kcal |
| Protein | 4-5 g |
| Fat | 3-4 g |
| Carbohydrates | 5-6 g |
| Fiber | 0.5 g |
The main health benefits come from the lean protein and fresh vegetables in the filling. Using homemade dough means you avoid preservatives found in store-bought wrappers.
This recipe can easily be adapted for gluten-free diets by using gluten-free flour blends, and swapping soy sauce for tamari or coconut aminos makes it soy-free. Keep in mind the sesame oil and soy can be allergens for some, so substitutions are possible.
From a personal wellness perspective, this recipe strikes a good balance between indulgence and nourishment. It’s satisfying without being overly heavy, making it a comforting choice when you want something homemade but not complicated.
Conclusion
Easy crispy homemade potstickers from scratch bring a little magic to any meal without making your kitchen feel like a production line. The balance of textures, simple ingredients, and hands-on preparation make this recipe a keeper in my book.
Feel free to tweak the filling, try different cooking methods, or pair them with your favorite sides to make them truly yours. They’re a great way to impress guests or just treat yourself to something warm and satisfying after a busy day.
I’ve loved sharing this recipe because it reminds me that homemade doesn’t have to mean complicated—and that some of the best meals come from the simplest ideas.
If you try it, I’d love to hear how you adapted it or what dipping sauces you paired with your potstickers. Happy cooking and crispy bites ahead!
FAQs
Can I use store-bought dumpling wrappers instead of making dough from scratch?
Absolutely! Store-bought wrappers save time and work well, but making your own dough gives a fresher taste and better texture, plus it’s surprisingly easy.
How do I prevent potstickers from sticking to the pan?
Use a good non-stick or well-seasoned cast iron pan, and make sure to heat the oil properly before adding potstickers. Don’t overcrowd the pan and avoid moving them too soon.
Can I freeze potstickers after assembling?
Yes, place assembled potstickers on a baking sheet in a single layer and freeze. Once solid, transfer to a freezer bag. Cook from frozen, adding a couple of extra minutes to the steaming time.
What dipping sauce pairs best with these potstickers?
A classic combo is soy sauce, rice vinegar, and a splash of chili oil or sesame oil. You can also try garlic-sesame sauce or a simple sweet chili sauce for variety.
How thin should I roll the dough for the potstickers?
Roll the dough to about 3 inches (7.5 cm) in diameter and keep the edges slightly thinner than the center to make folding easier and avoid thick, doughy bites.
Pin This Recipe!
Easy Crispy Homemade Potstickers from Scratch
A simple and quick recipe for crispy homemade potstickers with a tender steamed top and juicy filling, perfect for casual dinners and crowd-pleasing meals.
- Prep Time: 20 minutes
- Cook Time: 30 minutes
- Total Time: 50 minutes
- Yield: 30 potstickers 1x
- Category: Main Course
- Cuisine: Chinese
Ingredients
- 2 cups (240 g) all-purpose flour, sifted
- ¾ cup (180 ml) boiling water
- Pinch of salt
- 1 pound (450 g) ground pork or chicken
- 3 green onions, finely chopped
- 2 cloves garlic, minced
- 1 tablespoon freshly grated ginger
- 1 cup napa cabbage, finely shredded and excess moisture squeezed out
- 2 tablespoons soy sauce (preferably low-sodium)
- 1 teaspoon sesame oil
- Salt and pepper to taste
- 2 tablespoons vegetable oil
- ½ cup (120 ml) water for steaming
Instructions
- Make the dough: In a large bowl, combine 2 cups sifted flour and a pinch of salt. Slowly pour in about ¾ cup boiling water while stirring until mixture comes together. When cool enough, knead on a floured surface for 8 minutes until smooth and elastic. Cover and rest for 30 minutes.
- Prepare the filling: Mix 1 pound ground pork or chicken, 3 chopped green onions, 2 minced garlic cloves, 1 tablespoon grated ginger, 1 cup shredded napa cabbage (squeezed dry), 2 tablespoons soy sauce, 1 teaspoon sesame oil, salt, and pepper until well combined.
- Roll out wrappers: Divide dough into two logs, cut into 1-inch pieces (about 30). Flatten each piece and roll into 3-inch diameter thin circles, edges thinner than center.
- Assemble potstickers: Place a heaping teaspoon of filling in center of each wrapper. Wet edges with water, fold in half, and pinch to seal. Optionally pleat edges. Keep covered with damp towel.
- Cook potstickers: Heat 2 tablespoons vegetable oil in a large non-stick or cast-iron skillet over medium-high heat. Arrange potstickers flat side down without crowding. Fry 2 minutes until bottoms are golden and crispy.
- Steam to finish: Pour ½ cup water into pan, cover immediately, and steam 5-6 minutes until water evaporates and wrappers are tender. Remove lid and cook 1 more minute to crisp bottoms if needed.
- Serve warm with your favorite dipping sauce.
Notes
Resting the dough for 30 minutes is key for easy rolling. Avoid overfilling to prevent leaking. Use medium-high heat for frying to get a crispy bottom without burning. Steam immediately after frying to keep wrappers tender. Lightly dust dough with flour if sticky but avoid excess flour to prevent tough wrappers.
Nutrition
- Serving Size: 1 potsticker (about
- Calories: 65
- Fat: 3.5
- Carbohydrates: 5.5
- Fiber: 0.5
- Protein: 4.5
Keywords: potstickers, homemade dumplings, crispy potstickers, easy potstickers, Chinese recipe, dumplings from scratch


