
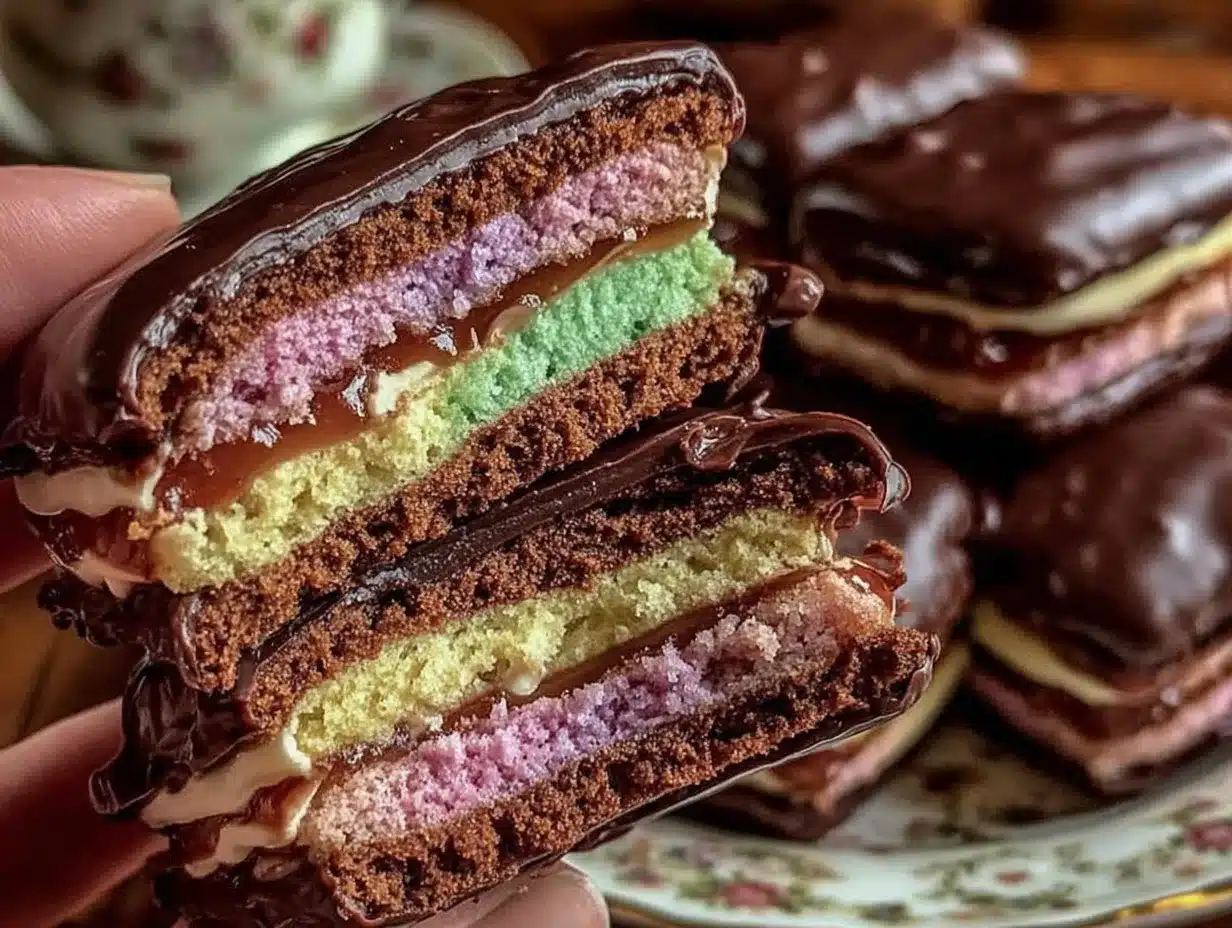
“You really need to try my Nonna’s rainbow cookies,” my coworker said one afternoon, sliding a bright, jewel-toned slice across the table. I eyed the layers skeptically—those vibrant almond-scented bands sandwiched between ribbons of jam and a glossy chocolate coat looked almost too pretty to eat. Honestly, I thought they were more for show than for snacking. But after one bite, I was hooked.
That day turned into a mini obsession. I found myself making these Italian rainbow cookies three times that week, tweaking my approach to get the texture just right—the perfect balance of softness and chew, the almond essence that lingers, and that smooth chocolate coating that snaps just so. It wasn’t just a cookie anymore; it was my little edible masterpiece that brightened long workdays and quiet evenings alike.
Making rainbow cookies from scratch felt intimidating at first—layering cake, spreading preserves, melting chocolate? But I quickly learned the process is surprisingly straightforward and oddly calming. Plus, the payoff is a cookie that feels like a celebration in every bite. These cookies bring a slice of old-school Italian bakery magic right to your kitchen, and honestly, that chocolate coating? It’s the kind of finish that will have your friends requesting the recipe before the plate’s empty.
What stuck with me most, though, was how this recipe became a quiet ritual—something to look forward to after a hectic day or to share during a spontaneous coffee break. It’s not just about the sweet layers or the classic flavors; it’s about the small moments of joy wrapped up in those colorful slices. If you want to experience that same little spark, then this perfect Italian rainbow cookies with chocolate coating recipe might just become your new favorite too.
Why You’ll Love This Recipe
After countless trials in my kitchen, I’ve nailed a method for making Italian rainbow cookies that’s both approachable and rewarding. This recipe stands out because of its balance of tradition and ease, bringing that nostalgic bakery vibe without endless fuss. Here’s why you’ll want to keep this one handy:
- Quick & Easy: The whole process takes under 90 minutes from start to finish, so you won’t be stuck in the kitchen all day.
- Simple Ingredients: Mostly pantry staples and a few common baking goodies—no specialty stores needed.
- Perfect for Celebrations: Whether it’s a holiday, birthday, or just a random Tuesday, these cookies add a festive touch.
- Crowd-Pleaser: Kids and adults alike can’t resist the colorful layers and that luscious chocolate finish.
- Flavor & Texture: The tender almond cake layers, tart jam, and silky chocolate create a combo that’s sweet, nutty, and satisfying.
This isn’t your average boxed cookie situation. What makes this recipe special is the way it layers flavor and texture with care—the almond paste in the batter gives it that signature nutty note, and melting high-quality bittersweet chocolate for the coating adds a sophisticated edge. I usually reach for Ghirardelli chips to get that perfect snap and shine.
Honestly, the first time I made these, I thought layering might be a pain, but it became oddly meditative. Plus, this recipe is forgiving—if your layers aren’t perfectly even, the chocolate coating hides those little quirks beautifully. This cookie is not just a treat; it’s a piece of tradition that’s been made approachable for home cooks who want to impress without stress.
What Ingredients You Will Need
This recipe calls for simple, wholesome ingredients that come together to create those iconic rainbow cookie layers with a rich chocolate finish. You likely already have most of these in your pantry or fridge.
- Almond Paste: The star in the batter for that classic nutty flavor. I recommend using a brand like Odense for smooth texture.
- Granulated Sugar: For sweetness and structure.
- Unsalted Butter: Softened, to keep the cake tender.
- Large Eggs: Room temperature, help bind and enrich the batter.
- All-Purpose Flour: Provides the structure; can swap with almond flour for a gluten-free twist but expect a denser texture.
- Baking Powder: For a gentle lift.
- Salt: Balances sweetness.
- Vanilla Extract: Adds warmth and depth.
- Almond Extract: Enhances the almond flavor—don’t skip this!
- Seedless Raspberry or Apricot Jam: Spread between layers for tart sweetness; fresh or store-bought works great.
- Food Coloring: Red, green, and yellow gel colors create the signature rainbow layers; gel colors work best for vibrant hues without thinning batter.
- Bittersweet Chocolate: For coating; I prefer Ghirardelli 60% chips for the perfect snap and sheen.
- Vegetable Oil or Coconut Oil: A tablespoon added to melted chocolate helps smooth it out for easy dipping.
For a dairy-free option, you can swap butter with vegan margarine and use a dairy-free chocolate like Enjoy Life. Also, if you want to switch up the jam, fresh strawberry or cherry preserves work well, especially in summer.
Equipment Needed
- 9×13-inch Baking Pan: Preferably metal for even heat distribution; glass pans can work but watch the baking time.
- Mixing Bowls: One large bowl for batter mixing, plus smaller ones if separating batter for coloring.
- Hand Mixer or Stand Mixer: Makes creaming butter and almond paste easier, but a whisk and elbow grease work too.
- Offset Spatula: Essential for spreading batter evenly and smoothing layers.
- Rubber Spatula: For folding ingredients without deflating batter.
- Sharp Knife or Serrated Knife: For cleanly slicing the layered cookie after it’s chilled.
- Double Boiler or Microwave-Safe Bowl: For melting chocolate gently; a double boiler helps avoid burnt chocolate.
- Cooling Rack: To let chocolate-coated cookies set without sticking.
For budget-friendly alternatives, a glass or ceramic pan can substitute the metal pan if you keep an eye on baking times. If you don’t have an offset spatula, the back of a spoon can work for spreading batter layers, though it’s a bit trickier.
Personally, I find using a stand mixer with paddle attachment speeds up mixing, but I’ve made these cookies many times just with a hand mixer. Patience is your best tool here!
Preparation Method
- Prepare Your Pan: Line a 9×13-inch baking pan with parchment paper, letting excess hang over edges for easy removal. Lightly grease the parchment to prevent sticking. (Time: 5 minutes)
- Mix the Batter: In a large bowl, cream together 7 ounces (200g) almond paste and 3/4 cup (150g) granulated sugar using a mixer on medium speed until smooth, about 3-5 minutes.
- Add Butter and Eggs: Beat in 1/2 cup (115g) softened unsalted butter until creamy. Then add 4 large eggs, one at a time, beating well after each addition for smooth consistency. (Tip: Room temperature eggs help avoid curdling.)
- Combine Dry Ingredients: In a separate bowl, sift together 1 cup (125g) all-purpose flour, 1 teaspoon baking powder, and 1/4 teaspoon salt.
- Incorporate Dry Ingredients: Gradually fold the flour mixture into the wet batter using a rubber spatula. Mix gently until just combined to keep the batter light.
- Add Extracts: Stir in 1 teaspoon vanilla extract and 1/2 teaspoon almond extract for that classic flavor punch.
- Divide and Color Batter: Split the batter evenly into three bowls. Add gel food coloring: red to one, yellow to another, and green to the last. Mix gently to avoid deflating the batter but ensure even color.
- Layer and Bake: Spread the red batter evenly in the bottom of the pan using an offset spatula. Bake at 350°F (175°C) for 10-12 minutes, until just set and lightly golden. Let cool slightly.
- Add Jam and Repeat: Spread a thin layer (about 1/4 cup) of seedless raspberry or apricot jam over the red layer. Next, spread the yellow batter evenly over the jam and bake another 10-12 minutes. Repeat with jam and the green batter for the final layer, baking the same way.
- Cool Completely: Once the last layer is baked, cool the entire cake in the pan for at least 30 minutes, then chill in the fridge for 1-2 hours to firm up for clean slicing.
- Slice the Cookies: Using a sharp serrated knife, cut into rectangular cookies about 1-inch wide. Wipe the knife between cuts for neat edges.
- Prepare Chocolate Coating: Melt 8 ounces (225g) bittersweet chocolate with 1 tablespoon vegetable or coconut oil in a double boiler or microwave in 30-second bursts, stirring well until smooth.
- Dip and Set: Dip each cookie into the melted chocolate, covering the top and sides. Place on a parchment-lined cooling rack. Chill until chocolate is firm, about 30 minutes.
Note: If chocolate seizes, add a little more oil and stir until smooth. If your layers bake unevenly, trim the tops gently before assembling.
This step-by-step process might feel long, but trust me, the layers bake quickly and the overall time is manageable. Plus, the visual payoff is worth every minute.
Cooking Tips & Techniques
Making rainbow cookies is a bit of an art, but a few tricks can help you nail it every time. Here’s what I’ve learned in my kitchen after a handful of batches:
- Almond Paste Matters: Using a quality almond paste is key. It’s what gives the cake that moist, dense texture and unmistakable flavor. If your almond paste is dry, soften it slightly by kneading before mixing.
- Layer Thickness: Try to keep batter layers about the same thickness for even baking and a neat rainbow effect. Using an offset spatula helps spread batter smoothly.
- Watch the Bake Times: Layers bake quickly; overbaking will dry them out and make the cookies crumbly. When the edges are just turning golden and the top springs back, take them out.
- Jam Application: A thin, even layer of jam is crucial—too thick and it’ll squish out when you layer; too thin and you lose flavor contrast.
- Chocolate Dipping: Melt chocolate gently to avoid burning. Adding a bit of oil makes it glossy and easier to work with. If you’re nervous about dipping, you can also spread the chocolate with a spatula.
- Clean Slices: Chill the layered cake thoroughly before slicing. Warm cake will crumble and smudge the layers.
- Multitasking: While layers bake, clean up your workspace or prepare the chocolate coating. Timing is your friend here to keep things smooth.
If you’re curious about other treats with a layered aesthetic, you might find the ombre birthday cake recipe inspiring for color techniques, or the emerald green layer cake for a fun twist on layered desserts.
Variations & Adaptations
This Italian rainbow cookies recipe is flexible enough to suit different tastes and diets. Here are a few variations I’ve enjoyed or considered:
- Gluten-Free Version: Replace the all-purpose flour with a 1-to-1 gluten-free flour blend. The texture will be slightly denser but still delicious.
- Jam Flavors: Swap raspberry jam for apricot, strawberry, or even fig preserves to change the flavor profile. I once used lemon curd for a bright, tangy twist that was surprisingly good.
- Chocolate Coating Alternatives: For a dairy-free option, use vegan dark chocolate or a chocolate candy coating. You can also drizzle instead of dipping for a lighter chocolate touch.
- Nut-Free Version: Skip the almond paste and add vanilla extract only. Use a nut-free butter substitute and a seed-based jam for allergy-friendly treats.
Another seasonal idea: in the fall, I’ve tried adding a dash of cinnamon to the batter for a cozy spin. The layers still pop visually but carry a warm spice note perfect for cooler weather.
Serving & Storage Suggestions
Rainbow cookies are best served chilled or at room temperature to enjoy their delicate layers and chocolate snap. They make a stunning addition to coffee breaks, holiday platters, and gift boxes.
Pair them with a strong espresso or a light, floral tea to balance the sweetness. They also hold up well alongside richer desserts if you’re planning a spread.
To store, keep the cookies in an airtight container in the refrigerator for up to one week. The chocolate coating helps seal in freshness. For longer storage, freeze the cookies in a single layer on a parchment-lined tray, then transfer to a freezer-safe container. Thaw in the fridge before serving.
When reheating, avoid microwaves which can melt the chocolate unevenly. Instead, let them come to room temperature naturally, or warm gently in an oven at 300°F (150°C) for 3-5 minutes.
Interestingly, letting the cookies rest for a day or two after assembly actually helps the flavors meld and the jam soften just right, making each bite even better.
Nutritional Information & Benefits
Each Italian rainbow cookie slice (about 2 inches by 1 inch) contains approximately 180-220 calories, with a balance of carbohydrates, fats, and moderate protein thanks to the almond paste and eggs.
The almond paste provides a good source of healthy fats and vitamin E, while the eggs add protein and essential nutrients. Using bittersweet chocolate adds antioxidants compared to milk chocolate options.
This recipe isn’t low-calorie, but it’s a treat that includes wholesome ingredients without artificial fillers. For those with gluten sensitivities, switching to gluten-free flour can make it a safe indulgence.
If you’re watching sugar intake, reducing jam quantity or choosing no-sugar-added preserves can help moderate sweetness.
Conclusion
Making these perfect Italian rainbow cookies with chocolate coating is a rewarding way to bring a touch of tradition and color into your baking routine. It’s a recipe that’s approachable yet impressive, with layers of flavor and texture that keep people coming back for more.
Feel free to tweak the colors, jams, or chocolate to make this cookie uniquely yours—it’s that kind of recipe that invites creativity. Personally, I love how these cookies transform a simple coffee break into a mini celebration, with every bite telling a story.
If you give this recipe a try, I’d love to hear how your layers turned out or what jam flavor you chose. Sharing little kitchen wins like this keeps the joy of baking alive. So go ahead, bake up some rainbow cookies, and enjoy that sweet moment for yourself.
FAQs About Perfect Italian Rainbow Cookies
How long do Italian rainbow cookies stay fresh?
Stored in an airtight container in the fridge, they stay fresh for about one week. For longer storage, freeze and thaw before serving.
Can I make rainbow cookies without almond paste?
You can substitute almond paste with extra almond extract and butter, but the texture and flavor won’t be quite the same. The almond paste is key for that classic taste.
What if I don’t have gel food coloring?
Gel colors give the best vibrancy without thinning the batter. If you only have liquid food coloring, use less and expect softer colors.
Is it necessary to chill the layered cake before slicing?
Yes, chilling firms up the layers and prevents crumbling, making it much easier to cut neat slices.
Can I make these cookies gluten-free?
Absolutely! Use a gluten-free flour blend in place of all-purpose flour. The texture may be a bit denser but still delicious.
Pin This Recipe!
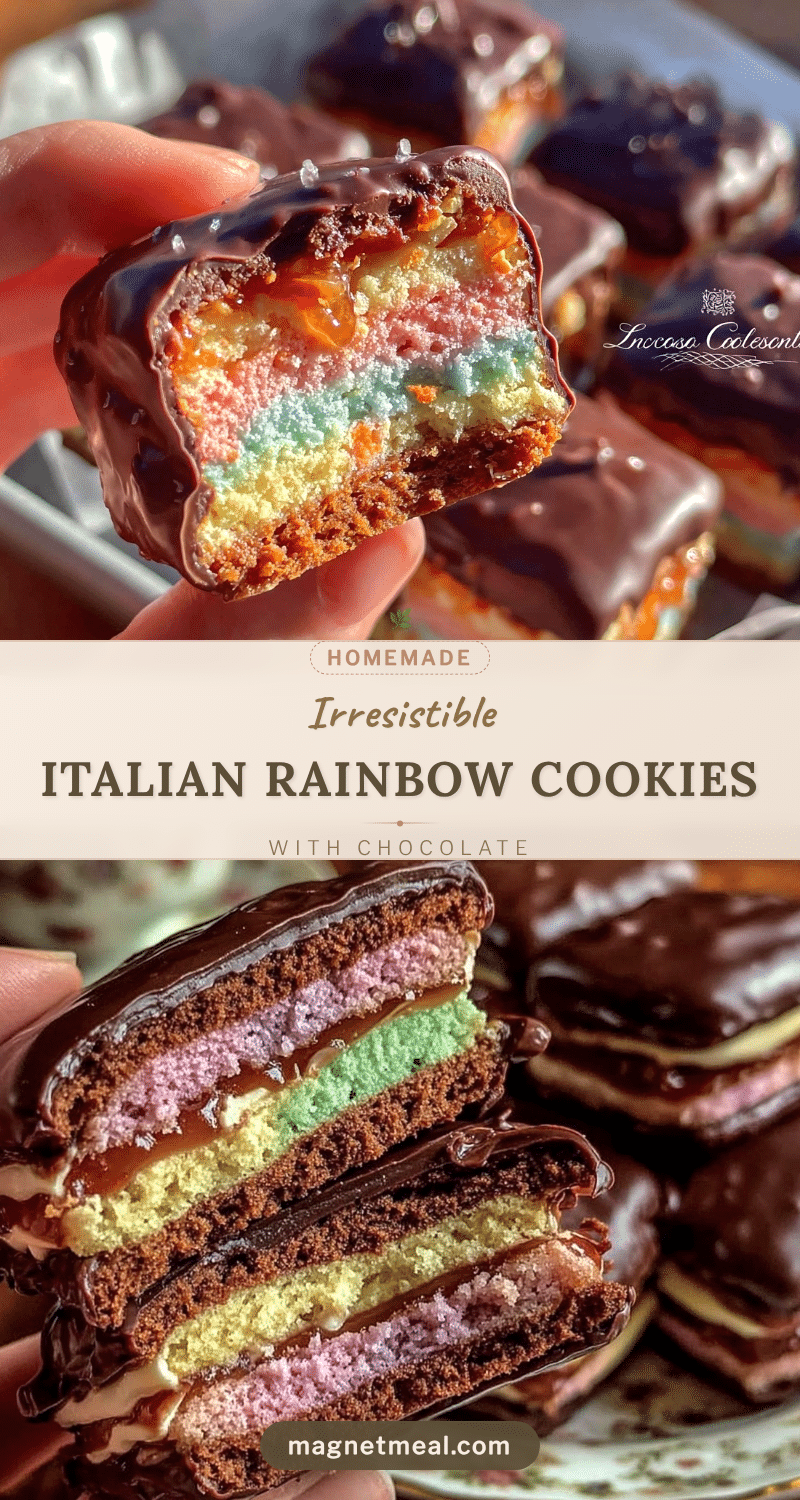
Perfect Italian Rainbow Cookies Recipe with Easy Chocolate Coating Steps

A classic Italian layered almond cookie with vibrant colored cake layers, tart jam, and a smooth bittersweet chocolate coating. This recipe is approachable, rewarding, and perfect for celebrations.
- Prep Time: 20 minutes
- Cook Time: 36 minutes
- Total Time: 1 hour 50 minutes
- Yield: 24 cookies 1x
- Category: Dessert
- Cuisine: Italian
Ingredients
- 7 ounces almond paste (about 200g)
- 3/4 cup granulated sugar (about 150g)
- 1/2 cup unsalted butter, softened (about 115g)
- 4 large eggs, room temperature
- 1 cup all-purpose flour (about 125g)
- 1 teaspoon baking powder
- 1/4 teaspoon salt
- 1 teaspoon vanilla extract
- 1/2 teaspoon almond extract
- Seedless raspberry or apricot jam, about 1/2 cup total (divided between layers)
- Red, yellow, and green gel food coloring
- 8 ounces bittersweet chocolate chips (about 225g)
- 1 tablespoon vegetable oil or coconut oil
Instructions
- Line a 9×13-inch baking pan with parchment paper, letting excess hang over edges for easy removal. Lightly grease the parchment to prevent sticking. (5 minutes)
- In a large bowl, cream together almond paste and granulated sugar using a mixer on medium speed until smooth, about 3-5 minutes.
- Beat in softened unsalted butter until creamy. Then add eggs one at a time, beating well after each addition for smooth consistency.
- In a separate bowl, sift together all-purpose flour, baking powder, and salt.
- Gradually fold the flour mixture into the wet batter using a rubber spatula. Mix gently until just combined.
- Stir in vanilla extract and almond extract.
- Divide the batter evenly into three bowls. Add red gel food coloring to one, yellow to another, and green to the last. Mix gently to combine.
- Spread the red batter evenly in the bottom of the pan using an offset spatula. Bake at 350°F (175°C) for 10-12 minutes until just set and lightly golden. Let cool slightly.
- Spread a thin layer (about 1/4 cup) of seedless raspberry or apricot jam over the red layer. Spread the yellow batter evenly over the jam and bake another 10-12 minutes.
- Repeat with jam and the green batter for the final layer, baking the same way.
- Cool the entire cake in the pan for at least 30 minutes, then chill in the fridge for 1-2 hours to firm up for clean slicing.
- Using a sharp serrated knife, cut into rectangular cookies about 1-inch wide. Wipe the knife between cuts for neat edges.
- Melt bittersweet chocolate with vegetable or coconut oil in a double boiler or microwave in 30-second bursts, stirring until smooth.
- Dip each cookie into the melted chocolate, covering the top and sides. Place on a parchment-lined cooling rack. Chill until chocolate is firm, about 30 minutes.
Notes
Use quality almond paste for best flavor and texture. Keep batter layers even for neat appearance. Melt chocolate gently and add oil to prevent seizing. Chill cake thoroughly before slicing for clean edges. For dairy-free, swap butter and chocolate accordingly. Gluten-free flour can be used but expect denser texture.
Nutrition
- Serving Size: 1 cookie (about 2 in
- Calories: 200
- Sugar: 15
- Sodium: 90
- Fat: 12
- Saturated Fat: 5
- Carbohydrates: 22
- Fiber: 1
- Protein: 4
Keywords: Italian rainbow cookies, layered cookies, almond cookies, chocolate coated cookies, festive cookies, almond paste cookies


