“You really think this is going to work without baking?” my roommate asked, eyeing the towering jar of crushed Oreos and cream cheese I’d just dumped into a bowl. Honestly, I was skeptical too. But that night, between bursts of laughter and the hum of Netflix in the background, the magic of this Creamy No-Bake Oreo Cheesecake with Whipped Cream Layers quietly took shape in the fridge. It wasn’t some fancy chef’s experiment—just a spur-of-the-moment fix for a sweet tooth that refused to quit.
We didn’t have a mixer, and I was out of eggs, so it was basically a test of patience and improvisation. The layers of whipped cream, crushed Oreos, and that silky cheesecake filling came together in a way that made me pause mid-bite. The texture? Ridiculously smooth and rich, with just enough crunch from the cookie bits. And the best part? No oven needed. It’s the kind of recipe you can pull off after a long day, when the last thing you want is to turn on the stove or fuss with complicated steps.
I found myself making it again the following weekend—this time adding a little extra whipped cream, because why not? It’s a dessert that feels fancy but is totally doable on a busy weekday or when you’re suddenly hosting unexpected guests. Honestly, it’s become my go-to cheat code for a decadent treat that doesn’t come with the usual stress. If you’ve ever been caught off guard by a craving or just want to impress without the heat, this recipe’s got your back.
There’s something quietly satisfying about layering that fluffy cream with Oreo chunks, each spoonful a gentle reminder that sometimes simple things turn out just right. This cheesecake stuck with me because it’s a little indulgence that’s easy to trust—no browning, no cracking, just pure, creamy goodness. And if you ask me, that’s pretty special.
Why You’ll Love This Creamy No-Bake Oreo Cheesecake Recipe
This no-bake Oreo cheesecake is honestly one of those recipes that feels like a secret weapon in the kitchen. I’ve tested it multiple times, tweaking the whipped cream layers to get that perfect fluffy yet stable texture, and it always delivers. Here’s why it’s worth making:
- Quick & Easy: Ready in about 20 minutes of prep, then just chill. Perfect when you want dessert without the wait or the oven heat.
- Simple Ingredients: You probably already have all the staples—Oreos, cream cheese, heavy cream—no special trips needed.
- Perfect for Any Occasion: Whether it’s a casual dinner, a potluck, or a cozy night in, this cheesecake fits right in.
- Crowd-Pleaser: Kids, friends, picky eaters—they all ask for seconds. The Oreo crunch with creamy layers is a total winner.
- Unbelievably Delicious: The texture is silky and dense but still light thanks to the whipped cream layers, making each bite feel like a treat.
What sets this version apart? I love how the whipped cream layers aren’t just a topping but a core part of the experience. Instead of just mixing everything together, layering adds a luscious contrast to the Oreo base and cream cheese filling. Plus, I sometimes fold in a hint of vanilla or a touch of espresso powder to deepen the flavor—just a little twist that makes it uniquely mine.
Honestly, if you’ve ever struggled with baked cheesecakes cracking or drying out, this recipe is a breath of fresh air. It’s dependable, forgiving, and downright satisfying. It’s like a little indulgence that feels both nostalgic and new at the same time—comfort food without the fuss.
What Ingredients You Will Need
This recipe uses simple, wholesome ingredients to deliver bold flavor and satisfying texture without the fuss. Most are pantry staples, and if you need substitutions, I’ve got you covered below.
- Oreos: About 24 cookies, crushed (use regular or Double Stuf for extra creaminess)
- Unsalted Butter: 6 tablespoons (85g), melted (helps bind the crust; I prefer Kerrygold for richness)
- Cream Cheese: 16 ounces (450g), softened to room temperature (full-fat for that creamy texture)
- Granulated Sugar: ¾ cup (150g), balances the tang from cream cheese
- Vanilla Extract: 1 teaspoon, pure vanilla if possible (adds warmth and depth)
- Heavy Whipping Cream: 2 cups (480ml), chilled (this is key for stiff peaks in whipped cream)
- Powdered Sugar: ⅓ cup (40g), sifted (sweetens and stabilizes the whipped cream layers)
Optional Ingredients & Tips:
- Espresso Powder: ½ teaspoon, for a subtle mocha note that pairs beautifully with Oreos.
- Almond Flour: Swap ¼ cup of crushed Oreos with almond flour for a nutty twist and gluten-free option.
- Dairy-Free Option: Use coconut cream instead of heavy cream and vegan cream cheese (brands like Kite Hill work well).
Look for firm, small-curd cream cheese to avoid lumps. For best results, chill your mixing bowl and beaters before whipping the cream—trust me, it makes a difference! And if you’re in summer mode, fresh berries on top add a nice pop of color and freshness.
Equipment Needed
- Mixing bowls (preferably glass or metal to chill for whipping cream)
- Electric mixer or hand whisk (a stand mixer helps, but a good whisk works if you don’t mind the arm workout)
- Measuring cups and spoons
- Spatula for folding and scraping
- Springform pan (8-inch or 20cm) or a deep dish for assembling the cheesecake
- Food processor or zip-top bag and rolling pin for crushing Oreos
If you don’t have a springform pan, a glass pie dish works fine, just be gentle when serving. I’ve found that a silicone spatula makes folding the whipped cream into the cream cheese mixture easier without deflating it too much. For whipping cream, chilling your bowl in the fridge or freezer beforehand helps it whip up faster.
Preparation Method
- Prepare the Oreo crust: Crush about 24 Oreos into fine crumbs using a food processor or a rolling pin inside a sealed bag. Mix the crumbs with 6 tablespoons (85g) melted unsalted butter until the mixture feels like wet sand.
- Press crust into pan: Transfer the Oreo crust mixture into an 8-inch (20cm) springform pan. Use the back of a spoon or a flat-bottomed glass to press it evenly along the bottom. Chill in the fridge while you prepare the filling (about 15 minutes).
- Beat cream cheese and sugar: In a large bowl, beat 16 ounces (450g) softened cream cheese with ¾ cup (150g) granulated sugar until smooth and creamy, about 3-4 minutes on medium speed. Add 1 teaspoon vanilla extract and mix until combined.
- Whip the cream: In a chilled bowl, whip 2 cups (480ml) heavy whipping cream with ⅓ cup (40g) sifted powdered sugar until stiff peaks form. Take care not to overbeat; the cream should hold its shape but remain smooth.
- Fold whipped cream into cream cheese: Gently fold about half of the whipped cream into the cream cheese mixture to lighten it. Then fold in the remaining whipped cream carefully to keep the mixture airy and smooth.
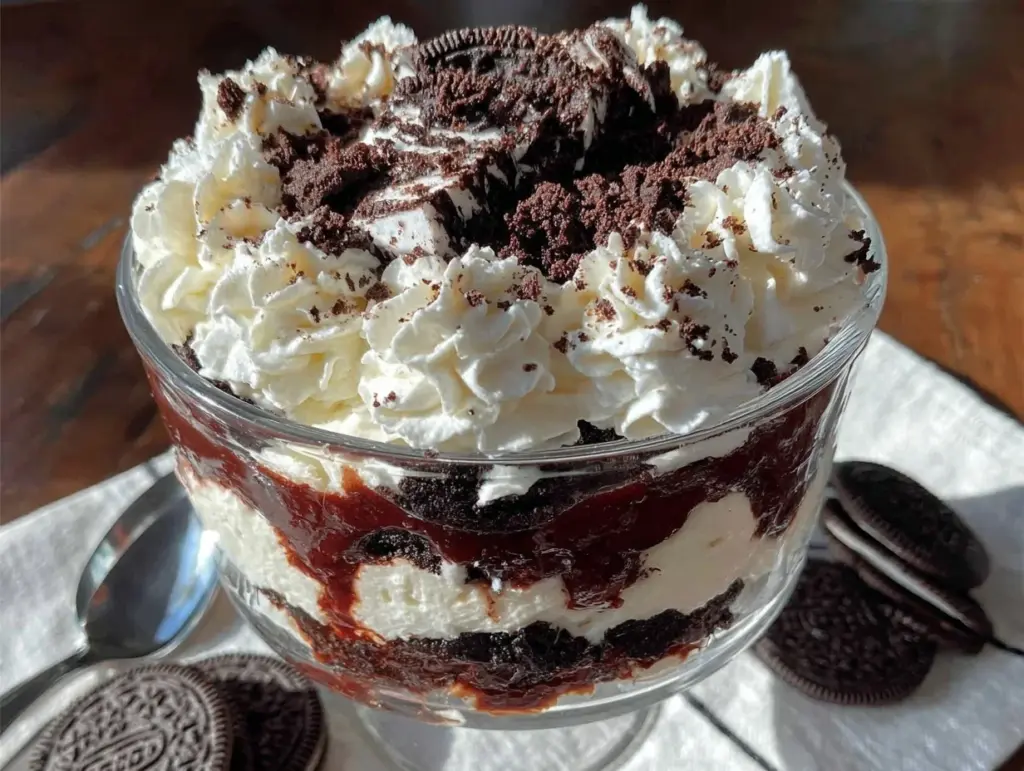
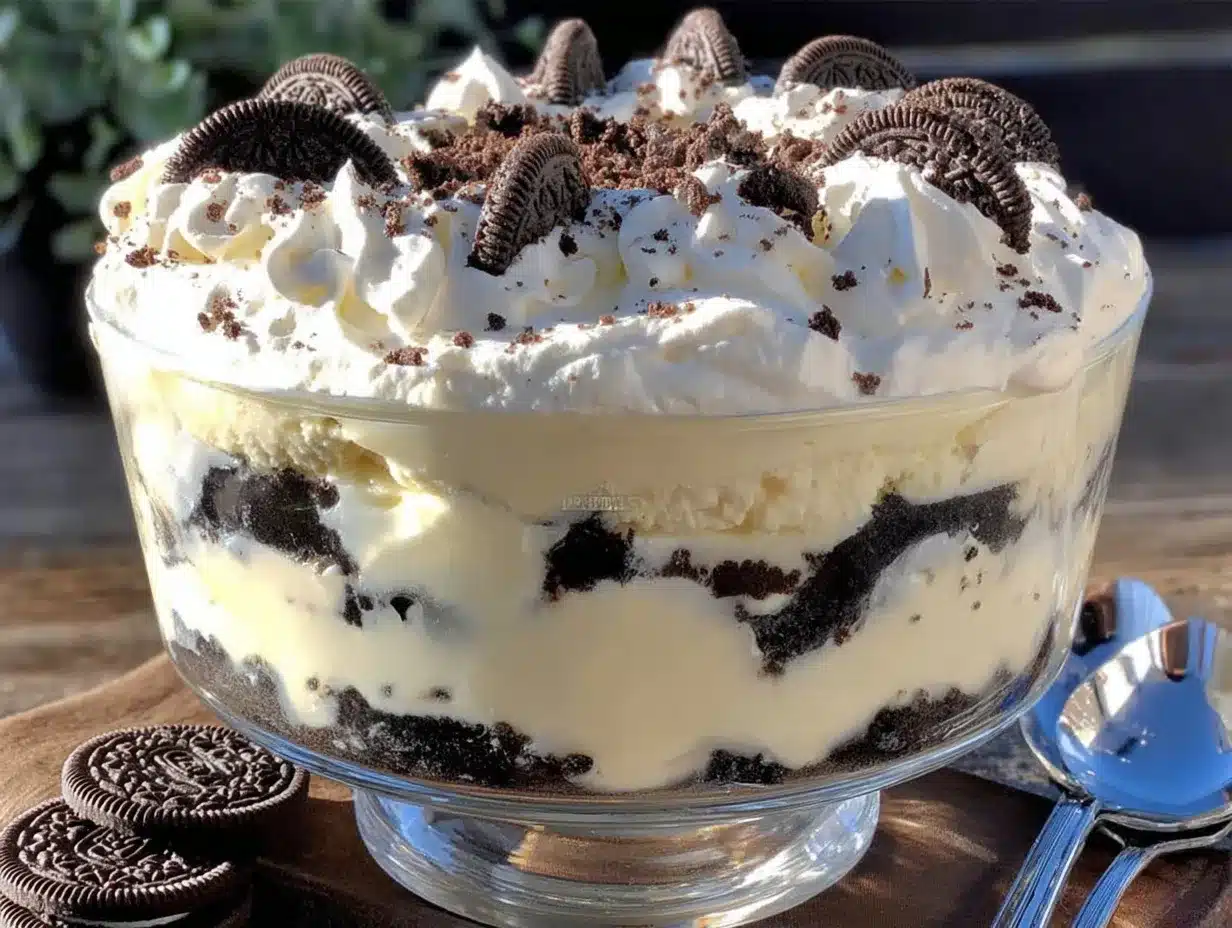
- Assemble layers: Spread half of the cream cheese mixture over the chilled crust. Sprinkle a generous layer of crushed Oreos on top—about ½ cup (50g). Then spoon the remaining cream cheese mixture, smoothing the top.
- Add final whipped cream layer: Whip a small extra ½ cup (120ml) heavy cream with a tablespoon powdered sugar until soft peaks form, then spread this fluffy layer on top. Garnish with a few Oreo halves or crumbs for a pretty finish.
- Chill to set: Cover the pan and refrigerate for at least 4 hours or overnight. The cheesecake firms up beautifully without baking, and the flavors meld together.
- Serve: Run a knife around the pan’s edge before releasing the springform. Slice with a hot, dry knife for clean cuts.
Pro tip: If the whipped cream starts to deflate while folding, pause and chill the bowl for a few minutes before continuing. Also, layering the whipped cream separately, rather than mixing it all at once, gives those luscious pockets of creaminess that make this cheesecake so special.
Cooking Tips & Techniques
Whipping cream to the perfect consistency can be tricky, but chilling your bowl and beaters is a game changer. I’ve learned the hard way that warm cream just won’t hold stiff peaks, and overbeating can turn it grainy and eventually into butter (yikes!). So keep an eye and stop as soon as you see firm peaks that hold their shape.
When folding the whipped cream into the cream cheese, use a light hand with a spatula—think gentle lifting and turning rather than vigorous stirring. I usually fold in thirds to keep as much air in as possible, which makes the cheesecake delightfully light.
Don’t skip chilling the crust first; it firms up the base so your cheesecake won’t slide around. And when you’re ready to slice, dipping the knife in hot water and wiping it dry between cuts helps make the edges clean and pretty.
One mistake I made early on was mixing the Oreos too finely into the filling—it got soggy and lost the cookie crunch, which is half the fun. Instead, sprinkle crushed Oreos between layers to keep that texture contrast.
If you’re pressed for time, this cheesecake can be made a day ahead. Just remember it’s best to slice once fully chilled, so plan accordingly.
Variations & Adaptations
This recipe is a solid base for all sorts of tweaks. Here are a few I’ve tried or thought about:
- Flavored Cream Cheese Layer: Add a tablespoon of peanut butter or Nutella into the cream cheese for a rich, nutty twist that pairs beautifully with Oreos.
- Fruit Addition: Swap some Oreo layers with fresh raspberries or sliced strawberries for a bright, tangy contrast. I sometimes add a raspberry glaze on top for a pop of color, similar to the finishes on my pink and green ombre birthday cake.
- Chocolate Variation: Mix in mini chocolate chips or a drizzle of melted chocolate between layers for a fudgy surprise.
- Vegan/Dairy-Free: Use coconut cream whipped to stiff peaks and vegan cream cheese alternatives. I recommend chilling the coconut cream overnight for the best results.
- Crunch Upgrade: Toss in chopped pecans or walnuts with the Oreo crust for added texture.
For a fun twist, I once swapped the traditional Oreo crust for crushed chocolate chip cookie crumbs, which gave a nice buttery flavor and worked surprisingly well with the creamy layers.
Serving & Storage Suggestions
This cheesecake is best served chilled, straight from the fridge. The whipped cream layers hold their shape nicely, giving each slice a beautiful, fluffy look. For presentation, garnish with extra Oreo halves or a dusting of cocoa powder for a little drama.
It pairs wonderfully with a hot cup of coffee or a cold glass of milk—perfect for those cozy dessert moments. If you’re hosting, try serving alongside simple fresh fruit or a light sorbet to balance the richness.
Store leftovers covered in the refrigerator for up to 4 days. The flavors actually deepen after a day or two, so it’s great for prepping ahead. Avoid freezing, as the whipped cream layers might separate and affect the texture once thawed.
When reheating, if you prefer a softer slice, let the cheesecake sit at room temperature for 10-15 minutes before serving to bring out the creaminess.
Nutritional Information & Benefits
Per slice (assuming 8 slices): approximately 450 calories, 35g fat, 30g carbohydrates, 5g protein. This dessert is rich and indulgent, so I recommend enjoying it as a special treat rather than a daily staple.
Key ingredients like cream cheese provide a good source of calcium and protein, while the heavy cream adds vitamin A and essential fats. Oreos, of course, bring in the nostalgic crunch and sweetness but watch portions if you’re mindful of sugar intake.
This no-bake recipe is naturally gluten-containing due to Oreos, but swapping in gluten-free cookie options makes it a safe choice for gluten-sensitive eaters. For those watching carbs, almond flour crust variations can reduce sugar impact.
Overall, this cheesecake lets you enjoy a rich, satisfying dessert without the stress of baking, perfect for anyone balancing indulgence with a busy lifestyle.
Conclusion
This Creamy No-Bake Oreo Cheesecake with Whipped Cream Layers has quietly become one of my favorite go-to desserts. It’s that rare recipe that feels special without the complicated prep or worry about oven timing. I love how customizable it is—whether you keep it classic or add your own twists, it always turns out creamy, dreamy, and crowd-pleasing.
Give yourself permission to enjoy dessert that’s approachable and delicious. I hope you find as much comfort and joy in this cheesecake as I do, whether it’s for a spontaneous craving or a laid-back gathering.
Feel free to share your spins or questions below—I love hearing how others make this recipe their own. Here’s to simple pleasures and sweet moments!
Frequently Asked Questions
Can I use low-fat cream cheese or milk to make this cheesecake lighter?
Low-fat cream cheese can make the filling less creamy and stable, so it’s best to stick with full-fat for the texture. Skim milk won’t whip like heavy cream, so avoid subbing it in for the whipped cream layers.
How long does this no-bake cheesecake need to chill before serving?
Ideally, chill for at least 4 hours to set properly, but overnight is best for the flavors to meld and the texture to firm up nicely.
Can I make this cheesecake ahead of time for a party?
Absolutely! It keeps well in the fridge for up to 4 days. Just assemble a day ahead and add the final whipped cream layer right before serving if you want it extra fresh.
What’s the best way to crush Oreos if I don’t have a food processor?
Place Oreos in a zip-top bag and gently crush them with a rolling pin or a heavy pan. Just be careful not to pulverize into dust unless you want a finer crust.
Is it possible to freeze this no-bake Oreo cheesecake?
Freezing is not recommended since whipped cream layers can separate and lose texture once thawed. It’s best enjoyed fresh from the fridge.
Pin This Recipe!
Creamy No-Bake Oreo Cheesecake Recipe with Easy Whipped Cream Layers
A rich and creamy no-bake Oreo cheesecake featuring layers of whipped cream and crushed Oreos, perfect for a quick and indulgent dessert without the need for baking.
- Prep Time: 20 minutes
- Cook Time: 0 minutes
- Total Time: 4 hours 20 minutes
- Yield: 8 servings 1x
- Category: Dessert
- Cuisine: American
Ingredients
- 24 Oreos, crushed (regular or Double Stuf)
- 6 tablespoons (85g) unsalted butter, melted
- 16 ounces (450g) cream cheese, softened to room temperature
- 3/4 cup (150g) granulated sugar
- 1 teaspoon vanilla extract
- 2 cups (480ml) heavy whipping cream, chilled
- 1/3 cup (40g) powdered sugar, sifted
- Optional: 1/2 teaspoon espresso powder
- Optional: 1/4 cup almond flour (to substitute part of Oreo crumbs for gluten-free option)
- Optional dairy-free: coconut cream instead of heavy cream and vegan cream cheese
Instructions
- Crush about 24 Oreos into fine crumbs using a food processor or a rolling pin inside a sealed bag.
- Mix the Oreo crumbs with 6 tablespoons melted unsalted butter until the mixture feels like wet sand.
- Press the Oreo crust mixture evenly into the bottom of an 8-inch (20cm) springform pan. Chill in the fridge for about 15 minutes.
- In a large bowl, beat 16 ounces softened cream cheese with 3/4 cup granulated sugar until smooth and creamy, about 3-4 minutes on medium speed.
- Add 1 teaspoon vanilla extract and mix until combined.
- In a chilled bowl, whip 2 cups heavy whipping cream with 1/3 cup powdered sugar until stiff peaks form, being careful not to overbeat.
- Gently fold about half of the whipped cream into the cream cheese mixture to lighten it, then fold in the remaining whipped cream carefully to keep the mixture airy and smooth.
- Spread half of the cream cheese mixture over the chilled crust.
- Sprinkle about 1/2 cup (50g) crushed Oreos on top.
- Spoon the remaining cream cheese mixture over the Oreo layer and smooth the top.
- Whip an extra 1/2 cup (120ml) heavy cream with 1 tablespoon powdered sugar until soft peaks form, then spread this fluffy layer on top.
- Garnish with a few Oreo halves or crumbs.
- Cover and refrigerate for at least 4 hours or overnight to set.
- Before serving, run a knife around the pan’s edge, release the springform, and slice with a hot, dry knife for clean cuts.
Notes
Chill mixing bowl and beaters before whipping cream for best results. Use a gentle folding technique to keep the mixture airy. Chill crust before adding filling to prevent sliding. Use a hot, dry knife for clean slices. Avoid freezing as whipped cream layers may separate. Can be made a day ahead and stored covered in the fridge up to 4 days.
Nutrition
- Serving Size: 1 slice (1/8 of chee
- Calories: 450
- Fat: 35
- Carbohydrates: 30
- Protein: 5
Keywords: no-bake cheesecake, Oreo cheesecake, whipped cream layers, easy dessert, no oven dessert, creamy cheesecake, Oreo dessert


