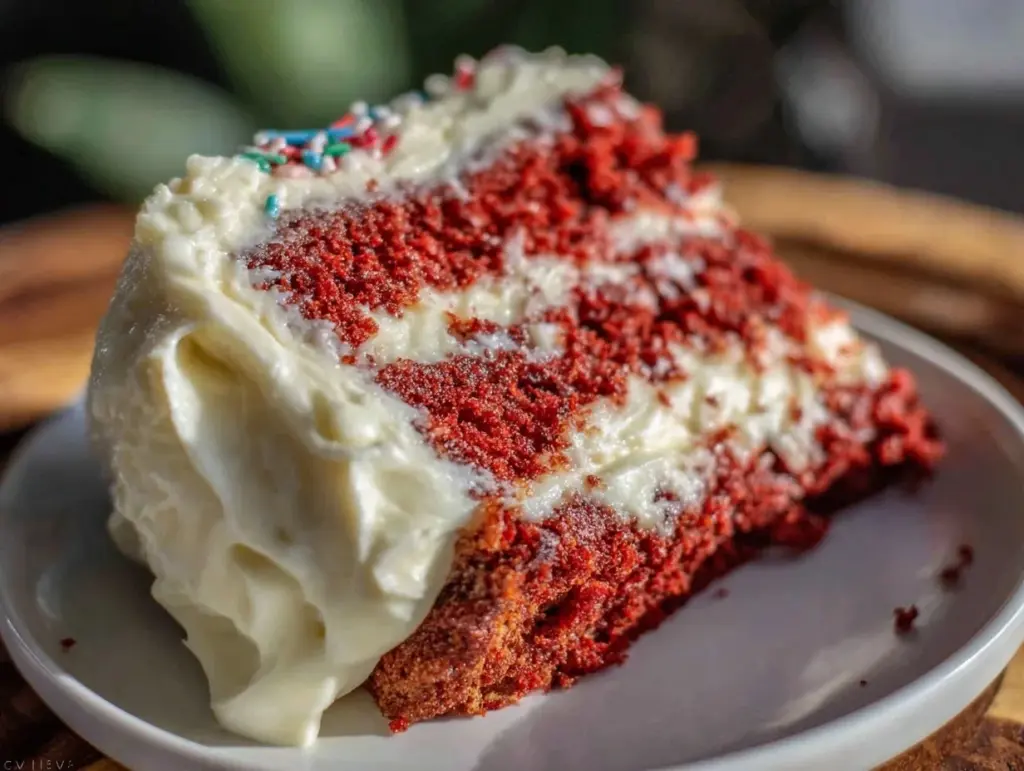
“Wait, is that a flag cake?” my neighbor asked with a grin, eyeing the bold red stripes and pristine white frosting peeking through the layers. Honestly, I wasn’t sure myself when I first attempted this red velvet flag cake. It started as a last-minute idea for the Fourth of July potluck, and let’s just say, I wasn’t convinced it would turn out beyond a messy pile of red crumbs and cream cheese. But after a couple of tries, some accidental frosting mishaps, and way too much cream cheese frosting tasting (not complaining), this cake became a showstopper in my circle.
The rich, velvety layers stacked with that tangy, silky cream cheese frosting somehow captured the spirit of the occasion and made me realize this recipe was more than just a seasonal gimmick. It stuck around my kitchen for weeks—not just because I love red velvet, but because there’s something about that flag design that feels both festive and comforting. It’s like a slice of celebration you can savor slowly, with every bite reminding you of good times and warm company.
So here we are, with a recipe that’s approachable enough for any home cook but impressive enough that people keep asking for the secret behind the perfect red velvet flag cake with cream cheese frosting. There’s a little patience required, sure, but nothing too tricky. Plus, the payoff? A stunning, tender cake that’s as delicious as it looks. That’s what made me trust this recipe—and I think you’ll feel the same once you try it.
Why You’ll Love This Recipe
I’ve tested countless red velvet cakes over the years, and this one stands out for a few reasons that make it a go-to whenever I want to impress without stressing:
- Quick & Easy: The batter comes together in about 20 minutes, and the whole cake is ready in under 2 hours, including baking and frosting—perfect for busy weekends or last-minute celebrations.
- Simple Ingredients: No need for exotic items here. You probably have everything in your pantry or fridge, from cocoa powder to buttermilk and cream cheese.
- Perfect for Celebrations: Whether it’s Independence Day, a birthday, or just a fun family gathering, this cake’s striking flag design always steals the show.
- Crowd-Pleaser: Kids and adults alike adore the moist crumb and that rich, tangy cream cheese frosting that’s not too sweet.
- Unbelievably Delicious: The balance of cocoa, buttermilk’s slight tang, and the smooth cream cheese frosting creates a texture and flavor combo that feels like comfort food with a festive twist.
This recipe isn’t your standard red velvet cake. The secret is in the layering and the frosting technique that keeps the cream cheese silky and stable, so it doesn’t slide off or get too heavy. Plus, I tweak the traditional recipe by folding in just the right amount of vinegar and baking soda for that signature red velvet lift and crumb. It’s a cake that’s as much about the look as the taste, but honestly, you’ll close your eyes after the first bite and just savor that moment.
For a different colorful cake experience, you might also enjoy the stunning pink and green ombre wicked birthday cake I made last summer. It’s a fun contrast to this classic flag design but just as easy to follow.
What Ingredients You Will Need
This recipe keeps things straightforward, using familiar ingredients that come together to create a bold red velvet flag cake with a rich cream cheese frosting that’s just the right balance of tangy and sweet.
- For the Cake Layers:
- All-purpose flour – 2 ½ cups (315g), sifted for lightness
- Cocoa powder – 2 tablespoons (unsweetened, I like Hershey’s for consistent flavor)
- Baking soda – 1 ½ teaspoons
- Salt – 1 teaspoon
- Granulated sugar – 2 cups (400g)
- Vegetable oil – 1 cup (240ml), neutral flavor
- Buttermilk – 1 cup (240ml), room temperature (if you don’t have buttermilk, mix 1 cup milk with 1 tablespoon lemon juice and let sit 5 minutes)
- Large eggs – 2, room temperature (helps with structure and moisture)
- Vanilla extract – 2 teaspoons
- White vinegar – 1 tablespoon (reacts with baking soda for that tender crumb)
- Red food coloring – 2 tablespoons (gel or liquid, depending on your preference for color intensity)
- For the Cream Cheese Frosting:
- Cream cheese – 16 oz (450g), softened (I like Philadelphia brand for smooth texture)
- Unsalted butter – ½ cup (115g), softened (adds richness)
- Powdered sugar – 4 cups (480g), sifted to avoid lumps
- Vanilla extract – 1 ½ teaspoons
- Salt – a pinch (balances sweetness)
Each ingredient plays its part—flour and cocoa provide the structure and subtle chocolate undertone, while buttermilk and vinegar keep the crumb tender and moist. The cream cheese frosting is the star that ties it all together with its creamy, tangy profile. If you want to try a dairy-free version, swapping the cream cheese and butter for plant-based alternatives works well, just be sure they’re room temperature for easy mixing.
Equipment Needed
- Two 9-inch (23cm) round cake pans – essential for even layers; if you don’t have two, bake layers one at a time.
- Mixing bowls – one large for batter, another for frosting.
- Electric mixer or stand mixer – speeds up beating and makes frosting silky. Hand mixers work too but might take longer.
- Rubber spatula – for folding and scraping down bowls.
- Cooling racks – important to cool cakes completely before frosting to avoid melting.
- Offset spatula or butter knife – helps spread frosting evenly, especially for the flag pattern.
- Toothpicks or cake tester – to check doneness.
I’ve tried making this cake with a whisk and it’s doable but the mixer definitely helps with smoother frosting. Also, if you’re on a budget, using silicone mats or parchment paper liner in pans prevents sticking without extra grease. Keeping your cream cheese and butter at room temperature is key for smooth frosting—too cold and you’ll get lumps, too warm and it might separate.
Preparation Method
- Preheat your oven to 350°F (175°C). Grease and flour two 9-inch cake pans, then line the bottom with parchment paper for easy release. This step saves a lot of grief later.
- Mix dry ingredients. In a large bowl, sift together the flour, cocoa powder, baking soda, and salt. This ensures even distribution and a light texture. Set aside.
- Combine wet ingredients. In another bowl, whisk together sugar and oil until combined (no need to overbeat). Add eggs one at a time, beating lightly after each addition. Stir in vanilla extract.
- Add buttermilk and red food coloring. Pour in the buttermilk and food coloring, mixing gently until the batter is uniformly red. Don’t overmix here; a few streaks are okay.
- Incorporate dry ingredients. Slowly add the dry mixture into the wet ingredients, folding gently with a spatula until just combined. Overmixing can toughen the cake.
- Stir in the vinegar. Quickly but gently fold in the vinegar — this reacts with baking soda to give the cake its tender crumb and slight rise.
- Divide the batter evenly. Pour the batter into the prepared pans and smooth the tops with a spatula. Tap the pans lightly on the counter to release air bubbles.
- Bake for 25-30 minutes. Use a toothpick to test doneness; it should come out clean or with moist crumbs. Avoid opening the oven early to prevent sinking.
- Cool completely. Let the cakes cool in the pans for 10 minutes, then transfer to cooling racks. This step is crucial for frosting success—warm cakes will melt the cream cheese.
- Prepare the cream cheese frosting. Beat cream cheese and butter together until smooth and creamy (about 3-5 minutes). Gradually add powdered sugar, beating on low to avoid a sugar cloud, then increase speed until fluffy. Mix in vanilla and a pinch of salt.
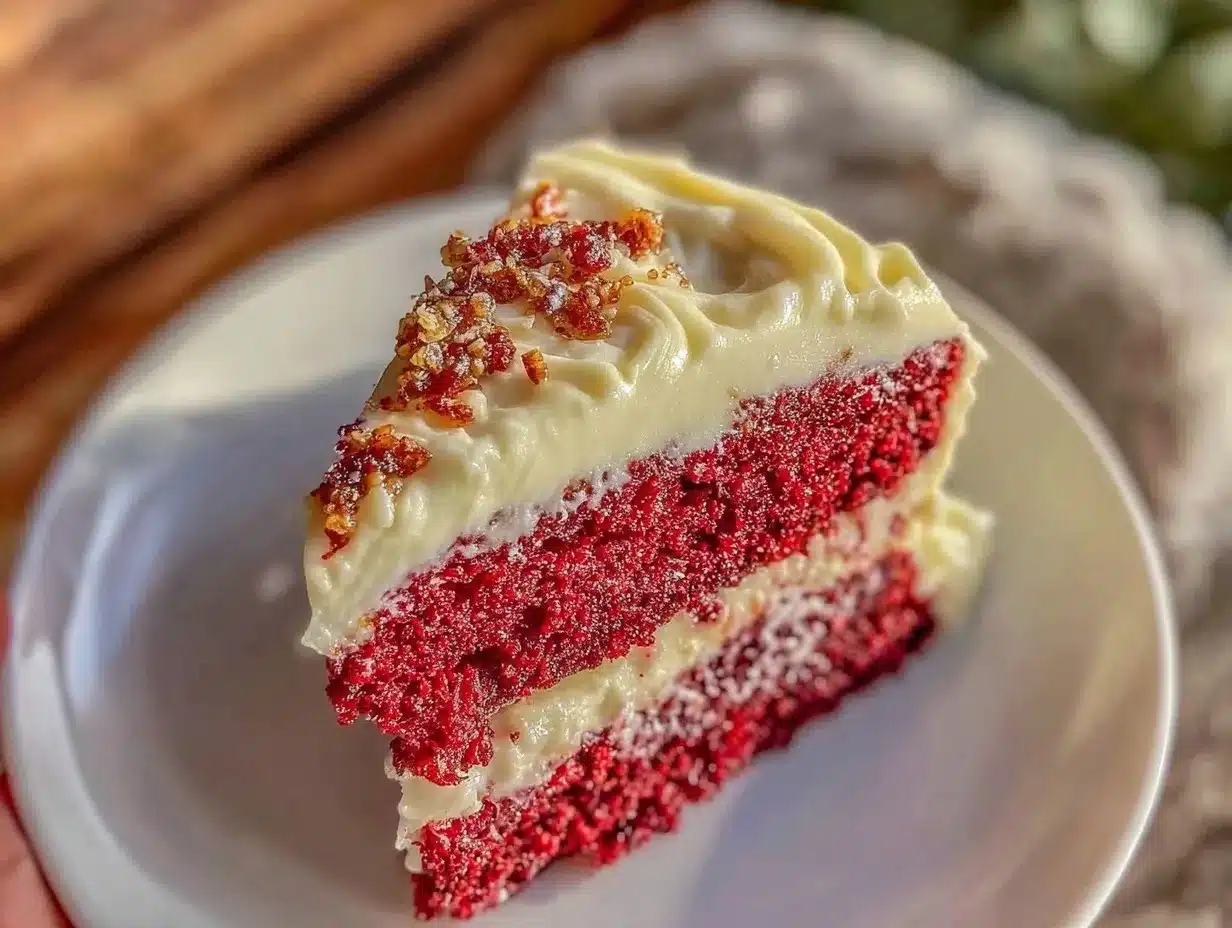
- Assemble the flag cake. Level the cake tops with a serrated knife if needed. Spread a thin layer of frosting on the first layer. For the stripes, alternate spreading frosting and cake layers to create clean lines. Use an offset spatula to smooth edges. The “flag” effect comes from frosting stripes and a square of frosting dots or stars in one corner—get creative but keep it neat!
- Chill before serving. Pop the cake in the fridge for at least 30 minutes to let the frosting set. This helps keep your flag crisp and prevents smudging when slicing.
If you want a trick I learned the hard way, don’t skip the chilling step. Trying to cut into a warm cream cheese frosting cake is a mess (trust me). Also, if your frosting feels too soft, a few minutes in the fridge and a quick re-whip helps bring it back to perfect spreadability.
Cooking Tips & Techniques
Making a red velvet cake with cream cheese frosting might seem straightforward, but a few pro tips can save you from common pitfalls:
- Room temperature ingredients matter. Eggs, buttermilk, cream cheese, and butter should all be at room temp to mix smoothly. Cold ingredients cause lumps or curdling.
- Don’t overmix the batter. Overworking flour develops gluten, making the cake dense. Fold gently until just combined.
- Use gel food coloring for vibrant red. Liquid food coloring can thin the batter and dull the color. Gel or paste offers brighter hues without changing consistency.
- Beat frosting long enough. Cream cheese frosting needs time to become fluffy. Short mixing leads to gritty texture; too long can make it runny.
- Level your cake layers. Uneven layers make it hard to get clean flag stripes. A serrated knife or cake leveler works wonders.
- Chill between steps. Especially after frosting, chilling helps keep the frosting firm for crisp lines and tidy cutting.
I once tried rushing to serve this cake right after frosting, and the stripes all blurred together—lesson learned! Also, I find multitasking easier by prepping the frosting while the cakes bake, which cuts down total time.
Variations & Adaptations
This recipe is pretty adaptable if you want to switch things up or accommodate special diets:
- Gluten-Free Red Velvet: Replace all-purpose flour with a 1-to-1 gluten-free baking flour. Add a teaspoon of xanthan gum if your blend doesn’t contain it.
- Vegan Version: Use dairy-free cream cheese and vegan butter alternatives. Swap eggs with flax eggs (1 tablespoon flax + 3 tablespoons water = 1 egg). Use coconut or almond milk instead of buttermilk, mixed with a splash of vinegar.
- Flavor Twists: Add a teaspoon of espresso powder to the batter for subtle mocha notes or sprinkle crushed pecans between layers for crunch.
- Different Frostings: You can try a whipped coconut cream frosting for a lighter, dairy-free topping if cream cheese isn’t your thing.
I personally love adding a hint of orange zest to the frosting sometimes—it pairs surprisingly well with the cocoa and cream cheese tang. If you want to try a different look, the wicked green velvet cupcakes recipe shows how to use velvet cake in a fun, festive way that’s great for parties.
Serving & Storage Suggestions
Serve this red velvet flag cake slightly chilled or at room temperature for the best balance of moist cake and creamy frosting. It pairs beautifully with a simple cup of coffee or a glass of cold milk.
For presentation, use a sharp serrated knife dipped in hot water and wiped dry to slice clean pieces without dragging the frosting. The flag design really pops on a white or neutral platter.
Storage is straightforward: wrap the cake tightly with plastic wrap or place it in an airtight container and refrigerate. It keeps well for up to 4 days. If you want to freeze it, slice into portions first and freeze wrapped in parchment and foil; thaw overnight in the fridge.
The flavors actually mellow and meld after a day, making leftovers even more delicious. Just be sure to bring the cake to room temp before serving for the best texture.
Nutritional Information & Benefits
Each slice of this red velvet flag cake (assuming 12 servings) roughly contains:
| Calories | 360 kcal |
|---|---|
| Fat | 18 g |
| Saturated Fat | 10 g |
| Carbohydrates | 45 g |
| Sugar | 32 g |
| Protein | 4 g |
The cream cheese contributes calcium and protein, while the cocoa powder offers antioxidants and a subtle chocolate flavor without overwhelming sweetness. Using buttermilk adds a slight tang and tender crumb with some probiotics if homemade.
For those watching gluten or dairy, the recipe adapts well, as mentioned, making it accessible for various dietary needs. Just keep in mind the sugar content if you’re monitoring intake.
Conclusion
If you’re looking for a cake that’s both visually stunning and genuinely delicious, this perfect red velvet flag cake with cream cheese frosting delivers on all fronts. It’s the kind of recipe that makes you want to bake it again and again, whether for holidays, birthdays, or just because the craving hits.
Feel free to tweak the layers, play with colors, or try the frosting variations to make it your own. For me, this cake is a reminder that some of the best recipes come from a little experimentation and a lot of love.
And hey, if you’ve ever wondered how to bring that same wow factor to other treats, the technique here can inspire you to make creative desserts like the football-shaped chocolate chip cookie cake, another favorite for gatherings.
Give it a shot, savor each bite, and don’t forget to share your version—I’d love to hear how your red velvet flag cake turns out!
FAQs
Can I make this red velvet flag cake a day ahead?
Absolutely. In fact, chilling it overnight helps the flavors meld and makes slicing easier. Just keep it covered in the fridge.
What’s the best way to get a vibrant red color?
Gel or paste food coloring works best for a bold red without thinning the batter. Adding a tiny bit of cocoa powder enhances the classic red velvet taste.
Can I use regular milk instead of buttermilk?
You can use regular milk mixed with 1 tablespoon of vinegar or lemon juice per cup to mimic buttermilk’s acidity and tenderizing effect.
How do I prevent cream cheese frosting from being too runny?
Make sure your cream cheese and butter are softened but not melted. Beat the frosting long enough to be fluffy, and chill it if it feels too soft before spreading.
Can this cake be made into cupcakes?
Yes! The batter and frosting are perfect for cupcakes. Adjust baking time to about 20-22 minutes and decorate with small frosting stars or stripes for a mini flag effect.
Pin This Recipe!
Perfect Red Velvet Flag Cake Recipe Easy Homemade Cream Cheese Frosting Tutorial
A visually stunning and delicious red velvet flag cake with rich, tangy cream cheese frosting, perfect for celebrations and easy enough for home cooks.
- Prep Time: 20 minutes
- Cook Time: 30 minutes
- Total Time: 1 hour 15 minutes
- Yield: 12 servings 1x
- Category: Dessert
- Cuisine: American
Ingredients
- 2 ½ cups (315g) all-purpose flour, sifted
- 2 tablespoons unsweetened cocoa powder
- 1 ½ teaspoons baking soda
- 1 teaspoon salt
- 2 cups (400g) granulated sugar
- 1 cup (240ml) vegetable oil, neutral flavor
- 1 cup (240ml) buttermilk, room temperature (or 1 cup milk + 1 tablespoon lemon juice, let sit 5 minutes)
- 2 large eggs, room temperature
- 2 teaspoons vanilla extract
- 1 tablespoon white vinegar
- 2 tablespoons red food coloring (gel or liquid)
- 16 oz (450g) cream cheese, softened
- ½ cup (115g) unsalted butter, softened
- 4 cups (480g) powdered sugar, sifted
- 1 ½ teaspoons vanilla extract (for frosting)
- A pinch of salt (for frosting)
Instructions
- Preheat oven to 350°F (175°C). Grease and flour two 9-inch cake pans and line bottoms with parchment paper.
- Sift together flour, cocoa powder, baking soda, and salt in a large bowl.
- In another bowl, whisk sugar and oil until combined. Add eggs one at a time, beating lightly after each addition. Stir in vanilla extract.
- Add buttermilk and red food coloring to wet ingredients, mix gently until uniform red color is achieved.
- Fold dry ingredients into wet ingredients gently until just combined. Avoid overmixing.
- Fold in vinegar quickly but gently.
- Divide batter evenly between prepared pans and smooth tops. Tap pans lightly to release air bubbles.
- Bake for 25-30 minutes. Test doneness with toothpick; it should come out clean or with moist crumbs.
- Cool cakes in pans for 10 minutes, then transfer to cooling racks to cool completely.
- Beat cream cheese and butter together until smooth and creamy (3-5 minutes). Gradually add powdered sugar, beating on low then high until fluffy. Mix in vanilla and salt.
- Level cake tops if needed. Spread a thin layer of frosting on the first layer. Alternate frosting and cake layers to create stripes. Use offset spatula to smooth edges and create flag design with frosting dots or stars in one corner.
- Chill cake in fridge for at least 30 minutes before serving to set frosting and keep flag design crisp.
Notes
Use room temperature ingredients for smooth mixing. Do not overmix batter to avoid dense cake. Gel food coloring gives vibrant red color without thinning batter. Chill cake before slicing to keep frosting firm and neat. If frosting is too soft, chill and re-whip before spreading. Use parchment paper liners to prevent sticking.
Nutrition
- Serving Size: 1 slice (1/12 of cak
- Calories: 360
- Sugar: 32
- Fat: 18
- Saturated Fat: 10
- Carbohydrates: 45
- Protein: 4
Keywords: red velvet cake, flag cake, cream cheese frosting, Fourth of July cake, celebration cake, easy red velvet, homemade frosting


