
“You’re joking, right? No ice cream maker?” That’s what I thought the first time someone mentioned making homemade ice cream without churning. Honestly, I was skeptical. Ice cream, to me, always meant standing by the freezer, stirring away for what felt like forever. But then, after a long day that drained all my energy, I found myself craving something sweet, creamy, and a bit fancy—something that felt like an indulgence but without the fuss. I opened the fridge, grabbed a few simple ingredients, and decided to give this no-churn salted caramel swirl ice cream a shot.
It was late, quiet, and the kitchen smelled like warm caramel melting on the stove. The moment I drizzled that golden caramel through the smooth, fluffy cream base, I realized this was something special. No complicated gadgets, no endless stirring, just a quick mix and a wait. The first bite? Creamy with that perfect salty-sweet balance that made me close my eyes and savor every spoonful. It quickly became my go-to treat when I needed a little comfort without the hassle.
Now, I find myself making this recipe a few times a week, tweaking the swirl thickness or the salt level to suit my mood. It’s simple, satisfying, and even my friends have started asking for the recipe after tasting it at casual get-togethers. If you’re someone who craves homemade ice cream but dreads the effort, this recipe might just become your new favorite too.
There’s something quietly reassuring about whipping up a batch of this no-churn salted caramel swirl ice cream. It’s the kind of dessert that promises a little moment of calm and indulgence, every single time.
Why You’ll Love This Recipe
From my kitchen trials to sharing with friends, this creamy no-churn salted caramel swirl ice cream recipe has proven itself again and again. It’s not just easy—it’s downright foolproof. Here’s why this recipe stands out:
- Quick & Easy: Comes together in about 15 minutes, perfect for busy weeknights or when that sweet craving hits unexpectedly.
- Simple Ingredients: Uses pantry staples like heavy cream, sweetened condensed milk, and homemade salted caramel sauce—no fancy or hard-to-find items.
- Perfect for Any Occasion: Whether it’s a casual family night or an impromptu gathering, this ice cream impresses without the stress.
- Crowd-Pleaser: The caramel swirl adds a touch of gourmet flair that everyone loves—from kids to adults.
- Unbelievably Delicious: The texture is rich and velvety, with just the right balance of sweet and salty in every bite.
This recipe isn’t your average no-churn ice cream. The secret lies in the homemade salted caramel swirl—warm, buttery, slightly salty, and swirled just enough to create those beautiful pockets of flavor. I’ve tried other versions, but this one nails the texture and taste every time. It’s a little comfort food magic that’s healthier and faster than store-bought options, yet still feels special enough to serve when you want to impress without the fuss.
What Ingredients You Will Need
This recipe uses simple, wholesome ingredients to deliver bold flavor and satisfying texture without the fuss. Most items are pantry staples, and you can easily swap a few to suit your dietary needs.
- Heavy Cream (2 cups / 480 ml) – For that rich, creamy base. I prefer organic heavy cream for the best texture.
- Sweetened Condensed Milk (1 can, 14 oz / 396 g) – Adds sweetness and creaminess without the need for extra sugar.
- Vanilla Extract (1 teaspoon) – Brings warmth and depth to the ice cream base.
- Sugar (1/2 cup / 100 g) – For the salted caramel sauce; regular granulated sugar works best.
- Unsalted Butter (4 tablespoons / 57 g) – Adds richness to the caramel; use real butter for authentic flavor.
- Heavy Cream (1/4 cup / 60 ml) – For making the caramel sauce smooth and luscious.
- Sea Salt (1/2 teaspoon) – The key to that perfect salted caramel balance.
Optional substitutes: Use coconut cream instead of heavy cream for a dairy-free twist. For a lower-sugar version, swap the sweetened condensed milk with a sugar-free condensed milk alternative, though the texture may vary slightly.
Equipment Needed
- Mixing Bowls: A large bowl for whipping cream and a medium bowl for combining ingredients.
- Electric Mixer or Hand Whisk: An electric mixer speeds things up, but a sturdy hand whisk works too (though it takes more muscle!).
- Saucepan: For making the salted caramel sauce. A heavy-bottomed pan helps prevent burning.
- Spatula: For folding the whipped cream and swirling the caramel in.
- Freezer-Safe Container: A loaf pan or plastic container with a lid works perfectly for freezing the ice cream.
For those on a budget, a handheld milk frother can help whip cream faster. I’ve also found that silicone spatulas are easier to clean after sticky caramel work. If you don’t have a saucepan, a small skillet can substitute but keep a close eye on the caramel as it cooks.
Preparation Method
- Make the Salted Caramel Sauce (about 15 minutes): In a medium saucepan over medium heat, add 1/2 cup (100 g) granulated sugar. Stir constantly as the sugar melts and turns a deep amber color—this takes roughly 5–7 minutes. Be patient; rushing risks burning. Once melted, remove from heat and stir in 4 tablespoons (57 g) unsalted butter until fully melted and smooth.
- Slowly pour in 1/4 cup (60 ml) heavy cream while stirring vigorously (it will bubble up, so watch out!). Mix until silky and smooth. Stir in 1/2 teaspoon sea salt. Set aside to cool completely—it will thicken as it cools.
- Prepare the Ice Cream Base (10 minutes): In a large mixing bowl, pour 2 cups (480 ml) heavy cream. Using an electric mixer, whip the cream on high speed until stiff peaks form. This usually takes about 3 to 5 minutes. Don’t overwhip or it will turn grainy.
- In a separate bowl, combine one 14 oz (396 g) can sweetened condensed milk with 1 teaspoon vanilla extract. Gently fold this mixture into the whipped cream using a spatula, ensuring you keep the airiness intact.
- Combine and Swirl (5 minutes): Pour half of the ice cream base into your freezer-safe container. Spoon half of the cooled salted caramel sauce over the base. Repeat layers with the remaining ice cream base and caramel. Using a butter knife or skewer, gently swirl the caramel through the ice cream base to create a marbled effect. Be careful not to overmix; you want those beautiful caramel ribbons.
- Freeze: Cover the container with a lid or plastic wrap and freeze for at least 6 hours, preferably overnight, until firm.
Pro Tip: If your caramel sauce is too thick before swirling, warm it slightly to make it easier to drizzle. Also, if you notice the whipped cream deflating as you fold in the condensed milk, fold delicately to maintain fluffiness.
Cooking Tips & Techniques
Getting the right balance of creaminess and the perfect salted caramel swirl is all about technique. Here’s what I’ve learned:
- Whipping Cream: Chill your bowl and beaters beforehand. Cold equipment helps cream whip faster and hold shape better.
- Making Caramel: Use medium heat and stir constantly to avoid burning. If the caramel hardens or clumps, gently warm it while stirring to smooth it out again.
- Swirling: Don’t overdo it. Too much swirling blends the caramel away, too little and you get uneven pockets. A few gentle figure-eight motions with a knife usually do the trick.
- Freezing: Cover the ice cream tightly to prevent ice crystals from forming. If you get ice crystals, let the ice cream sit out for 5 minutes before scooping to soften it just right.
- Multitasking: While the caramel cools, whip your cream. It saves time and keeps things moving smoothly.
One mistake I made early on was rushing the caramel cooling—too warm and it sinks to the bottom instead of swirling beautifully. Patience here pays off.
Variations & Adaptations
This no-churn salted caramel swirl ice cream recipe is surprisingly flexible. Here are a few ways I’ve mixed it up:
- Chocolate Salted Caramel: Stir in 1/2 cup (90 g) mini chocolate chips or swirl in a chocolate fudge sauce along with the caramel for a double-decker delight.
- Nutty Twist: Add toasted pecans or walnuts into the swirl for added crunch and flavor contrast. Toasting nuts brings out a warm, smoky note that pairs wonderfully with caramel.
- Dairy-Free Version: Use coconut cream instead of heavy cream and a coconut-based sweetened condensed milk alternative. The texture changes slightly, but the result is still decadent and creamy.
- Spiced Caramel: Add a pinch of cinnamon or cayenne pepper to your caramel sauce for a subtle warming kick—perfect for cooler evenings.
Personally, I once tried folding in a few chunks of my chocolate chip cookie cake leftovers, which added a fun texture surprise that my friends couldn’t stop talking about.
Serving & Storage Suggestions
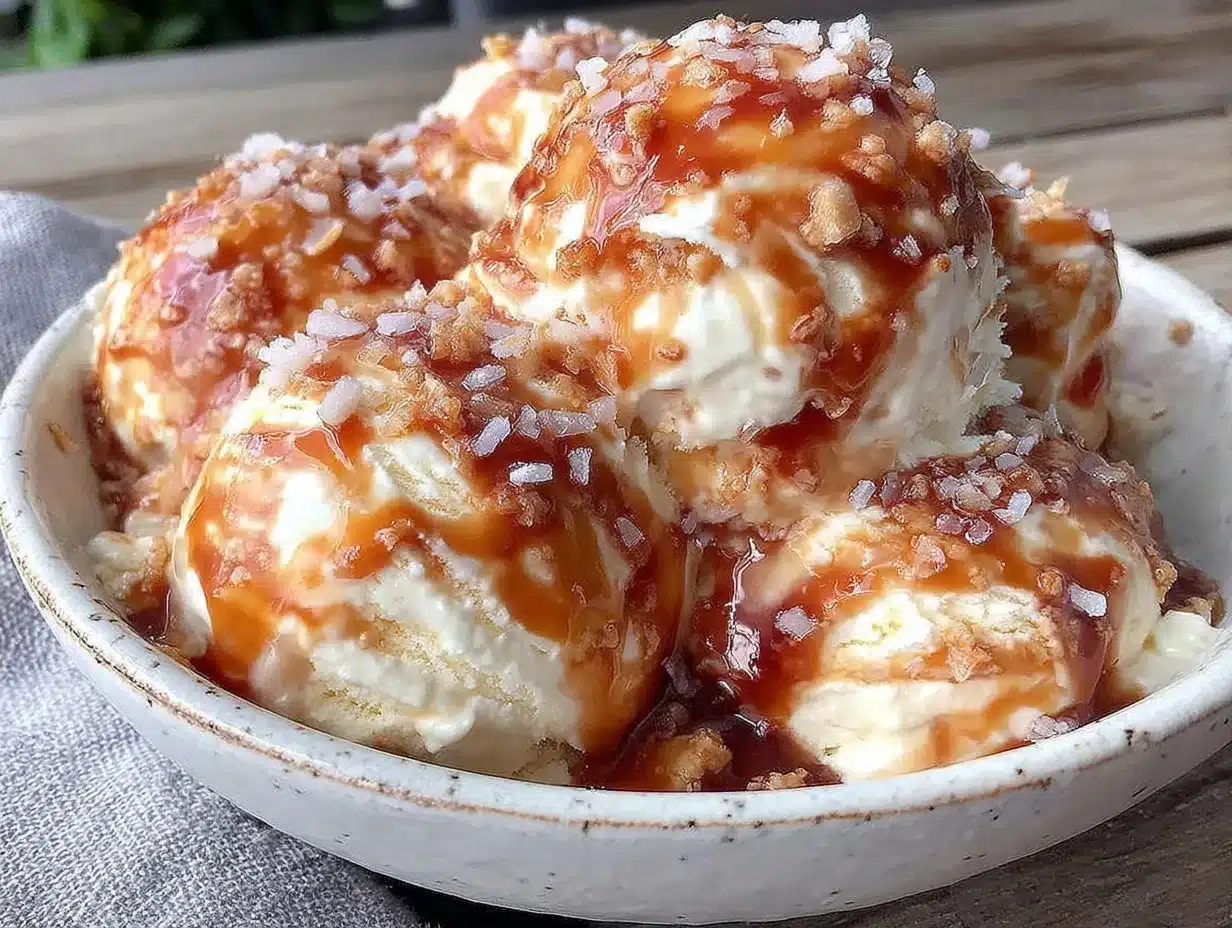
The creamy no-churn salted caramel swirl ice cream is best served straight from the freezer, ideally after letting it sit at room temperature for 5 minutes to soften slightly for easy scooping.
For presentation, drizzle a bit of extra warm salted caramel sauce on top and sprinkle with flaky sea salt or crushed nuts. It pairs beautifully with warm desserts like apple crisp or alongside a slice of birthday cake for a festive touch.
Store leftovers in an airtight container in the freezer. It keeps well for up to two weeks without losing texture or flavor. When reheating, avoid the microwave; instead, let the ice cream soften at room temperature before scooping again to maintain its creamy texture.
Over time, the flavors meld beautifully, so if you’re patient, the next day’s batch tastes even better—the caramel pockets become more pronounced, and the ice cream feels extra indulgent.
Nutritional Information & Benefits
While this no-churn salted caramel swirl ice cream is definitely a treat, it’s made with real ingredients and no artificial additives. A 1/2 cup (120 ml) serving roughly contains:
| Calories | 280 |
|---|---|
| Fat | 18g |
| Sugar | 25g |
| Protein | 3g |
Heavy cream provides a good dose of fat-soluble vitamins A and D. The caramel adds a touch of indulgence with real butter and cream, while sea salt balances sweetness and can help satisfy cravings more quickly. For those monitoring dairy or sugar intake, swapping ingredients as mentioned can help fit dietary needs.
Conclusion
This creamy no-churn salted caramel swirl ice cream recipe has become a quiet favorite in my kitchen. It’s the kind of dessert that doesn’t demand much but rewards you with rich, buttery flavor and that perfect salty-sweet kiss. Whether you’re new to homemade ice cream or just want a hassle-free way to impress, this recipe fits the bill.
Don’t be afraid to tweak the swirl thickness, salt level, or add your own twist with nuts or chocolate chips. It’s forgiving and fun to play with. Honestly, I love coming back to this recipe because it’s comfort food that feels a little special without any drama.
If you try it, I’d love to hear how you made it your own—drop a comment or share your favorite variations. Here’s to many creamy, caramel-filled smiles ahead!
Frequently Asked Questions
Can I make this ice cream without heavy cream?
You can use coconut cream as a dairy-free alternative, but the texture will be slightly different—still delicious, just a bit less creamy.
How long does the salted caramel swirl ice cream need to freeze?
It needs at least 6 hours, but overnight freezing is best to achieve a firm, scoopable texture.
Can I prepare the salted caramel sauce in advance?
Absolutely! The caramel sauce can be made up to a week ahead and stored in the fridge. Warm gently before swirling into the ice cream base.
Is it possible to make this recipe sugar-free?
Yes, by using sugar substitutes like erythritol-based sweetened condensed milk and adjusting the caramel accordingly. The texture and flavor might vary a bit.
How do I prevent ice crystals in no-churn ice cream?
Use fresh, cold cream and fold gently to keep air in. Cover tightly when freezing to prevent moisture from forming crystals. Let the ice cream soften a few minutes before scooping.
Pin This Recipe!
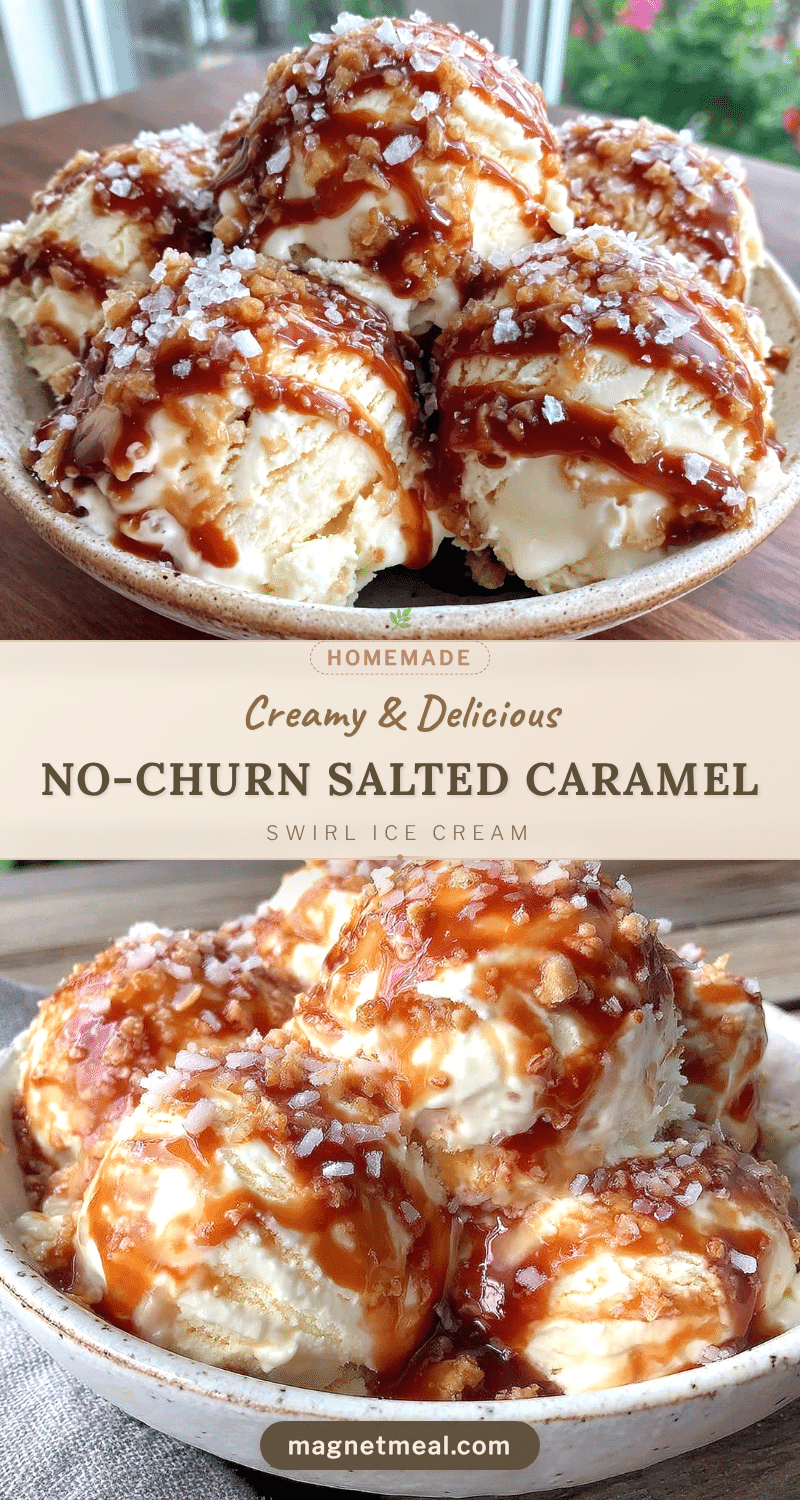
Creamy No-Churn Salted Caramel Swirl Ice Cream
A quick and easy homemade no-churn ice cream featuring a rich, creamy base swirled with warm, buttery salted caramel sauce for the perfect sweet and salty balance.
- Prep Time: 15 minutes
- Cook Time: 15 minutes
- Total Time: 6 hours 30 minutes
- Yield: 8 servings 1x
- Category: Dessert
- Cuisine: American
Ingredients
- 2 cups (480 ml) heavy cream
- 1 can (14 oz / 396 g) sweetened condensed milk
- 1 teaspoon vanilla extract
- 1/2 cup (100 g) granulated sugar
- 4 tablespoons (57 g) unsalted butter
- 1/4 cup (60 ml) heavy cream (for caramel sauce)
- 1/2 teaspoon sea salt
Instructions
- Make the Salted Caramel Sauce (about 15 minutes): In a medium saucepan over medium heat, add 1/2 cup (100 g) granulated sugar. Stir constantly as the sugar melts and turns a deep amber color (about 5–7 minutes). Remove from heat and stir in 4 tablespoons (57 g) unsalted butter until fully melted and smooth.
- Slowly pour in 1/4 cup (60 ml) heavy cream while stirring vigorously (it will bubble up). Mix until silky and smooth. Stir in 1/2 teaspoon sea salt. Set aside to cool completely.
- Prepare the Ice Cream Base (10 minutes): In a large mixing bowl, pour 2 cups (480 ml) heavy cream. Whip with an electric mixer on high speed until stiff peaks form (3 to 5 minutes).
- In a separate bowl, combine the sweetened condensed milk and 1 teaspoon vanilla extract. Gently fold this mixture into the whipped cream using a spatula, keeping the airiness intact.
- Combine and Swirl (5 minutes): Pour half of the ice cream base into a freezer-safe container. Spoon half of the cooled salted caramel sauce over the base. Repeat layers with the remaining ice cream base and caramel. Gently swirl the caramel through the ice cream base with a butter knife or skewer to create a marbled effect.
- Freeze: Cover the container with a lid or plastic wrap and freeze for at least 6 hours or overnight until firm.
Notes
Chill your bowl and beaters before whipping cream for better results. Stir caramel constantly to avoid burning. Warm caramel slightly if too thick before swirling. Fold condensed milk gently into whipped cream to maintain fluffiness. Cover ice cream tightly to prevent ice crystals. Let ice cream sit 5 minutes at room temperature before scooping for easier serving.
Nutrition
- Serving Size: 1/2 cup (120 ml)
- Calories: 280
- Sugar: 25
- Fat: 18
- Protein: 3
Keywords: no-churn ice cream, salted caramel, homemade ice cream, easy dessert, caramel swirl, no ice cream maker, quick ice cream recipe


