That cool, creamy bite — the kind that hits you before you even realize you’re reaching for another — instantly pulls me back to a sun-drenched backyard on a lazy Fourth of July afternoon. The kind of day where the air hums with laughter, the smell of charcoal lingers, and the simple joy of a no-fuss dessert is exactly what everyone needs. I remember balancing a plastic cup filled with these Easy No-Bake Patriotic Mini Cheesecake Cups, the vibrant reds and blues catching the sunlight like little edible flags waving in the breeze. It wasn’t about fancy plating or hours spent in the kitchen; it was about sharing something sweet and cool with friends and family while the kids chased bubbles across the yard.
Honestly, this recipe feels like a little secret I stumbled upon after too many failed attempts at summer desserts that melted too fast or required a million ingredients. I wanted something light, colorful, and just the right amount of creamy—no oven, no stress, just pure summertime ease. The mini cheesecakes turned into a tradition, popping up at potlucks and barbecues, always sparking compliments and that quiet smile from the person who thought a no-bake treat couldn’t be this satisfying.
Years later, making these still brings me back to that afternoon, and I think that’s why they stick around in my recipe box. They’re simple, nostalgic, and a little indulgent without being over the top. If you’re after a dessert that feels like a cool breeze on a hot day and tastes like a celebration, these mini cheesecake cups are quietly perfect.
Why You’ll Love This Recipe
Making these Easy No-Bake Patriotic Mini Cheesecake Cups is like finding a shortcut to summer dessert bliss. I’ve tested this recipe through countless gatherings, and here’s what makes it stand out:
- Quick & Easy: Ready in under 30 minutes, which is perfect when you’re juggling party prep or last-minute guests.
- Simple Ingredients: No specialty shopping needed—most items are pantry staples or easy to grab at any store.
- Perfect for Summer Parties: These mini cheesecakes are a hit at barbecues, pool parties, and picnics, adding a festive touch without fuss.
- Crowd-Pleaser: Kids and adults alike love the creamy texture and fresh berry toppings, making them a guaranteed crowd favorite.
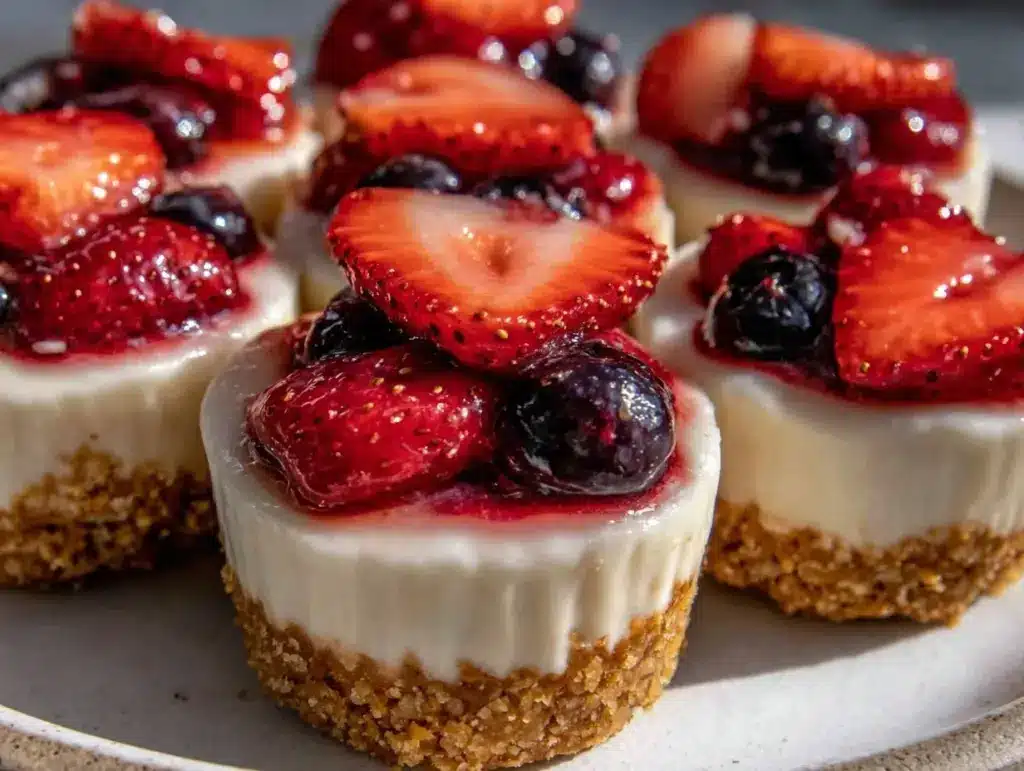
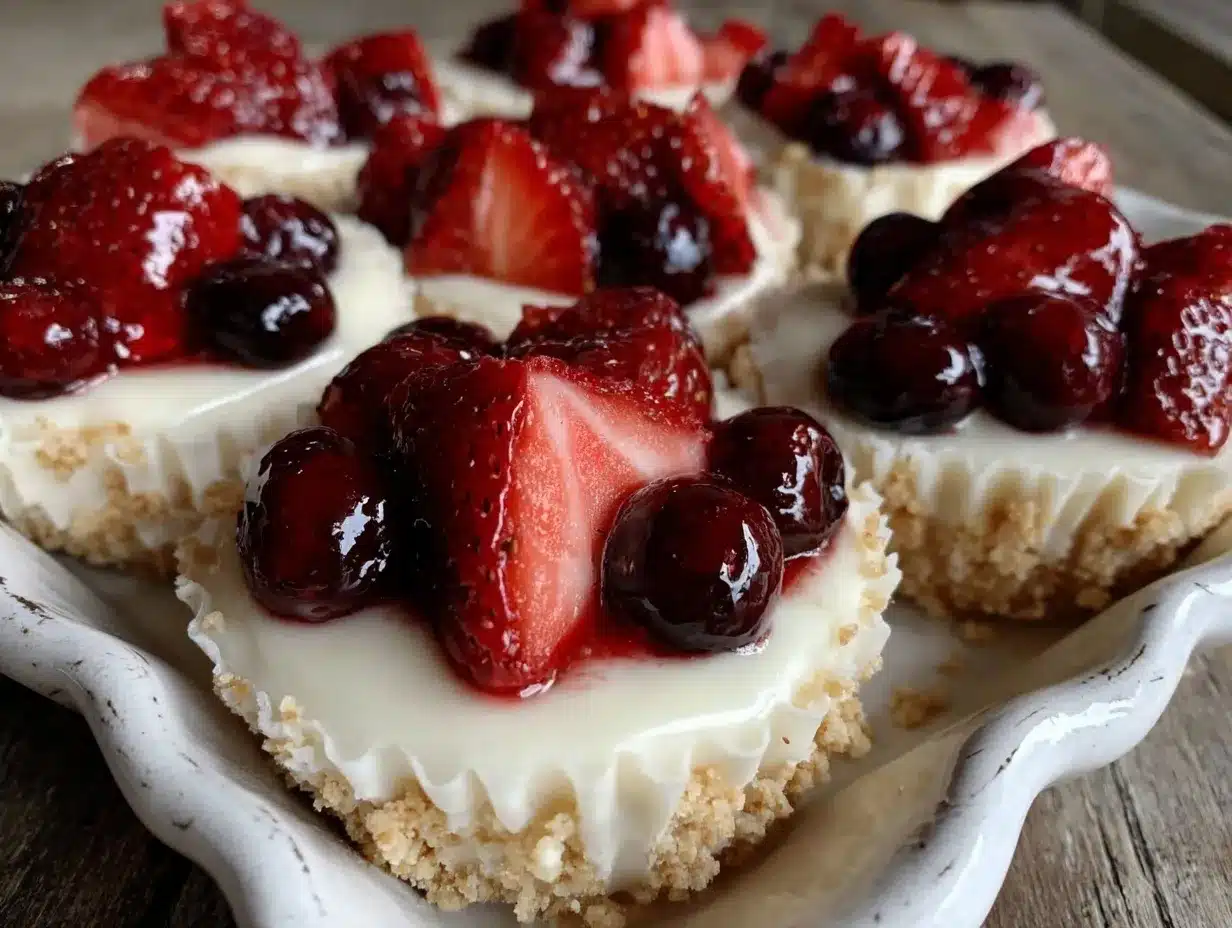
- Unbelievably Delicious: The combination of smooth cream cheese filling, buttery graham cracker crust, and sweet-tart berries hits all the right notes.
What sets this recipe apart is the no-bake approach paired with a perfectly balanced sweetness—not too heavy, not too light. The secret? Whipping the cream cheese just right and folding in fresh whipped cream to get that airy, melt-in-your-mouth texture. The patriotic colors come from layering strawberry and blueberry toppings, which feel just right for celebrating America’s summertime spirit.
This isn’t just another cheesecake recipe; it’s the kind you can pull out without stress and still impress your guests. Plus, it pairs beautifully with savory dishes like a juicy butter-basted ribeye steak or a refreshing avocado tuna salad lettuce wrap, making your summer feast feel complete without extra fuss.
What Ingredients You Will Need
This recipe uses simple, wholesome ingredients to deliver bold flavor and satisfying texture without the fuss. Most of these are pantry staples or easy-to-find fresh items, and substitutions are straightforward too.
- For the crust:
- Graham cracker crumbs (about 1 ½ cups / 150g) – I prefer Honey Maid for consistent texture
- Unsalted butter, melted (6 tablespoons / 85g) – adds richness and helps bind the crust
- Granulated sugar (2 tablespoons / 25g) – balances the buttery crumbs
- For the cheesecake filling:
- Cream cheese, softened (8 ounces / 225g) – use full-fat for best creaminess
- Powdered sugar (¾ cup / 90g) – smooth sweetness without grit
- Pure vanilla extract (1 teaspoon) – adds depth
- Heavy whipping cream (1 cup / 240ml), cold – whipped to soft peaks for light texture
- For the toppings:
- Fresh strawberries, sliced (1 cup / 150g) – juicy and bright red
- Fresh blueberries (1 cup / 150g) – plump and bursting with flavor
- Optional: fresh mint leaves for garnish (adds a fresh note)
Substitution tips: If you want a gluten-free option, swap graham crackers with gluten-free cookies or almond flour crust. For a dairy-free twist, try vegan cream cheese and coconut cream whipped until fluffy. If strawberries are out of season, frozen berries can work but thaw and drain well to avoid sogginess.
Equipment Needed
- Mixing bowls (one large for crust, one medium for filling)
- Electric mixer or stand mixer with whisk attachment – makes whipping cream and beating cream cheese so much easier
- Measuring cups and spoons (both metric and US standard for accuracy)
- Spoon or small offset spatula for layering filling into cups
- Clear plastic or glass mini dessert cups (about 4-ounce / 120ml size) – perfect for portion control and presentation
- Rubber spatula – for scraping bowls clean
For an even simpler approach, you can use a food processor to crush the graham crackers quickly. If you don’t have specialized mini cups, small mason jars or even sturdy paper cupcake liners work well. I’ve had great results with budget-friendly disposable cups for easy cleanup at summer gatherings.
Preparation Method
- Make the crust: In a large bowl, combine 1 ½ cups (150g) graham cracker crumbs, 6 tablespoons (85g) melted unsalted butter, and 2 tablespoons (25g) granulated sugar. Stir until the mixture resembles wet sand and holds together when pressed. (About 3 minutes)
- Fill mini cups with crust: Spoon about 1 to 2 tablespoons (15-30g) of the crust mixture into each mini cup. Press down firmly with the back of a spoon or your fingers to create an even base. This helps avoid a crumbly bottom. (Allow 5 minutes)
- Chill the crust: Place the cups in the fridge while preparing the filling to let the crust firm up slightly. (At least 10 minutes)
- Prepare the cheesecake filling: In a medium bowl, beat 8 ounces (225g) softened cream cheese with ¾ cup (90g) powdered sugar and 1 teaspoon vanilla extract until smooth and creamy. This usually takes about 2-3 minutes with an electric mixer on medium speed. Avoid lumps by stopping and scraping down the sides.
- Whip the cream: In a separate chilled bowl, whip 1 cup (240ml) cold heavy whipping cream until soft peaks form. Soft peaks mean when you lift the whisk, the cream holds a peak but the tip curls over.
- Fold whipped cream into cream cheese: Gently fold the whipped cream into the cream cheese mixture using a rubber spatula. Use slow, sweeping motions to keep the mixture airy and light. Stop once fully combined. (About 1-2 minutes)
- Assemble the cheesecake cups: Spoon or pipe the cheesecake filling over the chilled crust in each cup, filling almost to the top. Smooth the surface with the back of a spoon or spatula. (5 minutes)
- Add toppings: Arrange sliced strawberries on one side of each cup and fresh blueberries on the other to create the patriotic red, white, and blue look. Garnish with a small mint leaf if desired for a pop of green.
- Chill before serving: Refrigerate the assembled cheesecake cups for at least 2 hours to allow the filling to set properly. Overnight chilling works well too and enhances the flavors.
Pro tip: If you find the crust too loose after chilling, add a bit more melted butter next time or press harder when packing. Also, whipping the cream cold is key—warm cream won’t whip up right.
Cooking Tips & Techniques
Getting this no-bake cheesecake right is all about texture and timing. From experience, here are some pointers to keep your mini cheesecake cups perfect:
- Softened cream cheese is a must. Take it out of the fridge 30 minutes before you start. Cold cream cheese leads to lumps, and you don’t want that in a smooth filling.
- Whip the cream just right. Over-whipping can turn it grainy or buttery, while under-whipping leads to a runny filling. Aim for soft peaks—this keeps the filling light but stable.
- Folding technique matters. Use a gentle hand and a rubber spatula to fold whipped cream into the cream cheese. Vigorous mixing will deflate your air and make the filling dense.
- Chill time is non-negotiable. Rushing the set means the filling won’t firm up properly, and you’ll end up with a messy dessert. Patience pays off here.
- Fresh berries vs. frozen: If using frozen, thaw them fully and drain to avoid soggy cups.
- Storage tip: Cover with plastic wrap or airtight lids to prevent the crust from getting soft and the flavors from mingling with other fridge odors.
I once skipped chilling the crust and ended up with a crumbly bottom that fell apart when served. Since then, I always keep the crust chilled before filling. Also, playing around with toppings is fun—you can swap berries for other fruits or even add a drizzle of chocolate or caramel for a twist.
Variations & Adaptations
Feel free to customize these mini cheesecakes to suit your taste or dietary needs. Here are a few ways I’ve played with the recipe:
- Seasonal fruit swap: In summer, fresh peaches or raspberries work beautifully. For winter holiday parties, try pomegranate seeds and orange segments for a festive look.
- Flavor twist: Add a teaspoon of lemon zest or a splash of almond extract to the filling for a subtle flavor lift.
- Chocolate crust: Use crushed chocolate cookies or Oreos instead of graham crackers for a richer base.
- Dairy-free version: Substitute cream cheese with vegan cream cheese and heavy cream with canned coconut cream whipped until fluffy.
- Mini pie style: Serve the filling in pre-made mini tart shells instead of cups for a different crunch experience.
I once tried layering a thin spread of homemade blueberry jam between the crust and filling for extra berry flavor—it was a hit! Also, if you’re short on time, you can skip the crust for a crustless version, spooning filling straight into cups and topping with fruit.
Serving & Storage Suggestions
These mini cheesecakes are best served chilled, straight from the fridge. The cool cream cheese filling contrasts beautifully with the juicy berries on top. I like to present them in clear cups so the patriotic layers shine through—perfect for summer parties and easy to grab.
Pair them with light beverages like iced tea, sparkling lemonade, or even a chilled glass of rosé. They also complement hearty mains, such as the butter-basted ribeye steak or BBQ chicken cheddar wraps for a balanced meal.
For storage, cover tightly with plastic wrap or use reusable lids and refrigerate for up to 3 days. The crust might soften slightly but still tastes great. If you want to prepare ahead, assemble the crust and filling separately, then layer and top the day of serving for the freshest look.
Reheat? Not recommended—these mini cheesecakes are best enjoyed cold. But if they soften a bit in the fridge, a quick 10-minute chill usually firms them right back up. Flavors tend to meld and deepen when chilled overnight, which is a nice bonus for prepping ahead.
Nutritional Information & Benefits
Each mini cheesecake cup contains roughly 200-250 calories depending on portion size and toppings. They provide a good source of calcium from the cream cheese and heavy cream, while the berries add antioxidants and vitamins.
This dessert can fit into moderate indulgence plans and can be adapted for gluten-free or dairy-free diets easily. Just swap the crust or dairy components accordingly. The recipe avoids excess sugar by using powdered sugar moderately and relies on fresh fruit for natural sweetness.
From a wellness perspective, these mini cheesecakes are a satisfying treat that won’t leave you feeling overly heavy or sluggish—perfect for summer when you want something light but indulgent.
Conclusion
These Easy No-Bake Patriotic Mini Cheesecake Cups are a small but mighty way to bring festive flavor and simple joy to your summer parties. They’re a recipe I keep coming back to because they hit that sweet spot between easy prep, impressive look, and downright delicious taste. The flexibility to adapt them to your season, diet, or flavor mood only makes them more special.
Making these mini cheesecakes has become a personal tradition—one that reminds me that sometimes the best desserts don’t need fuss or fancy gadgets, just a little care and good ingredients. I hope you find as much simple pleasure in them as I do. Please share how you make them your own or any tweaks you try—I love hearing your stories!
Here’s to sweet summer memories made easy and delicious.
FAQs
Can I make these mini cheesecakes ahead of time?
Absolutely! You can prepare the crust and filling up to two days in advance. Assemble and top with berries the day you plan to serve for the freshest presentation.
What’s the best way to soften cream cheese quickly?
Leave it out at room temperature for about 30 minutes before starting. If you’re in a rush, cut the block into small cubes to soften faster.
Can I use frozen berries for the topping?
Yes, but thaw them completely and drain excess liquid to avoid soggy cups. Fresh berries work best for texture and appearance.
How many mini cheesecake cups does this recipe make?
It makes about 12 mini cups, depending on the size of your serving cups (around 4 ounces or 120ml each).
Is there a way to make the crust gluten-free?
Yes! Swap graham cracker crumbs with gluten-free cookies or almond flour. Just keep the same quantities and press firmly to form the base.
Pin This Recipe!
Easy No-Bake Patriotic Mini Cheesecake Cups
A quick and easy no-bake mini cheesecake recipe perfect for summer parties, featuring a buttery graham cracker crust, creamy filling, and fresh strawberry and blueberry toppings.
- Prep Time: 15 minutes
- Cook Time: 0 minutes
- Total Time: 2 hours 15 minutes
- Yield: 12 mini cheesecake cups 1x
- Category: Dessert
- Cuisine: American
Ingredients
- 1 ½ cups (150g) graham cracker crumbs
- 6 tablespoons (85g) unsalted butter, melted
- 2 tablespoons (25g) granulated sugar
- 8 ounces (225g) cream cheese, softened
- ¾ cup (90g) powdered sugar
- 1 teaspoon pure vanilla extract
- 1 cup (240ml) heavy whipping cream, cold
- 1 cup (150g) fresh strawberries, sliced
- 1 cup (150g) fresh blueberries
- Optional: fresh mint leaves for garnish
Instructions
- In a large bowl, combine graham cracker crumbs, melted unsalted butter, and granulated sugar. Stir until the mixture resembles wet sand and holds together when pressed (about 3 minutes).
- Spoon about 1 to 2 tablespoons (15-30g) of the crust mixture into each mini cup. Press down firmly to create an even base. Allow 5 minutes.
- Place the cups in the fridge while preparing the filling to let the crust firm up slightly (at least 10 minutes).
- In a medium bowl, beat softened cream cheese with powdered sugar and vanilla extract until smooth and creamy (2-3 minutes with an electric mixer).
- In a separate chilled bowl, whip cold heavy whipping cream until soft peaks form.
- Gently fold the whipped cream into the cream cheese mixture using a rubber spatula, using slow sweeping motions to keep the mixture airy and light (1-2 minutes).
- Spoon or pipe the cheesecake filling over the chilled crust in each cup, filling almost to the top. Smooth the surface (5 minutes).
- Arrange sliced strawberries on one side of each cup and fresh blueberries on the other to create the patriotic red, white, and blue look. Garnish with a small mint leaf if desired.
- Refrigerate the assembled cheesecake cups for at least 2 hours to allow the filling to set properly. Overnight chilling works well too.
Notes
Softened cream cheese is essential for a smooth filling. Whip the cream to soft peaks for the best texture. Chill the crust before adding filling to avoid a crumbly base. Fresh berries are preferred for topping; if using frozen, thaw and drain well. Store covered in the fridge up to 3 days. Variations include gluten-free crust, dairy-free substitutions, and seasonal fruit swaps.
Nutrition
- Serving Size: 1 mini cheesecake cu
- Calories: 225
- Sugar: 13
- Sodium: 120
- Fat: 16
- Saturated Fat: 9
- Carbohydrates: 18
- Fiber: 1
- Protein: 3
Keywords: no-bake cheesecake, mini cheesecake cups, patriotic dessert, summer party dessert, easy cheesecake, berry cheesecake


