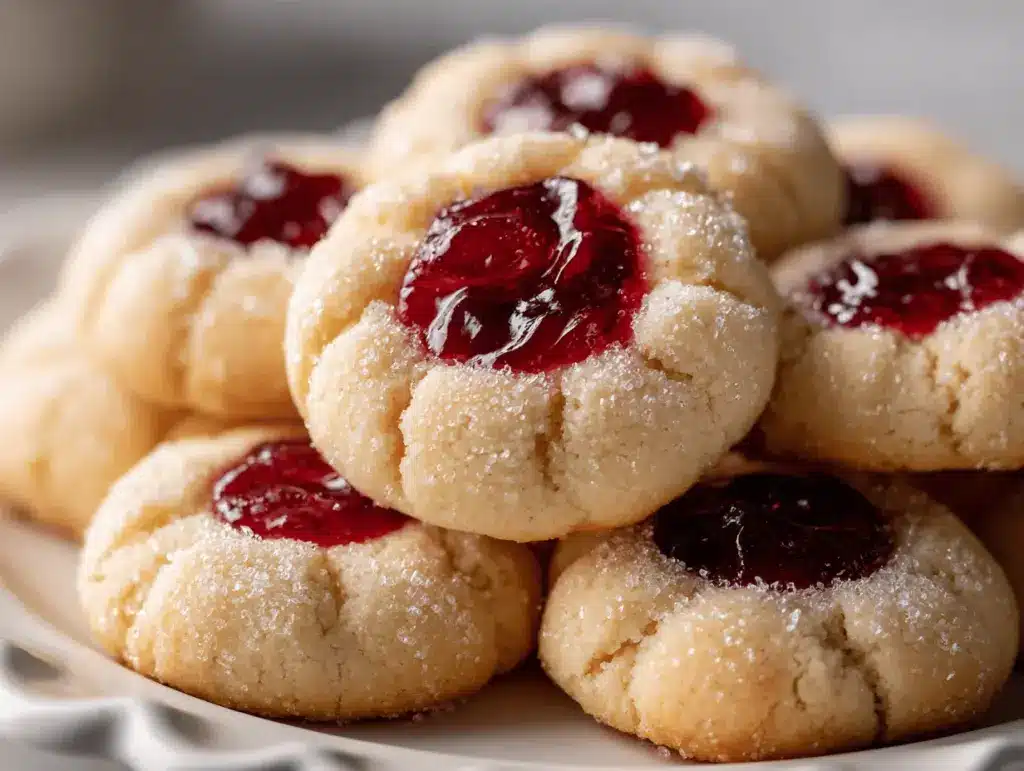
Introduction
The first time I baked cherry cheesecake thumbprint cookies, my kitchen filled up with the sweet, creamy smell that instantly reminded me of walking by a bakery window on a cold morning. You know the feeling—the kind where buttery, tender cookies are cooling on trays, and the air is thick with the scent of vanilla and cherries. I actually stumbled across this recipe during a holiday cookie swap, and let’s be honest, I was skeptical that something so beautiful could be easy to make. But I was wrong (and happy about it!).
These cherry cheesecake thumbprint cookies have become my go-to for celebrations, potlucks, and when I just crave something bakery-worthy without leaving home. They’re a mashup of two favorites: pillowy cheesecake and jammy thumbprint cookies. Honestly, they check every box for me—crisp edges, creamy middles, and that cherry pop right in the center. And the best part? You don’t need a culinary degree or fancy equipment to whip these up. As someone who’s tested this recipe at least a dozen times (and eaten way more than I should admit), I can promise you get bakery-style results every time.
Whether you want a simple dessert that wows guests, a cookie that travels well for gifting, or just a cozy treat for a quiet night in, these cherry cheesecake thumbprint cookies fit the bill. If you love easy recipes that taste like you spent hours in the kitchen (when you really didn’t!), you’re in the right place. Let’s get baking, friend!
Why You’ll Love This Recipe
- Quick & Easy: Ready in under 45 minutes—no chilling required! Perfect for those “I need cookies now” moments.
- Simple Ingredients: Nothing fancy here. You probably have everything in your pantry and fridge already.
- Perfect for Any Occasion: These cookies bring bakery vibes to birthdays, holidays, or just a regular Sunday afternoon.
- Crowd-Pleaser: I’ve brought these to family gatherings and never taken leftovers home. Kids love the cherry center, adults go crazy for the creamy filling.
- Unbelievably Delicious: The combo of tangy cheesecake and sweet cherry is next-level comfort food. Seriously, they’re the kind you close your eyes to savor.
Here’s what makes my cherry cheesecake thumbprint cookies a little different: I blend the cream cheese filling so it’s silky-smooth (no lumps here!), and I use a touch of almond extract for depth. The cookie base stays tender for days, and the cherry preserves or pie filling create the perfect finishing touch. If you’ve ever tried thumbprint cookies that turned out dry or bland, trust me—this recipe’s a game changer. It’s all about that ideal balance of buttery cookie, creamy center, and fruity topping.
Honestly, these cookies have become the treat I bake when I want people to ask for the recipe. There’s just something special about combining cheesecake and cherry in a bite-sized package. Whether you’re baking for a crowd or just spoiling yourself, you’ll love how easy and impressive these are. Get ready to add a new favorite to your cookie rotation!
What Ingredients You Will Need
This recipe uses simple, wholesome ingredients to deliver bold flavor and bakery-style texture—no fuss, no fancy grocery trips. Most of these are pantry staples, and you can swap or substitute as needed.
- For the Cookie Dough:
- 1 cup (226g) unsalted butter, softened (adds richness and tender texture)
- 2/3 cup (135g) granulated sugar
- 2 large egg yolks, room temperature (for structure and richness)
- 1 1/2 teaspoons pure vanilla extract (I like Nielsen-Massey for the best flavor)
- 1/2 teaspoon almond extract (optional, adds depth—skip if you’re not a fan)
- 2 1/4 cups (280g) all-purpose flour (King Arthur and Bob’s Red Mill are my go-tos)
- 1/4 teaspoon fine sea salt (balances sweetness)
- For the Cheesecake Filling:
- 6 oz (170g) cream cheese, softened (full-fat is best for creaminess)
- 1/4 cup (50g) granulated sugar
- 1/2 teaspoon pure vanilla extract
- 1 tablespoon (15ml) whole milk or half-and-half (helps make the filling smooth)
- For the Cherry Topping:
- 1/2 cup (160g) cherry preserves, cherry jam, or cherry pie filling (use what you love—preserves give a thicker, fruitier center)
- Optional: 1/4 teaspoon lemon zest (brightens the cherry flavor)
If you need gluten-free cookies, swap the all-purpose flour for a 1:1 gluten-free blend (Bob’s Red Mill works well). For dairy-free, use plant-based butter and vegan cream cheese—I’ve tried Miyoko’s and it works in a pinch. If you’re out of cherry preserves, raspberry or strawberry jam also taste fantastic. And for the filling, low-fat cream cheese works if you’re watching calories, though the texture won’t be quite as rich.
Pro tip: Look for cream cheese blocks, not the whipped tubs—it’s easier to blend and gives a smoother filling. For the cherry topping, I sometimes mix in a few chopped dried cherries if I want extra texture. And if you’re in a rush, canned cherry pie filling is perfectly fine (I’ve used it many times). All in all, these ingredients are flexible and forgiving, which is honestly a lifesaver on busy baking days.
Equipment Needed

- Large mixing bowl (for the dough—any sturdy bowl works)
- Medium bowl (for the cheesecake filling)
- Electric hand mixer or stand mixer (makes creaming butter and cheese easier, but a whisk works with elbow grease!)
- Baking sheets (I use rimmed sheets lined with parchment for easy cleanup)
- Parchment paper or silicone baking mats (prevents sticking and helps with even browning)
- Measuring cups and spoons (for accuracy—don’t eyeball the flour!)
- Small spoon or cookie scoop (for portioning dough)
- Thumb or back of a measuring teaspoon (to make the classic thumbprint indent)
- Rubber spatula (for scraping bowls clean and folding in flour)
- Wire cooling rack (helps cookies cool quickly and evenly)
If you don’t have an electric mixer, you can cream the butter and sugar with a sturdy wooden spoon—just be patient, it’ll get there. Silicone mats are reusable and save parchment; I’ve used both and honestly love mats for sticky cookies. For budget-friendly options, most big box stores sell basics for under $10, and I’ve picked up great cookie sheets at thrift shops (just line them well if they’re old!). If you use nonstick sheets without parchment, keep an eye out for browning edges. Maintenance tip: always wash your mixer attachments and spatulas right after using cream cheese—they can be stubborn if left to dry.
Preparation Method
- Prep the Oven and Baking Sheets: Preheat your oven to 350°F (175°C). Line 2 baking sheets with parchment paper or silicone mats. This helps cookies bake evenly and keeps cleanup easy.
- Make the Cookie Dough: In a large mixing bowl, cream together 1 cup (226g) unsalted butter and 2/3 cup (135g) sugar until light and fluffy, about 2-3 minutes. Add the 2 egg yolks, 1.5 teaspoons vanilla extract, and 0.5 teaspoon almond extract. Mix until combined. Scrape the bowl as needed.
- Combine Dry Ingredients: In a separate bowl, whisk together 2 1/4 cups (280g) all-purpose flour and 1/4 teaspoon salt. Gradually add the dry mix to the wet ingredients, blending on low speed until a soft dough forms. The dough should be smooth but not sticky. If it’s crumbly, add a teaspoon of milk.
- Shape the Cookies: Using a small scoop or spoon, portion the dough into 1-inch (2.5cm) balls (about 1 tablespoon/15g each). Roll gently between your palms and place on prepared sheets, spaced 2 inches (5cm) apart.
- Create Thumbprints: Press your thumb or the back of a teaspoon into the center of each dough ball to make a well. If the edges crack, pinch them gently back into shape. Don’t press all the way through.
- Mix Cheesecake Filling: In a medium bowl, blend 6 oz (170g) softened cream cheese, 1/4 cup (50g) sugar, 1/2 teaspoon vanilla, and 1 tablespoon (15ml) milk until smooth. Use a hand mixer for best results. The filling should be creamy, not runny.
- Fill the Cookies: Spoon or pipe about 1/2 teaspoon of cheesecake filling into each thumbprint well. Don’t overfill, or it may spill during baking.
- Add Cherry Topping: Spoon about 1/2 teaspoon cherry preserves or pie filling on top of the cheesecake layer. If using preserves, stir in a pinch of lemon zest for brightness.
- Bake: Bake in the preheated oven for 13-16 minutes, until edges are lightly golden and the filling is just set. Rotate pans halfway through for even baking. (If the filling puffs, that’s normal; it settles as it cools.)
- Cool: Remove from oven and let cookies cool on the sheets for 5 minutes, then transfer to a wire rack to cool completely. The centers will firm up as they cool.
Troubleshooting tips: If your thumbprints disappear while baking, the dough may be too warm—chill shaped cookies for 10 minutes before filling. If the filling spreads, reduce the milk next time. For best results, measure flour by spooning and leveling—not scooping directly from the bag. The cookies should smell sweet and buttery with a hint of almond and vanilla, and the cherry filling will glisten when done. My personal tip: I use a small piping bag for the cheesecake layer (makes it neat and tidy!), but a spoon works fine if you’re not fussy.
Cooking Tips & Techniques
After lots of cookie batches (and a few disasters), I’ve picked up some tricks that make cherry cheesecake thumbprint cookies bakery-worthy every time.
- Don’t Overmix: Once you add flour, mix just until combined. Overmixing makes cookies tough.
- Chill Dough if Sticky: If your dough feels soft or sticky, chill it for 15 minutes. It makes shaping easier and keeps thumbprints defined.
- Perfect Thumbprints: Press gently—if you go too deep, you’ll get cracks or holes. If cracks happen, just pinch them back together. Imperfect cookies taste just as good!
- Watch Filling Amount: Overfilling leads to messy overflow. Stick to about 1/2 teaspoon each for cheesecake and cherry layers.
- Rotate Baking Sheets: For even color, swap and rotate your sheets halfway through baking.
Common mistakes? I’ve burned a batch by using dark pans without parchment, so always line your sheets. Another pitfall—using cold cream cheese, which makes the filling lumpy. Set it out ahead, or microwave for 10 seconds if needed. Timing is everything: bake until edges are just golden, not brown. If you multitask, set a timer—these cookies go from perfect to overdone fast.
I learned the hard way that overcrowding the pan leads to spreading. Give each cookie space to puff and brown. For consistency, use a cookie scoop—makes every bite uniform. My best advice? Don’t stress about perfection. Some thumbprints will be wonky, some fillings might spill. They’ll still be irresistible.
Variations & Adaptations
Want to make these cherry cheesecake thumbprint cookies your own? Here are some easy ways to switch things up:
- Gluten-Free: Swap the flour for a 1:1 gluten-free blend. I’ve used Bob’s Red Mill and the cookies hold up beautifully.
- Dairy-Free: Use plant-based butter and vegan cream cheese. Miyoko’s and Earth Balance are reliable brands.
- Seasonal Flavors: Change the jam—try raspberry, blueberry, or apricot for a fresh twist. In fall, pumpkin butter makes a cozy swap for cherry.
- Nutty Option: Add 1/4 cup finely chopped pecans or walnuts to the dough for crunch.
- Chocolate Lovers: Stir mini chocolate chips into the cheesecake filling, or drizzle finished cookies with melted chocolate.
If you like a tangier filling, add a splash of lemon juice to the cheesecake layer. For different baking methods, you can air fry small batches at 325°F (160°C) for 8-10 minutes—watch closely to prevent burning. Allergens? For egg-free cookies, use 2 tablespoons applesauce in place of egg yolks (texture will be softer, but still tasty!). My favorite personal twist: swap almond extract for orange extract and top with orange marmalade—wow!
Customizing is half the fun. Play with combinations, and don’t be afraid to improvise with what you have. These cookies are forgiving and always a hit.
Serving & Storage Suggestions
Cherry cheesecake thumbprint cookies are best served at room temperature, when the flavors and textures are just right. Arrange them on a pretty platter for parties—they look bakery-perfect with their glossy cherry centers. For brunch, pair with coffee or black tea, or add fresh berries on the side.
If you want to get fancy, sprinkle with a light dusting of powdered sugar or drizzle with white chocolate. For gifting, stack cookies in a decorative tin with parchment layers—they travel well and stay fresh for days.
Storage: Store in an airtight container at room temperature for up to 3 days. For longer keeping, refrigerate—up to one week. The cheesecake filling stays creamy, and the cookie base remains tender. To freeze, place cookies in single layers separated by parchment and freeze for up to 2 months. Thaw overnight in the fridge or at room temperature.
Reheating: If you want that fresh-baked warmth, microwave cookies for 10 seconds or bake in a 300°F (150°C) oven for 3 minutes. Flavors actually deepen after a day or two, making leftovers especially tasty!
Nutritional Information & Benefits
Each cherry cheesecake thumbprint cookie (about 25g) contains roughly:
- Calories: 110
- Fat: 7g
- Carbohydrates: 12g
- Protein: 1g
- Sugar: 7g
The cream cheese adds a dose of calcium and protein, and the cherry topping brings antioxidants and vitamin C. Using real butter gives a satisfying texture and flavor, and you can adjust the sugar for a lighter option. If you’re gluten-free or dairy-free, substitutions work well without sacrificing taste.
Potential allergens include dairy, wheat, and eggs, but swaps are easy for most dietary needs. Personally, I love that these cookies offer a balance of treat and comfort without being overly heavy—a small indulgence that fits into a balanced lifestyle.
Conclusion
Cherry cheesecake thumbprint cookies are more than just a treat—they’re a cozy hug in cookie form. Whether you crave bakery-style flavor, want to impress guests, or just want a sweet pick-me-up, these cookies deliver every time. They’re easy enough for novice bakers, yet special enough for celebrations.
Don’t be afraid to experiment with flavors, fillings, or dietary swaps. The recipe’s forgiving, and every batch is a chance to make it your own. I keep coming back to these cookies for their combination of nostalgia and deliciousness—they never let me down.
If you give these irresistible cherry cheesecake thumbprint cookies a try, let me know in the comments. Share your twists, your baking stories, or tag me on Pinterest—I love seeing all your creations! Happy baking and enjoy every bite!
FAQs
Can I use store-bought cherry pie filling instead of preserves?
Absolutely! Cherry pie filling works great and gives a gooey, sweet center. Preserves are a bit thicker and fruitier, but both taste delicious.
How do I prevent my thumbprints from cracking?
If the dough cracks when pressing, it’s usually too cold or dry. Try warming the dough slightly or pinching the cracks back together. A gentle press helps too!
Can I freeze cherry cheesecake thumbprint cookies?
Yes, these cookies freeze beautifully. Layer them with parchment in an airtight container and freeze for up to 2 months. Thaw at room temp before serving.
What’s the best way to make uniform thumbprints?
A cookie scoop helps, and using the back of a teaspoon makes a consistent well. Don’t worry if they’re not perfect—imperfections add charm!
Can I substitute the cream cheese filling with something else?
Sure! Mascarpone or ricotta work well, or use a thick Greek yogurt for a tangy twist. Adjust sugar to taste and keep the filling thick.
Pin This Recipe!

Cherry Cheesecake Thumbprint Cookies Easy Bakery-Style Recipe
These cherry cheesecake thumbprint cookies combine the best of creamy cheesecake and jammy thumbprint cookies in a tender, buttery bite. Easy to make and bakery-worthy, they’re perfect for celebrations, gifting, or cozy nights in.
- Prep Time: 20 minutes
- Cook Time: 13-16 minutes
- Total Time: 40-45 minutes
- Yield: 30 cookies 1x
- Category: Dessert
- Cuisine: American
Ingredients
- 1 cup (226g) unsalted butter, softened
- 2/3 cup (135g) granulated sugar
- 2 large egg yolks, room temperature
- 1 1/2 teaspoons pure vanilla extract
- 1/2 teaspoon almond extract (optional)
- 2 1/4 cups (280g) all-purpose flour
- 1/4 teaspoon fine sea salt
- 6 oz (170g) cream cheese, softened
- 1/4 cup (50g) granulated sugar
- 1/2 teaspoon pure vanilla extract
- 1 tablespoon (15ml) whole milk or half-and-half
- 1/2 cup (160g) cherry preserves, cherry jam, or cherry pie filling
- Optional: 1/4 teaspoon lemon zest
Instructions
- Preheat oven to 350°F (175°C). Line 2 baking sheets with parchment paper or silicone mats.
- In a large mixing bowl, cream together butter and sugar until light and fluffy, about 2-3 minutes. Add egg yolks, vanilla extract, and almond extract. Mix until combined.
- In a separate bowl, whisk together flour and salt. Gradually add dry ingredients to wet, blending on low speed until a soft dough forms. If crumbly, add a teaspoon of milk.
- Portion dough into 1-inch balls (about 1 tablespoon each). Roll between palms and place on prepared sheets, spaced 2 inches apart.
- Press your thumb or the back of a teaspoon into the center of each dough ball to make a well. Pinch any cracks back together.
- In a medium bowl, blend softened cream cheese, sugar, vanilla, and milk until smooth.
- Spoon or pipe about 1/2 teaspoon of cheesecake filling into each thumbprint well.
- Spoon about 1/2 teaspoon cherry preserves or pie filling on top of the cheesecake layer. Stir in lemon zest if desired.
- Bake for 13-16 minutes, until edges are lightly golden and filling is just set. Rotate pans halfway through baking.
- Cool cookies on sheets for 5 minutes, then transfer to a wire rack to cool completely.
Notes
For gluten-free cookies, use a 1:1 gluten-free flour blend. For dairy-free, substitute plant-based butter and vegan cream cheese. Chill dough if sticky for easier shaping. Do not overfill thumbprints to prevent overflow. Cookies freeze well for up to 2 months. For best results, use block cream cheese and measure flour by spooning and leveling.
Nutrition
- Serving Size: 1 cookie (about 25g)
- Calories: 110
- Sugar: 7
- Sodium: 40
- Fat: 7
- Saturated Fat: 4
- Carbohydrates: 12
- Protein: 1
Keywords: cherry cheesecake thumbprint cookies, bakery-style cookies, easy cookie recipe, holiday cookies, cream cheese cookies, cherry cookies, thumbprint cookies, dessert, potluck cookies, gifting cookies


