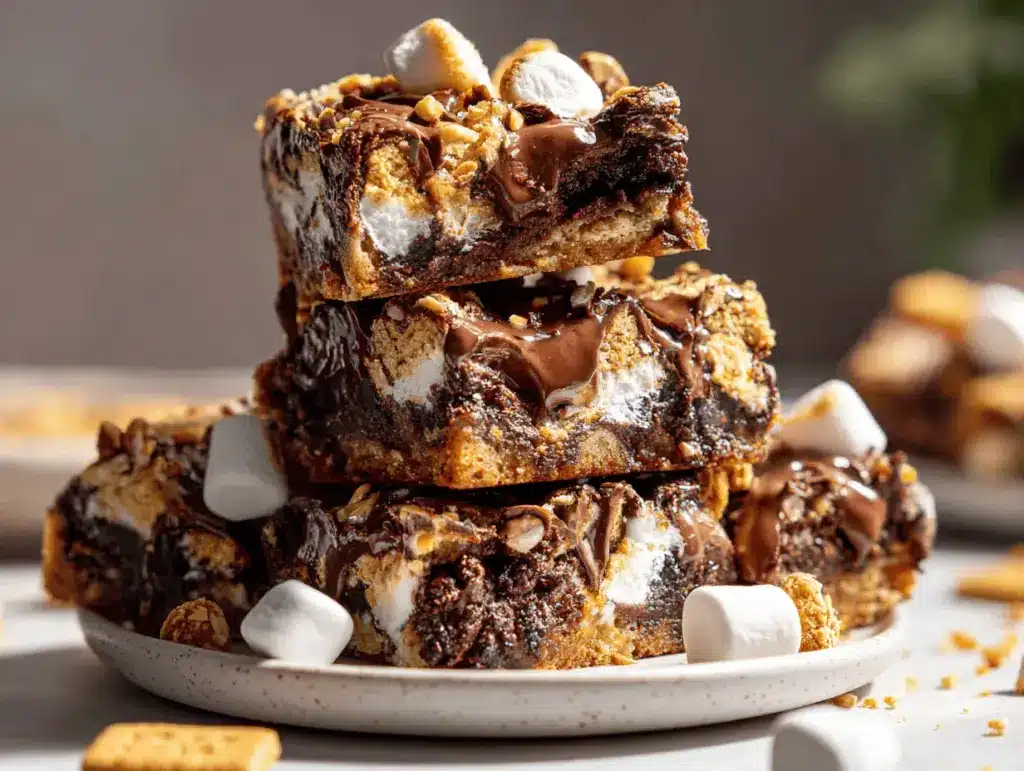
The scent of gooey marshmallows mingling with melted chocolate always zaps me straight back to childhood camping trips—sticky fingers, laughter, and the smell of toasted sugar in the air. That’s exactly what inspired me to develop these S’mores Rocky Road Cookie Bars. Honestly, they’re the kind of dessert that makes you pause mid-bite and smile. The best part? You don’t need a campfire or fancy equipment—just a baking pan and a craving for something truly decadent.
I first started making these bars when my youngest declared she missed summer even though it was January—let’s face it, the craving for s’mores has no season! With a base that’s part cookie, part rocky road, and all indulgence, this recipe quickly became a weekend family favorite. Over the years, I’ve tested different chocolate brands, swapped out nuts, and even tried making them gluten-free (with mixed success, but we got there!). Each batch brings a little nostalgia and a whole lot of joy.
Why do I keep coming back to S’mores Rocky Road Cookie Bars? Because they’re more than just dessert—they’re a celebration of comfort, rich flavors, and that gooey, crunchy magic you get with every bite. Perfect for busy families, picky eaters, and anyone who wants a homemade treat that’s both easy and unforgettable. As someone who’s baked these bars over a dozen times, I can say they’re foolproof, crowd-pleasing, and bursting with all the best parts of s’mores and rocky road. Let’s make a batch together—you’ll see exactly what I mean!
Why You’ll Love This Recipe
- Quick & Easy: You can whip up these S’mores Rocky Road Cookie Bars in about 15 minutes of prep—just mix, layer, and bake. Perfect for busy weeknights or unexpected guests.
- Simple Ingredients: No weird specialty items. You probably already have everything in your pantry: chocolate chips, mini marshmallows, graham crackers—classic s’mores goodness, plus a few rocky road extras.
- Perfect for Every Occasion: These bars shine at potlucks, birthday parties, or just cozy family movie nights. I’ve packed them for picnics and even snuck them into holiday dessert trays. They disappear fast!
- Crowd-Pleaser: Adults and kids alike go wild for these. I’ve had friends ask for the recipe after just one bite, and nobody can resist the gooey-marshmallow-and-chocolate combo.
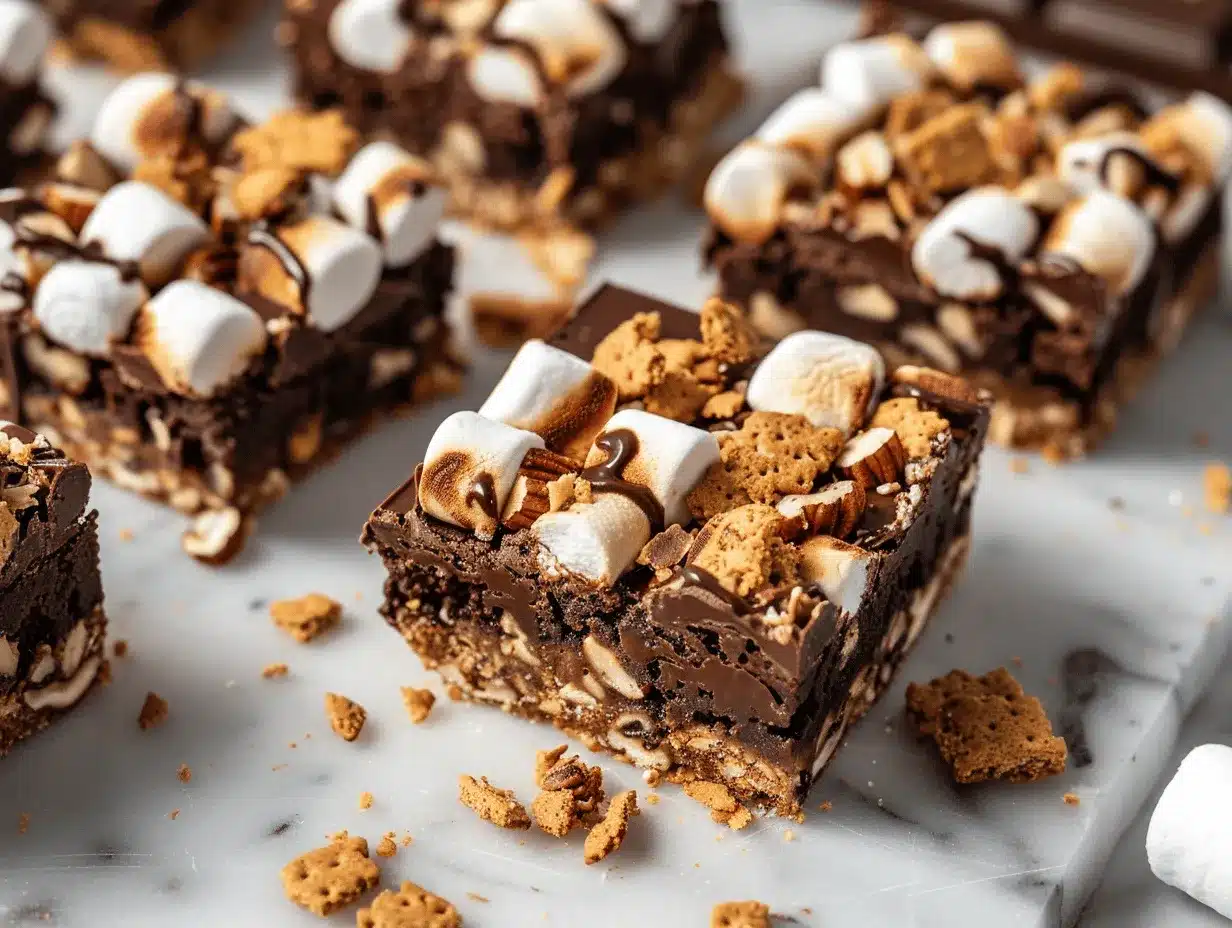
- Unbelievably Delicious: The base is chewy and cookie-like, packed with melty chocolate, crunchy nuts, and pillowy marshmallows. Each bite has that perfect contrast of textures—sweet, crunchy, and soft.
What makes these S’mores Rocky Road Cookie Bars stand out from all the other dessert bars? I use a little extra graham cracker for crunch, and blend the marshmallows right into the batter—so you get that gooey stretch in every slice. I’ve also found that toasting the top layer of marshmallows under the broiler for a minute (watch closely!) adds that authentic campfire flavor.
Honestly, these bars aren’t just good—they’re the kind that make you close your eyes and savor the moment. Whether you’re trying to impress guests or just want a pick-me-up after a long day, this recipe brings the wow-factor with zero stress. It’s comfort food at its finest, with a fun twist that keeps people coming back for more.
What Ingredients You Will Need
These S’mores Rocky Road Cookie Bars are all about simple, wholesome ingredients coming together for big, bold flavor. Most of these items are pantry staples, and I’ll share some swaps in case you need them. Here’s what you’ll need:
- For the Cookie Bar Base:
- 1 cup (226g) unsalted butter, softened (adds richness)
- 1 cup (200g) light brown sugar, packed
- 1/2 cup (100g) granulated sugar
- 2 large eggs, room temperature
- 2 teaspoons pure vanilla extract (I use Nielsen-Massey for best flavor)
- 2 cups (250g) all-purpose flour (swap with 1:1 gluten-free blend for GF version)
- 1 teaspoon baking powder
- 1/2 teaspoon baking soda
- 1/2 teaspoon fine sea salt
- For the Rocky Road & S’mores Mix-ins:
- 1 1/2 cups (255g) semisweet chocolate chips (Ghirardelli or Guittard are my go-to)
- 1 cup (60g) mini marshmallows, plus extra for topping (divided)
- 1 cup (100g) graham crackers, roughly broken into pieces (about 8 sheets)
- 1/2 cup (75g) toasted walnuts or pecans, chopped (optional, leave out for nut-free)
- For the Topping:
- 1/2 cup (85g) milk chocolate chunks or chips
- Extra mini marshmallows, scattered on top before baking
- Extra graham cracker bits, for crunch
If you want to make these bars dairy-free, swap the butter for Earth Balance and use dairy-free chocolate chips (Enjoy Life is great). For nut allergies, just skip the nuts—the bars are still delicious. Sometimes I swap half the chocolate chips for butterscotch or peanut butter chips if I’m feeling adventurous.
Seasonally, you can add dried cranberries or use white chocolate chips during the holidays. And if you’re out of graham crackers, crushed digestive biscuits work too! The ingredients are flexible—just keep the basics and you’ll end up with irresistible bars every time.
Equipment Needed
- 9×13-inch (23x33cm) baking pan (glass or metal; glass gives slightly softer edges)
- Large mixing bowl
- Medium mixing bowl
- Hand mixer or stand mixer (if mixing by hand, just use a sturdy spatula)
- Measuring cups and spoons
- Rubber spatula (makes folding in mix-ins a breeze)
- Parchment paper or nonstick spray (for easy removal)
- Wire cooling rack
- Offset spatula or butter knife (for spreading batter evenly)
I’ve tried making these in both glass and metal pans—metal gives crisper edges, but glass keeps things super gooey, which my kids love! If you don’t have a hand mixer, a whisk and elbow grease work fine (I’ve done it during a power outage). For budget-friendly options, Wilton and OXO make great basic tools.
Tip: Keep your rubber spatula clean by rinsing it between steps—marshmallow gets sticky fast. Parchment paper is a lifesaver for bar desserts; it makes cleanup so much easier.
Preparation Method
- Prep Your Pan: Line a 9×13-inch (23x33cm) pan with parchment paper, leaving a slight overhang for easy lifting. Spray lightly with nonstick spray. Preheat your oven to 350°F (175°C).
- Mix Dry Ingredients: In a medium bowl, whisk together 2 cups (250g) flour, 1 teaspoon baking powder, 1/2 teaspoon baking soda, and 1/2 teaspoon salt. Set aside.
- Cream Butter & Sugars: In a large bowl, beat 1 cup (226g) softened butter, 1 cup (200g) brown sugar, and 1/2 cup (100g) granulated sugar until light and fluffy—about 2 minutes with a mixer, or a bit longer by hand.
- Add Eggs & Vanilla: Beat in 2 large eggs and 2 teaspoons vanilla extract until just combined. Scrape the sides of the bowl as needed.
- Combine Wet & Dry: Gradually add the flour mixture to the wet ingredients, mixing on low until just combined. Don’t overmix—stop as soon as no streaks of flour remain.
- Fold in Mix-ins: Use a spatula to fold in 1 1/2 cups (255g) semisweet chocolate chips, 1 cup (60g) mini marshmallows, 1 cup (100g) graham cracker pieces, and 1/2 cup (75g) chopped nuts if using. The dough will be thick and chunky.
- Press Into Pan: Spread the batter evenly into your prepared pan. It’s sticky—wetting your hands or using an offset spatula helps.
- Add Toppings: Sprinkle 1/2 cup (85g) milk chocolate chunks, extra mini marshmallows, and extra graham cracker bits over the top. Press them in gently so they stick.
- Bake: Bake for 25-30 minutes, until the edges are golden and a toothpick inserted in the center comes out with a few moist crumbs. If you want extra toasted marshmallow, broil the bars for 1 minute at the end—watch closely!
- Cool: Let bars cool in the pan on a wire rack for at least 20 minutes. (If you try to cut too soon, they’ll fall apart—learned that the hard way!)
- Slice & Serve: Use the parchment overhang to lift the bars out. Slice into squares or rectangles. Serve warm for maximum gooeyness, or let them cool for cleaner cuts.
Troubleshooting: If your bars seem underbaked, let them cool fully—they firm up as they sit. If marshmallows melt too much, try adding a few extra on top halfway through the bake. Sensory cues: The bars should look golden at the edges, smell sweet and toasty, and feel soft but set in the center.
Efficiency tip: Measure your mix-ins ahead of time in small bowls so you can fold everything in quickly. If you’re making these for a party, bake a double batch and freeze half!
Cooking Tips & Techniques
Here’s what I’ve learned after a dozen batches (and a few baking mishaps):
- Don’t Overmix: Overworking the dough makes the bars tough instead of chewy. Mix just until the flour disappears—no need for perfection.
- Layer Mix-ins: Folding some marshmallows into the batter, then adding more on top, gives you gooey pockets and that classic toasted finish. If you add them all at once, they melt down and disappear.
- Broil Carefully: Toasting the top marshmallows under the broiler is magical—but they can burn in seconds. Never walk away! I’ve scorched one batch in the past (smelled terrible, tasted worse).
- Use Parchment Paper: Always line your pan. It helps lift out the bars and makes cleanup way easier. If you skip this, you’ll be chiseling sticky bits out of the corners.
- Timing Matters: For ultra-gooey bars, bake just until the edges are set and the center is slightly soft. For firmer bars, add 2-3 minutes. Every oven runs a bit differently, so check early.
I’ve found multitasking helps: measure prep bowls of mix-ins while the butter softens. If you get distracted (happens to me all the time), set a timer for each step. Consistency tip—use the same brand of chocolate chips and marshmallows each time for predictable results.
And if your bars fall apart when slicing, don’t worry—just call them “cookie crumbles” and serve over ice cream. Nobody complains!
Variations & Adaptations
- Gluten-Free: Use a 1:1 gluten-free flour blend in place of the all-purpose. I’ve had great luck with Bob’s Red Mill—texture stays chewy, not gritty.
- Dairy-Free: Swap butter for a dairy-free alternative (like Earth Balance). Stick with Enjoy Life chocolate chips for a completely dairy-free treat. The taste is still rich and indulgent!
- Holiday Twist: Add 1/2 cup dried cranberries and swap half the chocolate chips for white chocolate. These bars look festive and taste sweet-tart.
- Nut-Free: Skip the walnuts or pecans. You can add extra graham cracker bits for crunch if you want.
- Peanut Butter Lovers: Swirl in 1/3 cup creamy peanut butter to the batter before folding in the mix-ins. It’s a fun flavor upgrade that my teens are obsessed with.
I remember trying a version with coconut flakes and chopped macadamia nuts—honestly, it was like a tropical s’mores bar, and the flavor was wild! If you like experimenting, split the pan in half and try two variations at once.
No oven? You can press the dough into a lined pan and “bake” it in a countertop convection oven or even an air fryer (lower the temperature and check often). These bars are super forgiving, so don’t be afraid to get creative!
Serving & Storage Suggestions
Best way to serve these S’mores Rocky Road Cookie Bars? Warm, with a drizzle of melted chocolate or a scoop of vanilla ice cream. They’re lovely at room temperature too, especially for lunchboxes or party trays.
Serve on a rustic wooden board for that Pinterest-worthy look. Pair with cold milk, hot cocoa, or even coffee if you’re feeling fancy. During summer, I like them with lemonade—the sweet and tart balance is awesome.
For storage, keep bars in an airtight container at room temperature for up to 4 days. In the fridge, they’ll last a week (though the marshmallows firm up a bit). To freeze, wrap bars individually in foil and stash in a zip-top bag—good for 2 months. Reheat in the microwave for 10-15 seconds to restore gooeyness.
The flavor deepens after a day or two; the marshmallows meld with the chocolate and the graham crackers soften just a bit—so if you can resist eating them all at once, they get even yummier!
Nutritional Information & Benefits
Each bar (assuming 20 bars per pan) has roughly 210 calories, 10g fat, 28g carbs, and 2g protein. This is a dessert, so it’s definitely a treat, but you get a little fiber from the nuts and graham crackers. Marshmallows and chocolate bring in the classic s’mores sweetness!
Key benefits: Walnuts or pecans add healthy fats, and swapping for dark chocolate chips boosts antioxidants. If you go gluten-free or dairy-free, the recipe adapts easily for dietary needs. There are no major allergens if you skip the nuts and use allergy-friendly brands for chocolate and marshmallows.
From a wellness perspective, these bars are pure morale boosters—sometimes, you just need a gooey, chocolatey treat. As with any indulgence, moderation is key, but I’m all for enjoying dessert with friends and family!
Conclusion
So, why should you whip up a batch of S’mores Rocky Road Cookie Bars? They’re easy, fun, and guaranteed to make any day feel special. You get all the best parts of a campfire s’more and classic rocky road, wrapped up in a gooey, chewy bar that’s perfect for sharing (or keeping all to yourself—no judgment!).
Customize them however you like—swap ingredients, play with flavors, and make them your own. I love this recipe because it brings smiles every single time, whether it’s a cozy winter night or a summer picnic. Give them a try, and let me know in the comments how you adapted the recipe. Share your photos, tag me on social, or send your favorite twists—I always love seeing what you come up with!
Here’s to more sweet moments, sticky fingers, and irresistible bites. Happy baking!
Frequently Asked Questions
Can I make S’mores Rocky Road Cookie Bars ahead of time?
Absolutely! Bake, cool, and store in an airtight container for up to 4 days. They’re still delicious after a day or two—the flavors meld together nicely.
Do these bars freeze well?
Yes, they freeze beautifully. Wrap individual bars in foil and keep in a zip-top bag for up to 2 months. Thaw at room temperature or reheat briefly in the microwave.
How do I prevent the marshmallows from melting into the bars?
Reserve some marshmallows for the top layer, and add them midway through baking if you want extra gooey pockets. Watch carefully if broiling—the marshmallows toast very quickly!
Can I make these bars nut-free?
Definitely! Just skip the walnuts or pecans. Add more graham crackers or extra chocolate chips for crunch if you want.
What’s the best way to cut these bars cleanly?
Let the bars cool completely before slicing. Use a sharp knife, and wipe it clean between cuts. For super neat edges, chill the bars for 30 minutes before slicing.
Pin This Recipe!

S’mores Rocky Road Cookie Bars

These S’mores Rocky Road Cookie Bars combine the gooey, chocolatey magic of classic s’mores with the chewy, nutty texture of rocky road, all in an easy-to-make dessert bar. Perfect for any season, these bars are crowd-pleasing, nostalgic, and require no campfire—just a baking pan and your favorite mix-ins.
- Prep Time: 15 minutes
- Cook Time: 25-30 minutes
- Total Time: 45 minutes
- Yield: 20 bars 1x
- Category: Dessert
- Cuisine: American
Ingredients
- 1 cup (226g) unsalted butter, softened
- 1 cup (200g) light brown sugar, packed
- 1/2 cup (100g) granulated sugar
- 2 large eggs, room temperature
- 2 teaspoons pure vanilla extract
- 2 cups (250g) all-purpose flour
- 1 teaspoon baking powder
- 1/2 teaspoon baking soda
- 1/2 teaspoon fine sea salt
- 1 1/2 cups (255g) semisweet chocolate chips
- 1 cup (60g) mini marshmallows, plus extra for topping (divided)
- 1 cup (100g) graham crackers, roughly broken into pieces (about 8 sheets)
- 1/2 cup (75g) toasted walnuts or pecans, chopped (optional)
- 1/2 cup (85g) milk chocolate chunks or chips
- Extra mini marshmallows, for topping
- Extra graham cracker bits, for topping
Instructions
- Line a 9×13-inch (23x33cm) pan with parchment paper, leaving a slight overhang for easy lifting. Spray lightly with nonstick spray. Preheat oven to 350°F (175°C).
- In a medium bowl, whisk together flour, baking powder, baking soda, and salt. Set aside.
- In a large bowl, beat softened butter, brown sugar, and granulated sugar until light and fluffy (about 2 minutes with a mixer).
- Beat in eggs and vanilla extract until just combined. Scrape the sides of the bowl as needed.
- Gradually add the flour mixture to the wet ingredients, mixing on low until just combined. Do not overmix.
- Fold in semisweet chocolate chips, 1 cup mini marshmallows, graham cracker pieces, and nuts (if using) with a spatula. The dough will be thick.
- Spread the batter evenly into the prepared pan. Wet your hands or use an offset spatula to help.
- Sprinkle milk chocolate chunks, extra mini marshmallows, and extra graham cracker bits over the top. Press gently to adhere.
- Bake for 25-30 minutes, until edges are golden and a toothpick inserted in the center comes out with a few moist crumbs. For extra toasted marshmallow, broil for 1 minute at the end (watch closely).
- Let bars cool in the pan on a wire rack for at least 20 minutes.
- Use the parchment overhang to lift the bars out. Slice into squares or rectangles. Serve warm for gooeyness or let cool for cleaner cuts.
Notes
Do not overmix the dough for chewy bars. For nut-free, omit nuts and add more graham crackers or chocolate chips. For gluten-free, use a 1:1 gluten-free flour blend. For dairy-free, use plant-based butter and dairy-free chocolate chips. Broil marshmallows at the end for a toasted finish, but watch closely to prevent burning. Let bars cool before slicing for clean edges. Bars freeze well for up to 2 months.
Nutrition
- Serving Size: 1 bar (1/20th of pan)
- Calories: 210
- Sugar: 18
- Sodium: 120
- Fat: 10
- Saturated Fat: 6
- Carbohydrates: 28
- Fiber: 1
- Protein: 2
Keywords: s'mores, rocky road, cookie bars, dessert, easy, chocolate, marshmallow, graham cracker, homemade, family-friendly


