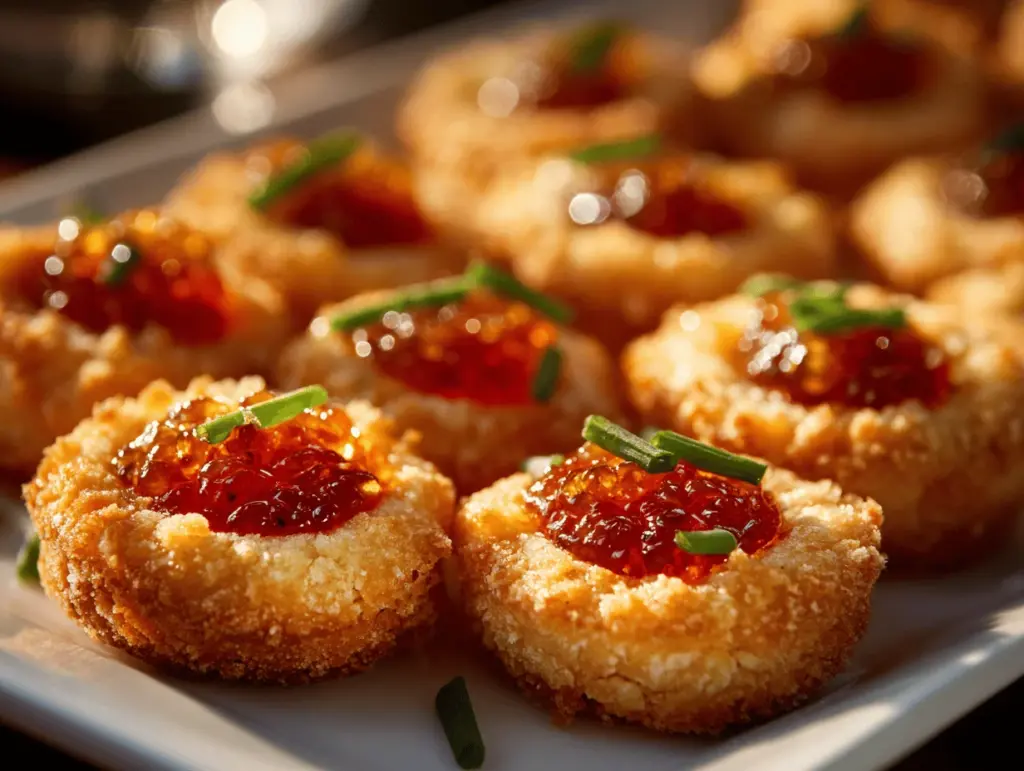
The first time I pulled a tray of Cheesy Thumbprint Appetizers with Hot Pepper Jelly from the oven, I swear the whole house smelled like a cozy bakery crossed with a holiday party. The buttery, golden crust, the melty cheese, and that tiny dollop of jewel-bright hot pepper jelly—oh, it’s just magic. Honestly, these little bites are the kind of snack that disappears before you can even say, “Wait, let me take a picture for Pinterest!”
I stumbled on the idea for these cheesy thumbprint appetizers one frantic afternoon before a potluck, desperate for a finger food that wasn’t just chips and dip. I remember thinking, “What if I take that buttery thumbprint cookie idea and make it savory, cheesy, and a little spicy?” A couple of tweaks, a handful of shredded cheese, and a jar of hot pepper jelly later, and the recipe was born. Since then, I’ve tested (and tasted) these cheesy thumbprints more times than I can count—tweaking the cheese blend, swapping in different jams, and, yes, sneaking more than my fair share straight off the cooling rack.
What I love most about these appetizers is how they bring people together. There’s something about that combo of rich, cheesy dough and tangy-sweet heat that just draws folks in. Whether you’re throwing a holiday bash, a game-day gathering, or just need a little something special for a cozy night in, these cheesy thumbprint appetizers are always a hit. Plus, you can prep them ahead—meaning less stress and more fun for you. Trust me, once you try them, you’ll want to make them for every party (and maybe a few non-parties too).
Why You’ll Love This Recipe
- Quick & Easy: You can whip up a batch of these cheesy thumbprint appetizers in under 45 minutes, start to finish. No fussy steps or fancy skills required—just mix, roll, press, and bake!
- Simple Ingredients: No need for a special trip to the gourmet market. Most of the ingredients are things you probably already have in your fridge and pantry—cheddar, cream cheese, flour, butter, and a jar of hot pepper jelly.
- Perfect for Parties: These bite-sized snacks are ideal for serving at parties, holiday gatherings, or even casual game nights. They look adorable on a platter and always spark conversation.
- Crowd-Pleaser: Every time I bring these out, I get requests for the recipe. Even picky eaters and spice skeptics end up reaching for seconds (or thirds!).
- Unbelievably Delicious: The cheesy, tender base paired with the sweet-spicy kick of hot pepper jelly is a flavor bomb. It’s comfort food with a little twist, and it’s honestly hard to stop at just one.
What really sets these appetizers apart from any other party snack is the texture and flavor combo. By blending both sharp cheddar and creamy cream cheese into the dough, you get a crumbly, rich base that holds up perfectly to the gooey dollop of jelly. The little thumbprint in the center acts like a flavor pocket, catching every bit of that sweet heat. I’ve tried other recipes that skip the cream cheese or use a different jam, but nothing quite compares to this version. You know that feeling when you taste something and instantly want to share it? That’s these cheese thumbprints. They’re not just good—they’re the kind of snack that makes you want to throw a party, just to have an excuse to make them again.
And let’s face it, we all need an easy, show-stopping appetizer in our back pocket. Whether you’re impressing friends, feeding a crowd, or just treating yourself, these cheesy thumbprint appetizers with hot pepper jelly are about to become your new go-to. I promise, once you try them, you’ll be hooked!
What Ingredients You Will Need
This recipe uses simple, everyday ingredients to create a snack that’s bursting with flavor and texture. Almost everything can be found in your kitchen already, and there’s plenty of room to swap or tweak based on what you have on hand.
- For the Dough:
- All-purpose flour – 1 cup (120g). The base of the dough, giving structure and a tender crumb.
- Unsalted butter – 1/2 cup (113g), softened. Adds richness and keeps the dough melt-in-your-mouth good. (If you only have salted butter, just skip the added salt!)
- Cream cheese – 4 oz (113g), softened. This is the secret for extra tenderness and tang—Philadelphia is my favorite, but store brand works too.
- Sharp cheddar cheese – 1 cup (about 115g), shredded. Go for the block and shred it yourself for the best melt and flavor. Pre-shredded works in a pinch, but it doesn’t melt quite as smoothly.
- Freshly grated parmesan – 1/4 cup (25g). Optional, but I love the salty punch it adds.
- Salt – 1/4 tsp. Just enough to balance the flavors.
- Ground black pepper – 1/8 tsp. Adds a little warmth.
- Crushed red pepper flakes – 1/4 tsp (optional). For an extra kick in the dough.
- For Filling & Topping:
- Hot pepper jelly – about 1/2 cup (120ml). The star of the show! Choose a good-quality brand for best results—Trader Joe’s and Stonewall Kitchen are my go-tos. Want it milder? Use sweet red pepper jelly or even apricot preserves.
- Extra shredded cheddar or parmesan – for sprinkling. Totally optional, but makes the tops golden and pretty.
- Fresh herbs: Chives, parsley, or thyme, finely chopped, for garnish. Not required, but they make the finished bites look fancy for parties.
Ingredient Tips & Substitutions:
- Flour: You can swap all-purpose for a gluten-free blend if needed.
- Cream Cheese: Dairy-free cream cheese works great if you want a lactose-free version.
- Cheddar: Try Monterey Jack or smoked gouda for a flavor twist.
- Hot Pepper Jelly: If you can’t find it, use regular pepper jelly plus a pinch of cayenne, or try jalapeño jelly for a green pop.
These ingredients keep things simple, but don’t be afraid to get a little creative with what you have on hand. The real key is that buttery, cheesy dough and a sweet-hot jelly center—everything else is just extra flair!
Equipment Needed
- Mixing bowl: Any medium-sized bowl will work for combining your dough.
- Electric mixer or sturdy wooden spoon: I love using my old hand mixer for this, but a spoon and a little elbow grease get the job done just fine (plus, fewer dishes!).
- Baking sheet: Lined with parchment paper or a silicone baking mat. If you don’t have those, a well-greased sheet will do.
- Measuring cups & spoons: Both US and metric work—accuracy makes a difference in baking.
- Small cookie scoop or tablespoon: This keeps your cheesy thumbprint appetizers uniform, but hands work too!
- Your thumb or the back of a rounded spoon: For making the signature “thumbprint.” (I’ve used the end of a wooden spoon handle in a pinch—works great!)
- Wire cooling rack: Optional, but it helps the appetizers cool evenly and stay crisp on the bottom.
If you don’t have a mixer, don’t sweat it—just make sure your butter and cream cheese are very soft so they mix easily. I’ve made these with nothing but a fork and a bowl when I was in a hurry, and they still turned out delicious. If you’re using a silicone mat, give it a quick wash before baking to keep flavors fresh (learned that the hard way after baking fish the night before—oops!).
All in all, you don’t need fancy gear—just basic tools and a little enthusiasm. If you’re on a budget, dollar-store measuring cups and a simple baking tray work perfectly well for these little cheesy wonders.
Preparation Method

- Preheat your oven: Set to 375°F (190°C). Line a baking sheet with parchment paper or a silicone baking mat for easy clean-up.
- Mix the dough: In a large bowl, combine 1/2 cup (113g) softened unsalted butter and 4 oz (113g) softened cream cheese. Beat together with an electric mixer or sturdy wooden spoon until creamy and well blended—about 1-2 minutes. If you see small lumps, that’s okay! Add 1 cup (120g) all-purpose flour, 1 cup (115g) shredded sharp cheddar, 1/4 cup (25g) grated parmesan (if using), 1/4 tsp salt, 1/8 tsp black pepper, and 1/4 tsp red pepper flakes (optional). Mix until a soft dough forms. The dough should pull away from the sides of the bowl but still feel a little tacky.
- Shape the appetizers: Scoop out heaping tablespoon-sized portions (about 20g each) and roll into balls. Place on your prepared baking sheet, spacing about 2 inches (5cm) apart. (Tip: If the dough feels too sticky, dust your hands with a bit of flour.) You should get about 20-22 thumbprints.
- Make the thumbprints: Use your thumb, the back of a rounded teaspoon, or the end of a wooden spoon handle to gently press an indentation in the center of each dough ball. Don’t press all the way through—just create a shallow “well” for the jelly.
- Fill with jelly: Using a small spoon (or a piping bag for neatness), fill each indent with about 1/2 teaspoon (2-3ml) hot pepper jelly. Try not to overfill, or it may bubble over during baking—learned that one the messy way!
- Bake: Place in the preheated oven and bake for 13-15 minutes, or until the edges are golden and the cheese is bubbling. The jelly will be molten hot—watch for a little caramelized edge, which is delicious.
- Optional cheese topping: In the last 2 minutes of baking, sprinkle a little extra cheddar or parmesan over the tops for added color and flavor.
- Cool & garnish: Let the appetizers cool on the baking sheet for 5 minutes, then transfer to a wire rack. Garnish with chopped fresh herbs if you like. The centers will firm up as they cool.
- Serve: These are best warm, but they’re still fantastic at room temperature. Arrange on a pretty platter and watch them vanish!
Troubleshooting: If your dough feels too dry, add a teaspoon of milk at a time until it comes together. If it’s too sticky, add a bit more flour, a tablespoon at a time. If your jelly bubbles over, just wipe the edges with a damp paper towel before serving—no biggie, they’ll still taste amazing.
Prep ahead tip: You can make the dough and shape the balls a day in advance; just cover and refrigerate. When ready to bake, make your thumbprints, fill, and pop them in the oven!
Cooking Tips & Techniques
After making these cheesy thumbprint appetizers more times than I care to admit, I’ve picked up some smart tricks (and learned from a few kitchen fails along the way!).
- Soften your butter and cream cheese: Room temperature is key for a smooth dough. If you forget, microwave each in 10-second bursts, checking often—it’s easy to go from softened to melted, trust me.
- Don’t overmix the dough: Stop as soon as everything’s combined. Overworking can make the bites tough instead of tender.
- Uniform size matters: Use a small scoop or tablespoon to portion the dough. This helps them bake evenly, so you don’t wind up with burnt or raw spots.
- Don’t overfill the thumbprints: A little jelly goes a long way! Too much, and it will run out and caramelize on the pan (which tastes good, but is messy to clean).
- Chill if needed: If your kitchen is warm and the dough gets too soft, pop the tray in the fridge for 10 minutes before baking. This helps them hold their shape better.
- Make ahead for stress-free parties: Shape and thumbprint the dough balls, then refrigerate or freeze them on the tray. Fill and bake straight from the fridge (just add a minute or two to the bake time if cold).
- Multitasking tip: While the first tray bakes, prep the next batch and keep it in the fridge. This way, you’re never rushing, and every batch comes out perfect.
One time, I got distracted and left the jelly off a few appetizers—ended up serving them with a little dip on the side, and people still loved them! Honestly, even if things don’t look “Pinterest perfect,” the flavors are so good, no one will care. Remember, baking is part science, part art, part happy accident.
Variations & Adaptations
One of the best things about these cheesy thumbprint appetizers with hot pepper jelly is how easy they are to customize. I’ve played around with all sorts of swaps and tweaks, and they always turn out great!
- Gluten-Free: Substitute a 1-to-1 gluten-free flour blend for the all-purpose flour. The texture is slightly more delicate but still delicious.
- Different Cheeses: Try swapping the cheddar for Monterey Jack, pepper jack (for extra heat), or even smoked gouda for a richer flavor. I once did a batch with blue cheese and fig jam—fancy and fun!
- Jam/Jelly Options: If hot pepper jelly is too spicy or hard to find, use a mild red pepper jelly, jalapeño jelly, or even apricot preserves with a pinch of cayenne. For a festive twist, cranberry or cherry preserves with a touch of black pepper work beautifully.
- Herb Infusion: Mix fresh chopped rosemary or thyme right into the dough for a fragrant, savory touch.
- Nuts: Roll the dough balls in finely chopped pecans or walnuts before baking for extra crunch (great for holiday parties!).
- Dairy-Free: Use plant-based butter and dairy-free cream cheese and cheese. The flavor will be a bit different, but still tasty.
One of my favorite personal twists is to add a pinch of smoked paprika to the dough and fill each thumbprint with spicy mango chutney instead of pepper jelly—sounds odd, but it’s so addictive! Whether you’re adapting for dietary needs or just feeling creative, these thumbprints are super forgiving. Don’t be afraid to experiment and make them your own.
Serving & Storage Suggestions
These cheesy thumbprint appetizers with hot pepper jelly shine brightest when served slightly warm, but they’re also amazing at room temp (which makes them perfect for parties and potlucks!). I like to arrange them on a wooden board with a few sprigs of fresh herbs, maybe with some extra jelly in a little bowl for dipping.
They pair beautifully with bubbly drinks, crisp white wine, or a cold beer. For a bigger spread, serve alongside a fresh fruit platter, marinated olives, or a simple green salad—it’s the kind of combo that makes guests linger by the snack table just a little longer.
Storage: Store any leftovers in an airtight container in the refrigerator for up to 4 days. The flavors actually deepen by day two! To reheat, just pop them in a 325°F (165°C) oven for 5-7 minutes, or microwave for 15 seconds (though the oven keeps them crispier).
Freezing: You can freeze the unbaked dough balls (without jelly) for up to a month. When ready to use, thaw in the fridge, add the jelly, and bake as usual. Baked thumbprints can be frozen too—just reheat directly from frozen in a low oven until warmed through.
Honestly, these little bites rarely last long enough for storage, but it’s good to know you can make ahead and enjoy them all week (if you have any left!).
Nutritional Information & Benefits
Each cheesy thumbprint appetizer clocks in at roughly 85 calories, with about 5g fat, 6g carbohydrates, and 2g protein (estimates based on a batch of 20). The use of real cheddar and cream cheese gives you a little calcium and protein boost, while the pepper jelly adds a pop of vitamin C from the peppers.
If you use gluten-free flour or dairy alternatives, these can fit a variety of dietary needs. Just watch for allergens—dairy and gluten are both present in the classic version. The great thing is you get that “treat” feeling in a portion-controlled, bite-sized snack, so it’s easy to enjoy one or two without overdoing it.
From a wellness perspective, I love that these appetizers feel indulgent but are made from honest, real ingredients. They’re a fun way to sneak a little extra protein and flavor into your party spread, and even with the sweet jelly, they’re much lower in sugar than most desserts.
Conclusion
I can’t say enough good things about these cheesy thumbprint appetizers with hot pepper jelly. They’re fun, easy, and just a little bit fancy—absolutely perfect for any gathering, whether you’re hosting a crowd or just treating yourself to a special snack. The combo of cheesy, buttery dough and that zippy, sweet-hot jelly is honestly irresistible.
Don’t be afraid to play around with flavors and make them your own. I love how this recipe adapts to whatever’s in my fridge or whatever mood I’m in (and it’s always a conversation starter at parties!). Whether you’re a seasoned home cook or just getting started, you can totally master these little bites.
So go ahead, give these a try and let me know what you think! Leave a comment, share your twists, or tag me with your Pinterest-worthy creations—I’d love to see how you make them your own. Happy baking, and enjoy every cheesy, spicy bite!
Frequently Asked Questions
Can I make these cheesy thumbprint appetizers ahead of time?
Yes! You can prepare the dough and shape the balls a day in advance. Keep them covered in the fridge, then fill and bake when you’re ready. Baked appetizers also store well and can be reheated just before serving.
What if I can’t find hot pepper jelly?
No worries! Substitute with red pepper jelly, jalapeño jelly, or even apricot or mango preserves with a pinch of cayenne. The sweet heat combo is what you’re after.
Can I freeze these appetizers?
Absolutely. Freeze unbaked dough balls (without jelly) and bake straight from the freezer, adding a couple extra minutes to the bake time. Baked snacks can also be frozen and reheated in a low oven.
How spicy are these appetizers?
It depends on your jelly! Most hot pepper jellies are mild, just a gentle tingle. For more heat, use a spicier jelly or add extra red pepper flakes to the dough.
Are these suitable for gluten-free or dairy-free diets?
Yes, with the right swaps. Use a gluten-free all-purpose flour blend and dairy-free alternatives for the cheeses and cream cheese. The texture will be a bit different but still tasty and satisfying!
Pin This Recipe!

Cheesy Thumbprint Appetizers: Easy Hot Pepper Jelly Party Snack

These cheesy thumbprint appetizers feature a buttery, tender dough packed with cheddar and cream cheese, topped with a dollop of sweet-hot pepper jelly. Perfect for parties, potlucks, or any gathering, they’re quick to make and always a crowd-pleaser.
- Prep Time: 15 minutes
- Cook Time: 15 minutes
- Total Time: 30 minutes
- Yield: 20-22 appetizers 1x
- Category: Appetizer
- Cuisine: American
Ingredients
- 1 cup (120g) all-purpose flour
- 1/2 cup (113g) unsalted butter, softened
- 4 oz (113g) cream cheese, softened
- 1 cup (115g) sharp cheddar cheese, shredded
- 1/4 cup (25g) freshly grated parmesan cheese (optional)
- 1/4 tsp salt
- 1/8 tsp ground black pepper
- 1/4 tsp crushed red pepper flakes (optional)
- About 1/2 cup (120ml) hot pepper jelly
- Extra shredded cheddar or parmesan, for sprinkling (optional)
- Fresh herbs (chives, parsley, or thyme), finely chopped, for garnish (optional)
Instructions
- Preheat oven to 375°F (190°C). Line a baking sheet with parchment paper or a silicone baking mat.
- In a large bowl, beat together the softened butter and cream cheese until creamy and well blended (about 1-2 minutes).
- Add flour, shredded cheddar, parmesan (if using), salt, black pepper, and red pepper flakes (if using). Mix until a soft dough forms.
- Scoop heaping tablespoon-sized portions (about 20g each) and roll into balls. Place on the prepared baking sheet, spacing about 2 inches apart.
- Use your thumb, the back of a rounded teaspoon, or the end of a wooden spoon handle to gently press an indentation in the center of each dough ball.
- Fill each indent with about 1/2 teaspoon hot pepper jelly.
- Bake for 13-15 minutes, or until edges are golden and cheese is bubbling.
- Optional: In the last 2 minutes of baking, sprinkle extra cheddar or parmesan over the tops.
- Let cool on the baking sheet for 5 minutes, then transfer to a wire rack. Garnish with chopped fresh herbs if desired.
- Serve warm or at room temperature.
Notes
For best results, use block cheddar and shred it yourself. Don’t overfill the thumbprints with jelly to avoid bubbling over. Dough can be made ahead and refrigerated. For gluten-free or dairy-free versions, substitute with appropriate flour and cheese alternatives. These freeze well, both baked and unbaked.
Nutrition
- Serving Size: 1 appetizer
- Calories: 85
- Sugar: 2
- Sodium: 90
- Fat: 5
- Saturated Fat: 3
- Carbohydrates: 6
- Protein: 2
Keywords: cheesy thumbprint appetizers, hot pepper jelly, party snack, finger food, easy appetizer, cheddar, cream cheese, holiday appetizer, savory thumbprint, make ahead


