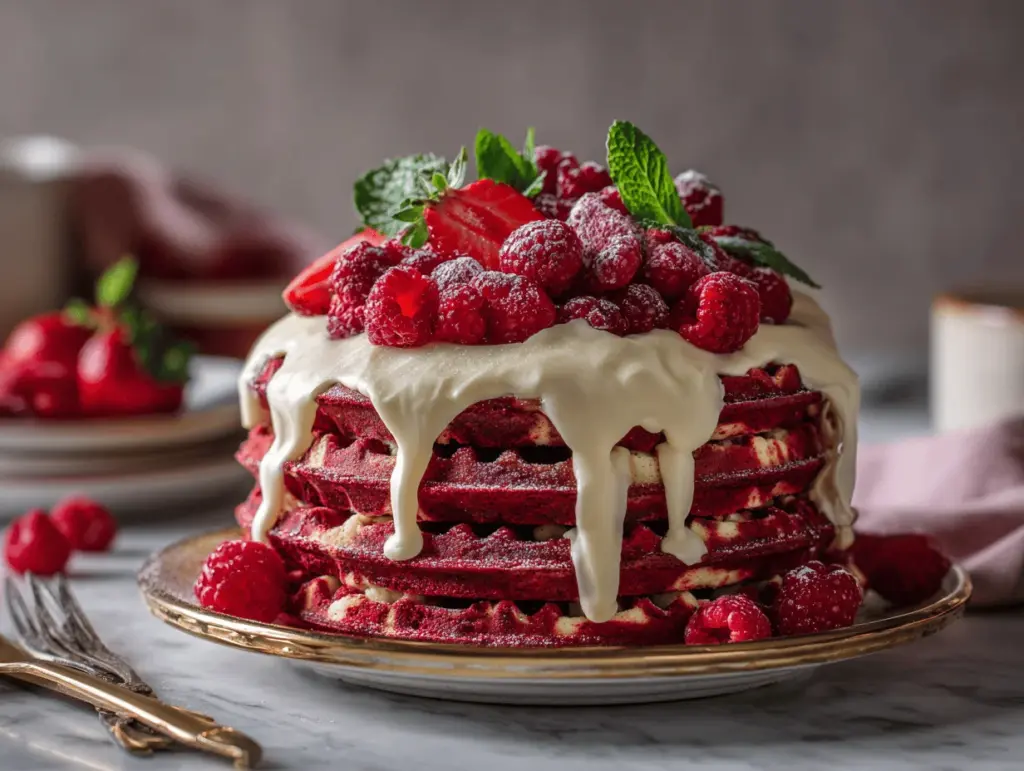
The first time I made a red velvet marble waffle cake, my kitchen smelled like a bakery on Valentine’s morning—sweet, a little cocoa-rich, and somehow celebratory. I can’t help but remember how my family gathered around, forks ready, the moment I pulled that cake off the waffle iron. It’s not just the color (that deep, dramatic red velvet swirl always gets people excited), but the flavor combo: a hint of cocoa, buttery vanilla cake, and a tangy cream cheese frosting that’s honestly addictive.
I stumbled on this recipe during a weekend brunch marathon. I wanted something that screamed “special occasion” but didn’t require hours of work—something you could make for birthdays, holidays, or just a cozy Sunday morning. That’s when the idea for this red velvet marble waffle cake came to life. It’s a mashup of classic red velvet cake and fluffy waffles, finished with a swoosh of creamy frosting you’ll want to lick off the spoon.
Red velvet marble waffle cake is my go-to for impressing guests and treating myself—because let’s face it, dessert for breakfast is a vibe! The best part? You don’t need fancy gadgets or complicated steps. If you’ve got a waffle iron and a little curiosity, you’re halfway there. I’ve tested this recipe more times than I can count, tweaking the batter ratios and perfecting that marbled look so every slice is a showstopper. Whether you’re baking for picky eaters or just craving something fun, this cake delivers comfort, nostalgia, and pure joy.
So, if you’re ready for a breakfast-dessert hybrid that sparks happiness with every bite, keep reading. The red velvet marble waffle cake with easy cream cheese frosting is about to become your new favorite treat!
Why You’ll Love This Recipe
- Quick & Easy: Whips up in under an hour—no need for oven drama or complicated layers. You get a fancy cake without the fuss.
- Simple Ingredients: Most of what you’ll need is already in your pantry (think flour, cocoa, buttermilk, and cream cheese—the usual suspects).
- Perfect for Celebrations: This cake shines at brunches, birthdays, or any gathering where you want a little “wow” factor. It’s festive without being over-the-top.
- Crowd-Pleaser: Kids love the vibrant swirls (and, let’s be honest, so do adults). The cream cheese frosting seals the deal every time.
- Unbelievably Delicious: The contrast of red velvet richness and vanilla waffle cake is something you need to taste to believe. Plus, the texture—soft inside, crisp waffle edges—is pure comfort.
What sets this red velvet marble waffle cake apart? Well, we’re not just mixing two batters and hoping for the best. The secret is in swirling the classic red velvet with vanilla right in the waffle iron, creating marbled pockets of flavor and color. I always blend a little extra cocoa into the red velvet portion for a deeper flavor, and the buttermilk keeps things moist and fluffy.
I’ve made plenty of cakes, but this recipe is special. It’s the kind that makes you pause after the first bite, close your eyes, and let the flavors do their thing. Whether you’re serving it for breakfast or dessert, it turns an ordinary meal into something memorable—no stress, just pure joy.
Trust me, if you want a cake that’s as fun to make as it is to eat, this is the one. It looks like you spent hours but really, you just let your waffle iron do the magic.
What Ingredients You Will Need
This red velvet marble waffle cake uses easy-to-find, wholesome ingredients. Most are pantry staples, but I’ll share a few tips for getting the best results. You can swap or adjust a couple of things if needed—so don’t worry if you’re missing an item or two!
- For the Red Velvet Batter:
- All-purpose flour (120 g / 1 cup)—gives structure; use gluten-free flour if needed
- Granulated sugar (100 g / ½ cup)—sweetness
- Cocoa powder (15 g / 2 tbsp)—Dutch-processed for deeper flavor
- Baking powder (1 tsp)—for lift
- Baking soda (½ tsp)—reacts with buttermilk
- Salt (¼ tsp)—balances flavors
- Large egg (1)—room temperature
- Buttermilk (120 ml / ½ cup)—for tang and tenderness (substitute with milk + 1 tsp vinegar)
- Vegetable oil (2 tbsp)—moisture
- Red food coloring (2 tsp)—gel or liquid; adjust for intensity
- Vanilla extract (1 tsp)—essential for flavor
- White vinegar (½ tsp)—for classic red velvet chemistry
- For the Vanilla Waffle Batter:
- All-purpose flour (120 g / 1 cup)
- Granulated sugar (60 g / ¼ cup)
- Baking powder (1 tsp)
- Salt (¼ tsp)
- Large egg (1)
- Milk (120 ml / ½ cup)—whole milk preferred (or dairy-free)
- Butter (30 g / 2 tbsp)—melted
- Vanilla extract (1 tsp)
- For the Cream Cheese Frosting:
- Cream cheese (115 g / 4 oz)—softened; full-fat for best texture
- Butter (30 g / 2 tbsp)—softened
- Powdered sugar (120 g / 1 cup)—sifted
- Vanilla extract (½ tsp)
- Milk (1-2 tbsp)—to adjust consistency
- Optional Toppings:
- Fresh berries (strawberries, raspberries, blueberries)—for color and tartness
- Mini chocolate chips or shavings—adds crunch
- Crushed pecans or walnuts—nutty finish
If you need to substitute, almond flour works for gluten-free, and coconut oil can replace vegetable oil. For dairy-free options, use plant-based milk and vegan cream cheese. I usually reach for King Arthur flour and Philadelphia cream cheese—never lets me down!
Equipment Needed
- Waffle iron: Any standard or Belgian waffle maker works. If you don’t have one, you can try a grill pan (but the texture won’t be quite the same).
- Mixing bowls: At least two for the separate batters—one for red velvet, one for vanilla. Glass or stainless steel is easiest to clean.
- Whisk & spatula: For mixing and swirling. Silicone spatulas are great for scraping every bit of batter.
- Measuring cups & spoons: Accuracy matters for cake texture, so don’t eyeball it!
- Electric mixer (hand or stand): Not essential but speeds up the frosting. You can use a sturdy whisk in a pinch.
- Cooling rack: Helps keep waffles crisp while cooling.
- Serving plate or cake stand: For the dramatic reveal.
My old waffle iron has survived years of heavy use—just make sure you clean and oil it regularly. If you’re on a budget, basic nonstick models do the trick. I’ve even used a sandwich press in a pinch, though the pattern is flatter. Remember to check the cord for wear and wipe down after every batch to keep things running smoothly!
Preparation Method

- Prep the waffle iron: Preheat to medium-high. Lightly grease with oil or nonstick spray. (If it sizzles, it’s ready!)
- Mix the red velvet batter: In a bowl, whisk together 1 cup flour, ½ cup sugar, 2 tbsp cocoa powder, 1 tsp baking powder, ½ tsp baking soda, and ¼ tsp salt. In another bowl, whisk 1 egg, ½ cup buttermilk, 2 tbsp oil, 2 tsp red food coloring, 1 tsp vanilla, and ½ tsp vinegar. Combine wet and dry, stirring until just smooth. Don’t overmix—lumps are okay! Set aside.
- Mix the vanilla waffle batter: In a separate bowl, combine 1 cup flour, ¼ cup sugar, 1 tsp baking powder, and ¼ tsp salt. In another small bowl, whisk 1 egg, ½ cup milk, 2 tbsp melted butter, and 1 tsp vanilla. Add wet to dry, stir until just combined. Batter should be pourable but thick.
- Marble the batters: Pour 2 tbsp red velvet batter into the center of the waffle iron, followed by 2 tbsp vanilla batter on top. Use a knife or chopstick to gently swirl them together—don’t overdo it, you want distinct streaks.
- Cook the waffles: Close the iron and cook for 3-5 minutes (or until golden and crisp at the edges). Peek at 3 minutes—waffles should be lightly springy to the touch and smell chocolatey. If you see steam and hear sizzling, things are going well!
- Repeat: Continue with remaining batters, alternating and swirling each time. Transfer finished waffles to a cooling rack. This helps prevent sogginess.
- Make the frosting: Beat 4 oz cream cheese and 2 tbsp butter until creamy. Gradually add 1 cup powdered sugar and ½ tsp vanilla, then beat in 1-2 tbsp milk to reach a spreadable consistency. Taste and adjust sweetness as needed.
- Assemble the cake: Stack waffles on a serving plate, spreading a thin layer of frosting between each. Finish with a generous layer on top. (If you want extra drama, add fresh berries or chocolate chips.)
- Slice and serve: Use a sharp knife for clean cuts. Serve warm or at room temp.
Tips: If the batter sticks, let the waffles cook a bit longer. For super-crisp edges, let waffles cool on a rack before assembling. If you accidentally over-swirl, you’ll still get gorgeous pink streaks—honestly, it’s hard to mess up!
I keep a small bowl of oil handy to re-grease the waffle iron after every couple batches. If you notice uneven cooking, rotate the waffles halfway for even browning. The frosting is best spread with an offset spatula, but a butter knife works in a pinch.
Cooking Tips & Techniques
- Don’t overmix: Cake batters can get tough if you stir too much. Once the dry and wet ingredients are mostly blended, stop—lumps are your friend!
- Temperature matters: Use room-temperature eggs and dairy for fluffier waffles. Cold ingredients can cause uneven cooking.
- Swirling technique: Gently swirl the batters with a skewer or knife. Too much swirling blends the colors; too little leaves big blocks. I learned this after my first attempt looked more “tie-dye” than marble!
- Waffle iron care: Always preheat and grease the iron. If you forget, the first batch will probably stick (been there, scraped that!).
- Multitasking: While one waffle cooks, prep the next batch or start the frosting. This keeps things moving and avoids downtime.
- Consistency counts: Try to keep batter portions equal for every waffle. I use a ¼-cup measure for each batter to keep things even.
- Frosting fixes: If the cream cheese frosting is too thick, add milk 1 tsp at a time. Too runny? More powdered sugar does the trick.
Common mistakes? Forgetting to grease the iron (sticky disaster), overcooking (dry waffles), or rushing the swirl (muddy colors). The first time, I got impatient and tried to frost while the waffles were hot—my frosting melted everywhere! Lesson learned: cool before stacking.
Honestly, don’t sweat small imperfections. The marble effect is meant to look natural, and the flavor is foolproof. If you’re baking for a crowd, double the recipe and keep waffles warm in a low oven until ready to assemble.
Variations & Adaptations
- Gluten-free: Swap all-purpose flour for a 1:1 gluten-free blend. The texture stays soft and fluffy—just make sure your baking powder is gluten-free too.
- Dairy-free: Use plant-based milk and vegan cream cheese for the frosting. Coconut oil works as a substitute for butter and vegetable oil.
- Chocolate chip swirl: Add ¼ cup mini chocolate chips to the red velvet batter for extra gooeyness.
- Seasonal twist: In summer, top with fresh berries and a drizzle of honey. For winter, add a pinch of cinnamon to the vanilla batter and sprinkle with crushed peppermint.
- Nutty version: Stir in ¼ cup toasted pecans or walnuts to either batter for crunch.
- Cooking methods: No waffle iron? Bake the marbled batter in muffin tins at 350°F/175°C for 15-18 minutes.
- Flavor boost: Add a dash of almond extract to the vanilla batter or a touch of espresso powder to the red velvet—both add something special!
Once, I tried layering the cake with raspberry jam between waffles—total hit at brunch. Feel free to experiment with flavors and toppings; this recipe is forgiving and fun to play with.
Serving & Storage Suggestions
Serve your red velvet marble waffle cake slightly warm or at room temperature. The cream cheese frosting melts into the waffles if they’re a little warm—so dreamy! For presentation, top with a swirl of frosting, fresh berries, and a sprinkle of mini chocolate chips. A cake stand or pretty platter makes it Pinterest-perfect.
This cake pairs beautifully with hot coffee, chai, or a cold glass of milk. For brunch, serve alongside crispy bacon, fresh fruit salad, or a mimosa—talk about a crowd-pleaser!
To store, keep leftovers covered in the fridge for up to 3 days. The flavors meld and get even richer overnight. For longer storage, freeze individual waffle layers (no frosting) in airtight bags for up to 1 month. Thaw, then frost before serving.
Reheat waffles in a toaster or low oven until just warm. The frosting can be refreshed with a whisk, or spread cold for a firmer texture. Don’t worry if the colors fade a bit in the fridge—it’s still delicious!
Nutritional Information & Benefits
| Serving Size | Calories | Protein | Carbs | Fat |
|---|---|---|---|---|
| 1 slice (1/8 recipe) | Approx. 240 | 5g | 34g | 9g |
Key benefits: Buttermilk and eggs add protein, while cocoa provides antioxidants. Cream cheese delivers calcium and a satisfying tang. If you use gluten-free and dairy-free options, it fits most dietary needs. Nuts and berries add fiber and healthy fats if you include them.
This recipe contains wheat, eggs, and dairy—so be mindful of allergies. I love how it balances indulgence and comfort. When I’m craving something sweet but don’t want a sugar crash, one slice is usually perfect.
Conclusion
The red velvet marble waffle cake with cream cheese frosting is more than just a recipe—it’s a joyful, creative way to celebrate everyday moments. It’s colorful, decadent, and surprisingly easy to make (even if you’re not a cake expert). Whether you’re baking for a special brunch or just treating yourself, this cake delivers flavor, fun, and a little bit of wow.
Customize the batters, play with toppings, and make it your own. I keep coming back to this recipe because it’s reliable, beautiful, and always makes people smile. Honestly, there’s nothing like the first bite—soft waffle, rich cocoa, creamy frosting, and a hint of tang.
Give it a try and let me know your favorite twists! Share your marble creations in the comments, pin it for later, and tag me if you make your own version. Happy baking—and remember, perfection isn’t required. The best cakes have personality!
FAQs
Can I make the waffle cake batter ahead of time?
Yes! You can mix both batters and store them in separate covered containers in the fridge for up to 24 hours. Stir before using, as the flour may settle.
What if I don’t have buttermilk?
No worries—just use regular milk mixed with 1 tsp lemon juice or white vinegar. Let it sit for 5 minutes before adding to the batter.
How do I prevent waffles from getting soggy?
Cool each waffle on a wire rack before stacking or frosting. This keeps the edges crisp and prevents moisture buildup.
Can I freeze leftover waffle cake?
Absolutely! Freeze unfrosted waffle layers in airtight bags for up to a month. Thaw, then frost just before serving for best texture.
Is the food coloring necessary?
It gives the classic red velvet look, but you can skip it if you prefer. The flavor stays rich, and you’ll get a “marble” effect with cocoa and vanilla alone.
PrintRed Velvet Marble Waffle Cake with Easy Cream Cheese Frosting
A festive mashup of classic red velvet cake and fluffy waffles, marbled together and topped with tangy cream cheese frosting. Perfect for brunch, birthdays, or dessert, this cake is quick, easy, and guaranteed to impress.
- Prep Time: 20 minutes
- Cook Time: 25 minutes
- Total Time: 45 minutes
- Yield: 8 servings 1x
- Category: Dessert
- Cuisine: American
Ingredients
- For the Red Velvet Batter:
- 1 cup all-purpose flour
- 1/2 cup granulated sugar
- 2 tablespoons Dutch-processed cocoa powder
- 1 teaspoon baking powder
- 1/2 teaspoon baking soda
- 1/4 teaspoon salt
- 1 large egg, room temperature
- 1/2 cup buttermilk (or milk + 1 teaspoon vinegar)
- 2 tablespoons vegetable oil
- 2 teaspoons red food coloring (gel or liquid)
- 1 teaspoon vanilla extract
- 1/2 teaspoon white vinegar
- For the Vanilla Waffle Batter:
- 1 cup all-purpose flour
- 1/4 cup granulated sugar
- 1 teaspoon baking powder
- 1/4 teaspoon salt
- 1 large egg
- 1/2 cup whole milk (or dairy-free milk)
- 2 tablespoons melted butter
- 1 teaspoon vanilla extract
- For the Cream Cheese Frosting:
- 4 ounces cream cheese, softened
- 2 tablespoons butter, softened
- 1 cup powdered sugar, sifted
- 1/2 teaspoon vanilla extract
- 1–2 tablespoons milk (to adjust consistency)
- Optional Toppings:
- Fresh berries (strawberries, raspberries, blueberries)
- Mini chocolate chips or shavings
- Crushed pecans or walnuts
Instructions
- Preheat waffle iron to medium-high and lightly grease with oil or nonstick spray.
- Mix the red velvet batter: In a bowl, whisk together flour, sugar, cocoa powder, baking powder, baking soda, and salt. In another bowl, whisk egg, buttermilk, oil, food coloring, vanilla, and vinegar. Combine wet and dry ingredients, stirring until just smooth. Do not overmix.
- Mix the vanilla waffle batter: In a separate bowl, combine flour, sugar, baking powder, and salt. In another bowl, whisk egg, milk, melted butter, and vanilla. Add wet to dry ingredients and stir until just combined.
- Marble the batters: Pour 2 tablespoons red velvet batter into the center of the waffle iron, followed by 2 tablespoons vanilla batter on top. Gently swirl with a knife or chopstick for a marbled effect.
- Cook the waffles: Close the iron and cook for 3-5 minutes, until golden and crisp at the edges. Check at 3 minutes for doneness.
- Repeat with remaining batters, alternating and swirling each time. Transfer finished waffles to a cooling rack.
- Make the frosting: Beat cream cheese and butter until creamy. Gradually add powdered sugar and vanilla, then beat in milk to reach a spreadable consistency. Adjust sweetness as needed.
- Assemble the cake: Stack waffles on a serving plate, spreading a thin layer of frosting between each. Finish with a generous layer on top. Add optional toppings if desired.
- Slice and serve: Use a sharp knife for clean cuts. Serve warm or at room temperature.
Notes
Don’t overmix batters for tender waffles. Use room-temperature eggs and dairy for best texture. Cool waffles on a rack before assembling to keep edges crisp. Frosting can be adjusted for thickness with milk or powdered sugar. For gluten-free or dairy-free, substitute flour and dairy ingredients as needed. Waffles can be baked in muffin tins if no waffle iron is available.
Nutrition
- Serving Size: 1 slice (1/8 of cake)
- Calories: 240
- Sugar: 18
- Sodium: 320
- Fat: 9
- Saturated Fat: 5
- Carbohydrates: 34
- Fiber: 1
- Protein: 5
Keywords: red velvet, waffle cake, cream cheese frosting, brunch, marble cake, easy dessert, breakfast cake, special occasion, festive, quick cake


