Imagine biting into a soft, creamy ball bursting with Oreo flavor—sweet, chocolatey, and just a touch playful. That’s exactly what you get with my Oreo Cookie Dough Protein Balls. The first time I made these, it was one of those “what’s in the pantry?” moments (honestly, I was craving something sweet but didn’t want to wreck my healthy eating streak). Oreo cookie dough protein balls are the sort of snack that sounds too good to be true—like, could they possibly taste like dessert and still be a healthy snack?
I discovered this recipe during a late-night kitchen experiment after a workout. I wanted something high-protein, but still totally fun and comforting. The classic Oreo flavor has always been my weakness—you know, that chocolate crunch and the creamy filling. Mixing that with a protein boost felt almost rebellious, but wow, the results were unreal. These protein balls are perfect for anyone who wants a snack that’s easy, portable, and guilt-free. My kids actually beg for them, and my gym buddies always ask for the recipe.
What I love about Oreo cookie dough protein balls is how they fit into so many routines. They’re ideal for busy mornings, satisfying afternoon cravings, or a post-workout boost. Plus, you don’t need fancy ingredients or special skills—it’s all about mixing, rolling, and sneaking bites while you go. I’ve made this recipe at least a dozen times, tweaking the ingredients and ratios until it’s just right. As someone who tests and retests everything, I can promise: these are the best protein balls for Oreo lovers, hands down. Let’s get rolling!
Why You’ll Love This Recipe
- Quick & Easy: You can whip these up in under 15 minutes—no baking, no fuss. Perfect for busy schedules or when you need a snack in a hurry.
- Simple Ingredients: Nothing fancy or hard to find. Most of what you’ll need is already hanging out in your kitchen.
- Perfect for Any Occasion: Whether it’s after school, post-gym, or a midnight craving, Oreo cookie dough protein balls fit the bill.
- Crowd-Pleaser: Both kids and adults have given these rave reviews at family gatherings and potlucks. They disappear fast!
- Dessert-Like Flavor: Seriously, they taste just like Oreo cookie dough but with a satisfying protein punch. You get that creamy, chocolatey goodness in every bite.
What sets my Oreo cookie dough protein balls apart? First, I use blended oats and a touch of almond flour for a soft texture (no gritty protein powder aftertaste here). Second, crushing real Oreos into the mix gives you those signature cookie bits—no fake flavors or extracts. The protein powder blends in so well, you’d never guess these are a healthy snack. And, let’s face it, rolling these little balls is oddly therapeutic—my kitchen always smells like a bakery afterward.
This recipe isn’t just about flavor—it’s about feeling good. You get the comfort of cookie dough, the nostalgia of Oreos, and the satisfaction of knowing you’re fueling your body. No need to compromise on health or taste. Whether you’re impressing friends or simply treating yourself, these protein balls turn an ordinary snack into something memorable. If you want a snack that’s quick, delicious, and actually good for you, this is the one to try.
What Ingredients You Will Need
This recipe uses simple, wholesome ingredients to deliver that bold Oreo cookie dough flavor and satisfying texture. Most are pantry staples, and you can swap things out if you need to. Here’s what goes into Oreo cookie dough protein balls:
- Base Ingredients:
- Rolled oats (1 cup / 100g, quick or old-fashioned)—gives structure and a soft bite
- Almond flour (1/4 cup / 28g)—adds richness and keeps it gluten-free (use oat flour if nut allergies)
- Vanilla protein powder (1/2 cup / about 50g)—for that protein boost (I like Optimum Nutrition or Orgain)
- Cream cheese (2 oz / 56g, softened)—for creaminess and the “dough” texture (swap for dairy-free cream cheese if needed)
- Maple syrup or honey (2-3 tbsp / 30-45ml)—natural sweetness and helps bind everything
- Almond milk (2-3 tbsp / 30-45ml, unsweetened)—for moisture (can use regular or oat milk)
- Oreo Element:
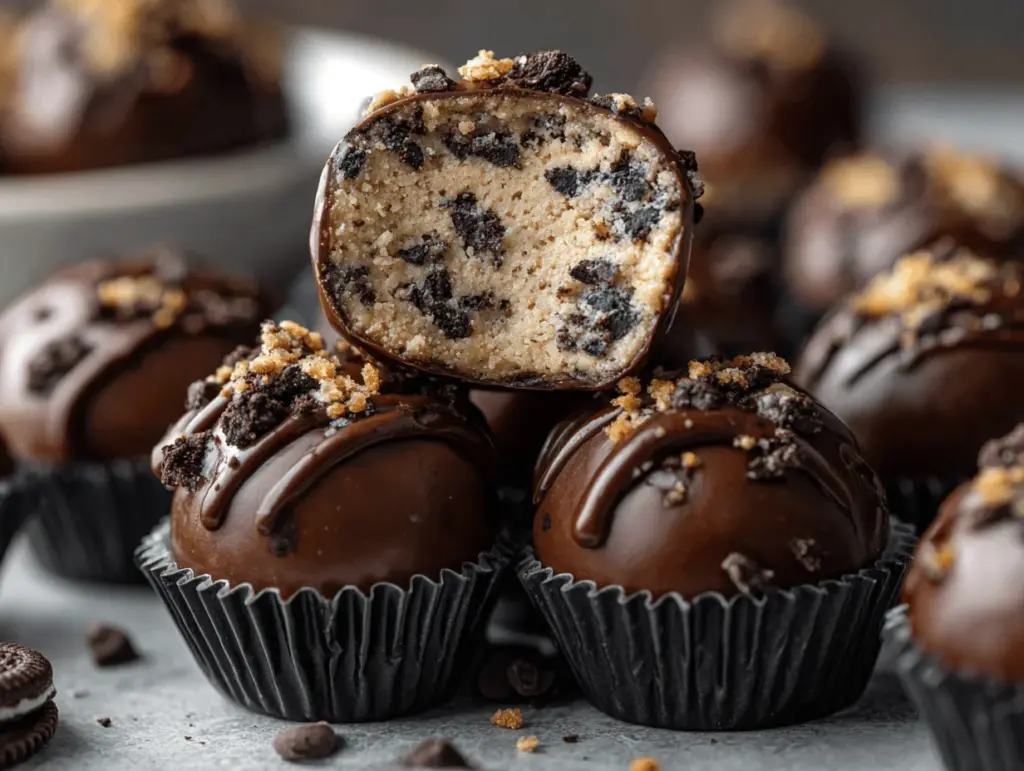
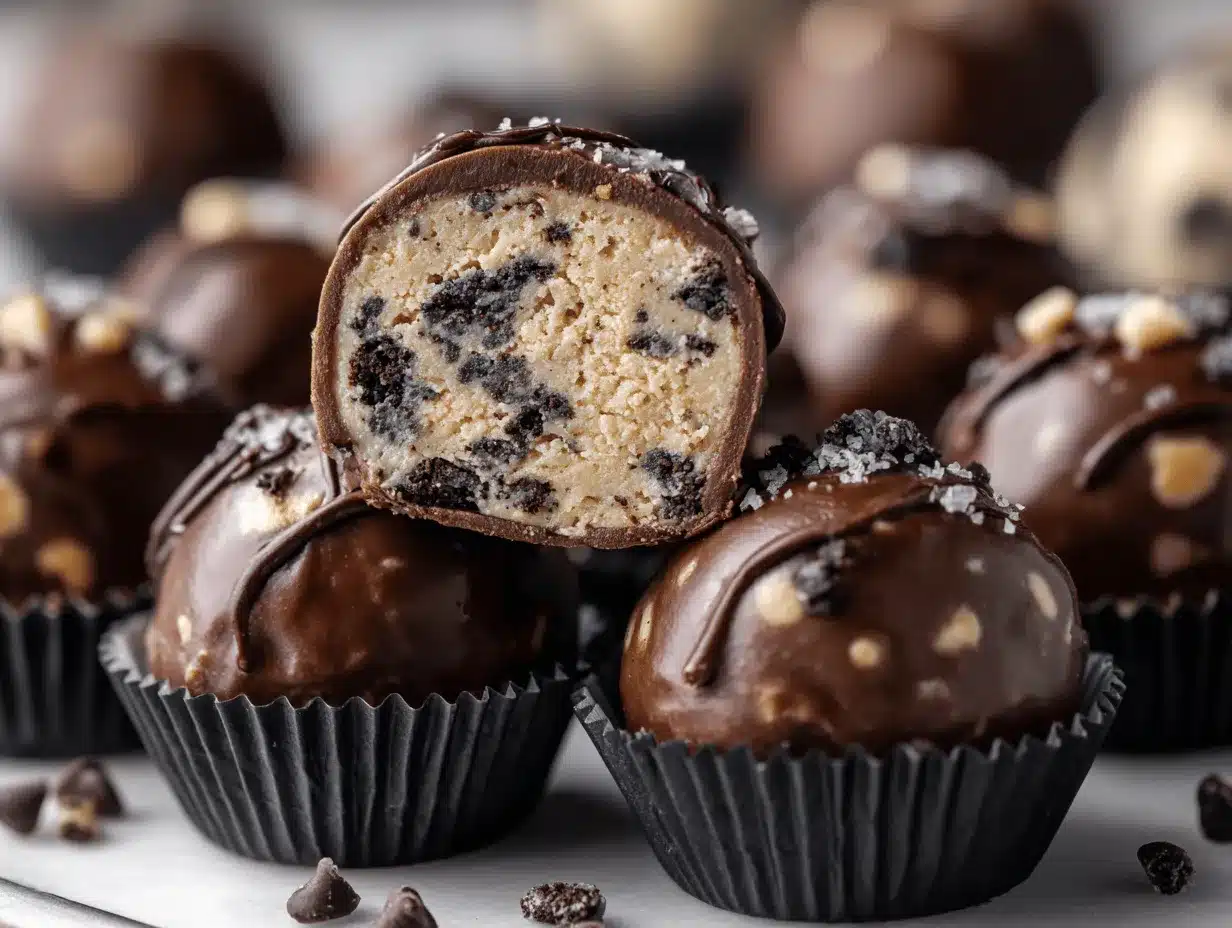
- Oreo cookies (4-5 cookies, crushed)—for authentic flavor and that classic speckled look (use gluten-free Oreos if needed)
- Flavor Boosters & Add-Ins:
- Vanilla extract (1/2 tsp / 2ml)—rounds out the cookie dough flavor
- Mini chocolate chips (2 tbsp / 28g)—for extra chunkiness and chocolate bursts (can use dark chocolate or omit if avoiding sugar)
- Pinch salt—balances the sweetness and brings out the Oreo flavor
- Optional for Rolling/Decoration:
- Extra crushed Oreos or chocolate chips—for rolling the balls or decorating the tops
If you’re missing something, don’t stress! Swap almond flour for coconut flour (start with less) or oat flour. Use honey instead of maple syrup, or swap cream cheese for Greek yogurt—though it’ll be a bit tangier. If you want lower sugar, try stevia-sweetened chocolate chips or reduce the syrup a tad. I’ve used both regular and vegan Oreos, and the results are pretty much identical. The protein powder is flexible too—just make sure it’s one you actually like the taste of (trust me, it makes a difference).
Honestly, the ingredients are forgiving. The magic is in the combination—the oats and cream cheese give that doughy base, while the crushed Oreos and chocolate chips bring the fun. You’ll end up with something that’s both satisfying and just a little bit indulgent. If you’re making these for kids, you can sneak in a little flaxseed or chia without anyone noticing!
Equipment Needed
You don’t need a ton of fancy equipment for Oreo cookie dough protein balls, which is part of their charm. Here’s what I use:
- Mixing bowl (large)—for combining everything (glass or stainless works best, but plastic is fine in a pinch)
- Wooden spoon or silicone spatula—for mixing (if you’re doubling the batch, opt for a sturdy spoon!)
- Measuring cups and spoons—precision helps keep the texture just right (I like stainless sets for durability)
- Food processor or blender (optional)—to finely crush oats or cookies if you want a smoother texture (I’ve used a zip-top bag and rolling pin when I didn’t want to drag out the food processor—works surprisingly well)
- Baking sheet or plate—for chilling and setting the protein balls
- Wax paper or parchment paper—helps prevent sticking when rolling or storing
If you don’t have a food processor, just crush the Oreos in a bag with a rolling pin and use quick oats. Cleanup is simple, and none of the tools are hard to maintain. I’ve used everything from cheap plastic bowls to more expensive gear—honestly, as long as you can mix and shape, you’re good to go. If you’re making these on a budget, just use what you have. It’s all about the snack, not the setup!
Preparation Method
Let’s get right into it—making Oreo cookie dough protein balls is super straightforward. Here are the steps:
- Prep ingredients:
- Crush 4-5 Oreo cookies (use a food processor, blender, or zip-top bag and rolling pin). You want a mix of fine crumbs and some chunkier bits for texture.
- Measure out 1 cup (100g) rolled oats, 1/4 cup (28g) almond flour, 1/2 cup (50g) vanilla protein powder, 2 oz (56g) cream cheese, 2-3 tbsp (30-45ml) maple syrup, and 2-3 tbsp (30-45ml) almond milk.
- Set aside 2 tbsp (28g) mini chocolate chips and 1/2 tsp (2ml) vanilla extract.
Prep time: about 5 minutes
- Blend the base:
- In a large bowl, combine rolled oats, almond flour, and vanilla protein powder.
- Add the softened cream cheese, maple syrup or honey, vanilla extract, and almond milk.
- Mix thoroughly using a wooden spoon or spatula until a thick, slightly sticky dough forms.
- If the mixture seems too dry, add another splash of almond milk. Too wet? Add a spoonful of oats.
Mixing time: 2-3 minutes
- Fold in the flavor:
- Gently stir in crushed Oreo cookies, mini chocolate chips, and a pinch of salt.
- Reserve a bit of crushed Oreos for rolling or topping if you want extra crunch.
- The dough should look speckled and smell sweet—almost like fresh cookie dough!
Folding time: 1-2 minutes
- Shape the balls:
- With clean hands, scoop out tablespoon-sized portions (about 25g each) and roll into balls.
- If the dough sticks, lightly dampen your hands or chill the mix for 10 minutes first.
- Place finished balls on a plate lined with parchment or wax paper.
- You should get about 12-15 balls, depending on your scoop size.
Rolling time: 5 minutes
- Chill and set:
- For best results, chill the protein balls in the fridge for at least 30 minutes (they’ll firm up and the flavors meld together).
- You can eat them right away, but honestly, waiting makes them even better.
Chilling time: 30 minutes
- Serve or store:
- Enjoy cold for maximum cookie dough texture. Store extras in an airtight container in the fridge for up to 5 days or freeze for longer.
Troubleshooting Tips: If the dough’s too sticky, add more oats or chill before rolling. If it’s crumbly, add a splash of almond milk. Sometimes protein powders absorb liquid differently—if yours is super dry, increase the cream cheese or milk just a bit. The dough should be soft but not gooey. I’ve had batches go crumbly, but rolling gently and letting them chill works wonders!
Cooking Tips & Techniques
Here’s where experience really pays off. I’ve learned a few tricks for perfect Oreo cookie dough protein balls:
- Texture matters: Blend or pulse the oats if you want a smoother dough, but leave a few chunks for that classic cookie dough vibe.
- Protein powder: Not all brands taste the same. Choose one you love, because some can overpower the Oreo flavor. If yours is chalky, add extra cream cheese or a splash more milk (I learned that the hard way—my first batch was way too dense).
- Binding agents: If the balls aren’t sticking, it’s usually a moisture issue. Cream cheese is a hero here—it makes everything creamy and easy to shape. Too dry? Add more maple syrup or almond milk. Too wet? More oats or flour.
- Don’t overmix: Stir until just combined. Overmixing can make the balls tough and take away that soft cookie dough feel.
- Chill for flavor: Letting the balls sit in the fridge for half an hour makes the Oreo flavor pop and the texture set. I’ve skipped this step before, and while they’re still good, chilling is worth the wait.
- Multitasking: I like to crush the Oreos while the base is mixing. Makes cleanup faster and gets you snacking sooner!
- Consistency: Use a cookie scoop for even balls, or weigh them if you want perfect portions. It’s not essential, but it helps if you’re prepping snacks for the week.
Honestly, the biggest mistake is not tasting as you go. If you want sweeter, add a touch more syrup. If you want more Oreo crunch, toss in another cookie. Don’t be afraid to experiment—you’ll get better each time!
Variations & Adaptations
Oreo cookie dough protein balls are super flexible. You can make them suit almost any diet or taste:
- Gluten-free: Use gluten-free Oreos and swap almond flour for oat flour. Works perfectly!
- Vegan: Choose vegan protein powder and dairy-free cream cheese. Vegan Oreos are easy to find these days.
- Low-sugar: Use sugar-free maple syrup and stevia-sweetened chocolate chips. Reduce the number of Oreos or try “Thins.”
- Seasonal twist: Add crushed peppermint candies for a holiday vibe or swap in golden Oreos for a vanilla flavor.
- Nut-free: Use sunflower seed flour or oat flour instead of almond. Sub in regular milk or oat milk.
My favorite personal adaptation? Swapping half the Oreos for chocolate graham crackers and adding a pinch of cinnamon. It tastes like s’mores cookie dough! You can also roll the balls in extra cookie crumbs or drizzle melted chocolate for a fancier look. If you’re feeling creative, mix in dried fruit or a spoonful of peanut butter for a different flavor profile. There’s really no wrong way to customize these!
Serving & Storage Suggestions
Serve Oreo cookie dough protein balls cold for the best texture—they’re creamy and hold their shape. Stack them on a cute plate, sprinkle with extra cookie crumbs, or stick a toothpick in each for party snacks. They pair perfectly with a cold glass of milk, iced coffee, or a protein shake.
For storage, place the balls in an airtight container lined with parchment paper. They keep in the fridge for up to 5 days. If you want to make a big batch, freeze them for up to a month—just thaw in the fridge overnight before eating. Reheat gently in the microwave for 8-10 seconds if you like them super soft (but honestly, chilled is best!).
The flavors develop as they sit—the Oreo taste gets stronger, and the dough texture becomes even better. They’re perfect for packing into lunchboxes, bringing to potlucks, or sneaking as a late-night treat. I’ve even tucked a few into my gym bag for post-workout snacking!
Nutritional Information & Benefits
Each Oreo cookie dough protein ball packs about 90-110 calories, 4-6g protein, 8g carbs, and 5g fat (depending on your ingredient choices and size). The protein powder and cream cheese add a satisfying boost, while oats give slow-release energy.
Key health perks: Oats support digestion, almond flour adds healthy fats, and using less sugar keeps these lighter than real cookie dough. They’re gluten-free if you choose the right ingredients, and you can make them nut-free or vegan with easy swaps. Watch out for dairy and gluten if you’ve got allergies—substitute as needed.
I love these as a smart snack that actually fuels your day. They’re sweet enough to satisfy cravings, but balanced enough to fit into a healthy lifestyle. If you’re counting macros or following a specific diet, just adjust the mix-ins to suit your needs!
Conclusion
Oreo cookie dough protein balls are the snack you didn’t know you needed—fun, flavorful, and just a little bit nostalgic. They’re easy to make, endlessly adaptable, and perfect for anyone who wants to treat themselves without going overboard. I’ve made these for everything from school events to late-night cravings, and they never last long!
Don’t be afraid to tweak the recipe—try new mix-ins, swap ingredients, or make them bite-sized for parties. The combination of classic Oreo flavor and healthy ingredients is pure magic. Honestly, this is one of those recipes I come back to again and again, especially when I want something quick and satisfying.
Ready to give them a go? Leave a comment with your favorite variation, share this post with your Oreo-loving friends, or tag me with your creations. Nothing beats a homemade snack that tastes like dessert but actually fits your healthy routine. Happy snacking, friends!
FAQs
Are Oreo cookie dough protein balls gluten-free?
They can be! Just use gluten-free Oreos and oat flour instead of almond flour. Always double-check your protein powder and other ingredients to be sure.
Can I make these vegan?
Yes! Use dairy-free cream cheese, vegan protein powder, and regular Oreos (most are vegan). Swap honey for maple syrup or agave.
How long do these last in the fridge?
They’ll stay fresh for up to 5 days in an airtight container. I like to layer parchment paper between them to keep them from sticking.
Can I freeze Oreo cookie dough protein balls?
Definitely. Freeze them on a baking sheet, then transfer to a bag or container. Thaw in the fridge overnight before eating.
What kind of protein powder should I use?
Any vanilla or chocolate protein powder you enjoy works well. Just make sure it’s one with a flavor you actually like—this makes all the difference!
PrintOreo Cookie Dough Protein Balls

Soft, creamy protein balls bursting with Oreo flavor—these easy, no-bake snacks taste like dessert but are packed with protein and wholesome ingredients. Perfect for busy mornings, post-workout fuel, or satisfying sweet cravings without compromising your healthy routine.
- Prep Time: 10 minutes
- Cook Time: 0 minutes
- Total Time: 40 minutes
- Yield: 12-15 balls 1x
- Category: Snack
- Cuisine: American
Ingredients
- 1 cup rolled oats (quick or old-fashioned)
- 1/4 cup almond flour (or oat flour for nut-free)
- 1/2 cup vanilla protein powder
- 2 oz cream cheese, softened (or dairy-free cream cheese)
- 2–3 tbsp maple syrup or honey
- 2–3 tbsp unsweetened almond milk (or regular/oat milk)
- 4–5 Oreo cookies, crushed (gluten-free if needed)
- 1/2 tsp vanilla extract
- 2 tbsp mini chocolate chips (optional, can use dark chocolate or omit)
- Pinch salt
- Extra crushed Oreos or chocolate chips for rolling/decoration (optional)
Instructions
- Crush Oreo cookies using a food processor, blender, or zip-top bag and rolling pin. Aim for a mix of fine crumbs and chunkier bits.
- Measure out all ingredients: oats, almond flour, protein powder, cream cheese, maple syrup, almond milk, vanilla extract, mini chocolate chips, and salt.
- In a large mixing bowl, combine rolled oats, almond flour, and vanilla protein powder.
- Add softened cream cheese, maple syrup or honey, vanilla extract, and almond milk. Mix thoroughly with a wooden spoon or spatula until a thick, slightly sticky dough forms. Adjust consistency with more milk or oats as needed.
- Gently fold in crushed Oreo cookies, mini chocolate chips, and a pinch of salt. Reserve some crushed Oreos for rolling or topping if desired.
- Scoop out tablespoon-sized portions (about 25g each) and roll into balls with clean hands. If sticky, dampen hands or chill dough for 10 minutes.
- Place finished balls on a plate lined with parchment or wax paper. You should get about 12-15 balls.
- Chill the protein balls in the fridge for at least 30 minutes to firm up and meld flavors.
- Serve cold for best texture. Store extras in an airtight container in the fridge for up to 5 days or freeze for longer storage.
Notes
For gluten-free, use gluten-free Oreos and oat flour. For vegan, use dairy-free cream cheese and vegan protein powder. Adjust sweetness and texture by varying maple syrup and milk. Chill balls for best flavor and texture. Store in fridge up to 5 days or freeze for up to a month. If dough is too sticky, add oats or chill before rolling; if crumbly, add more milk. Taste and adjust mix-ins as desired.
Nutrition
- Serving Size: 1 protein ball (about 25g)
- Calories: 100
- Sugar: 4
- Sodium: 60
- Fat: 5
- Saturated Fat: 2
- Carbohydrates: 8
- Fiber: 1
- Protein: 5
Keywords: Oreo protein balls, cookie dough protein balls, healthy snack, no-bake, gluten-free, vegan option, post-workout, easy protein snack, kids snack, dessert


