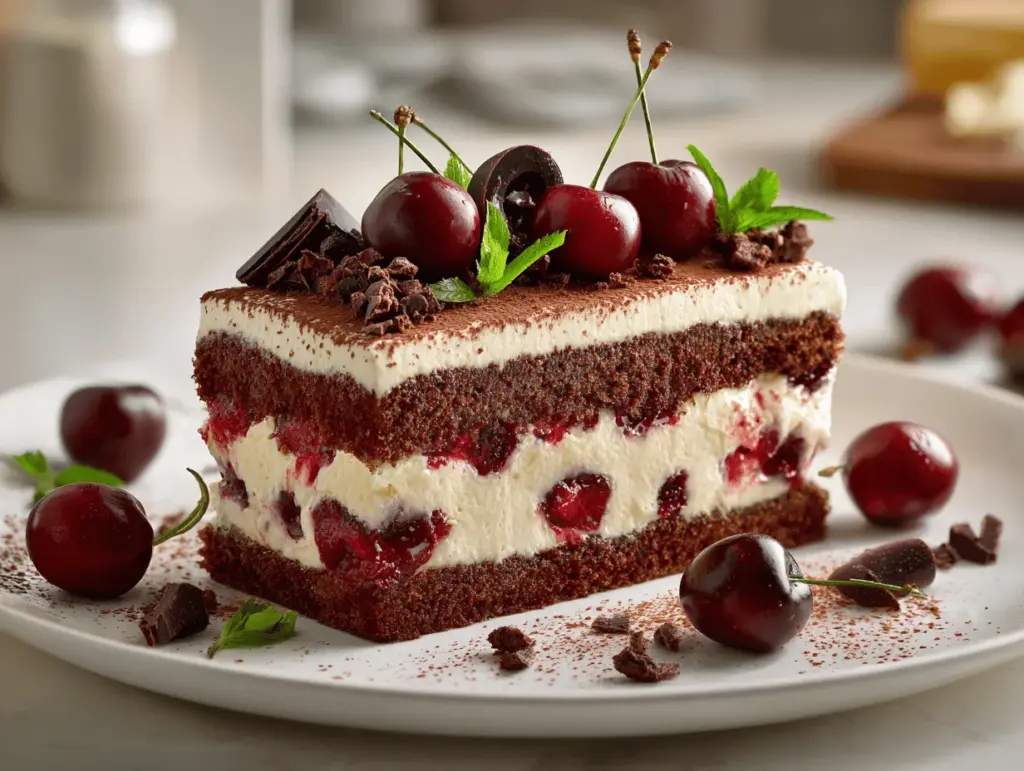
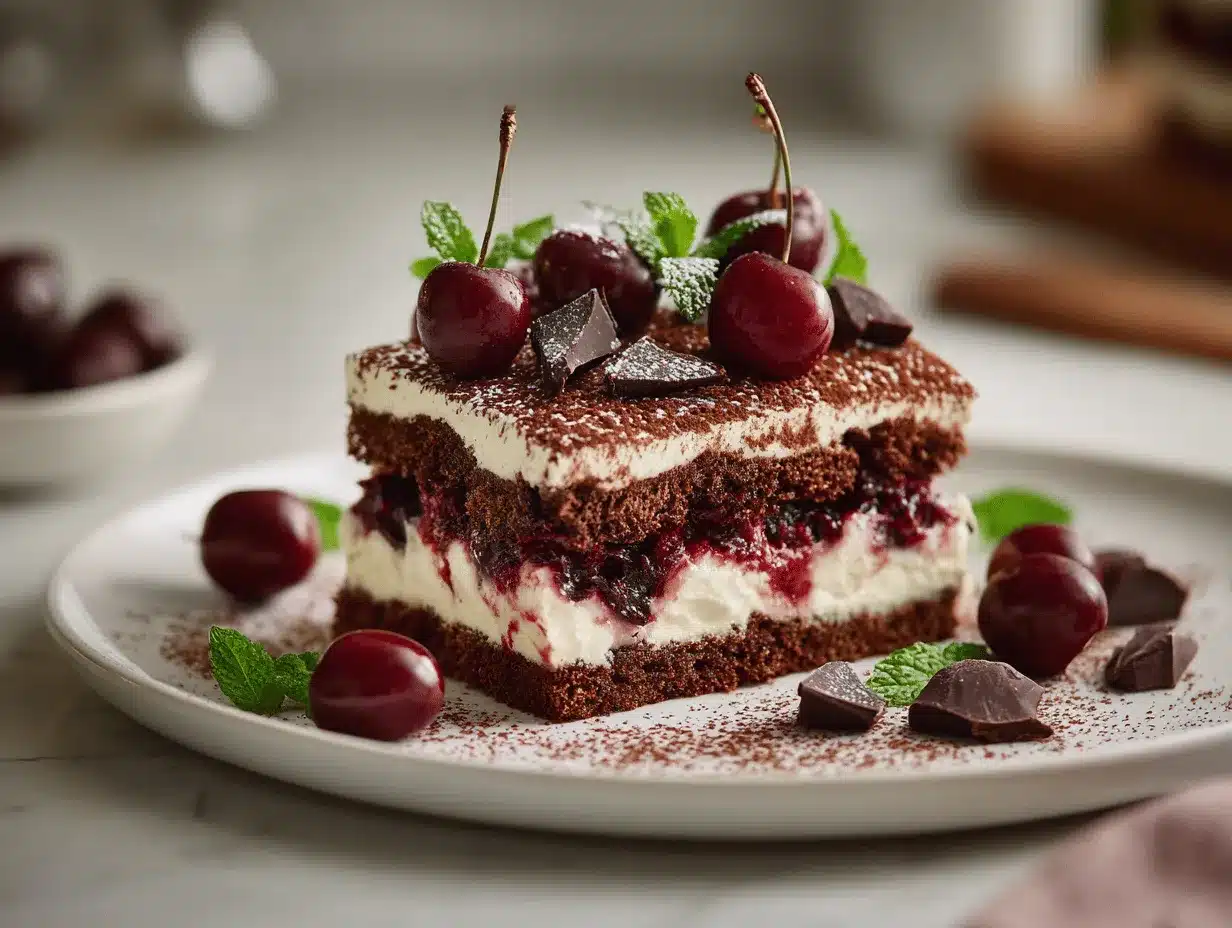
The first time I bit into a slice of Black Forest Tiramisu Cake, I swear I stopped in my tracks. Imagine the creamy richness of tiramisu meeting the bold, fruity punch of a classic Black Forest cake—layers of espresso-soaked ladyfingers, whipped mascarpone, and juicy cherries all mingling together. If that doesn’t get your tastebuds tingling, I don’t know what will! Honestly, this cake is what dessert dreams are made of, and it’s the kind of showstopper that gets people talking (and asking for seconds).
I stumbled upon this cake when I wanted to whip up something special for my best friend’s birthday. She’s obsessed with anything cherry and can’t resist tiramisu, so I thought, “Why not combine the two?” The result was nothing short of magic. The espresso gives the ladyfingers that classic tiramisu depth, the cherries add a bright, tangy contrast, and the chocolate shavings… well, they just take it over the top. The best part? It’s surprisingly easy to make and looks like you spent hours fussing over it.
This Black Forest Tiramisu Cake has become my go-to for parties, potlucks, and even lazy Sunday afternoons. Whether you’re a die-hard tiramisu lover, a Black Forest devotee, or someone who just wants a dessert that looks as good as it tastes, you’ll adore this recipe. It’s great for feeding a crowd, and let’s be real—nobody can resist those swoops of mascarpone cream and the glossy cherries peeking through. And if you’re looking for something that packs a punch both in flavor and presentation, this is it.
I’ve tested and tweaked this recipe more times than I can count, perfecting the ratios and making sure every bite is spot-on. Let’s just say, my family never complains about recipe testing days! If you’re ready to make a Black Forest Tiramisu Cake that’ll become your signature dessert, keep reading—I can’t wait to share all my secrets with you.
Why You’ll Love This Black Forest Tiramisu Cake
Let me tell you, this cake hits all the right notes—creamy, rich, fruity, and just the right amount of sweet. After making it for countless gatherings, I can confidently say it’s always the first dessert to disappear. Here’s why you’ll fall head over heels for this Black Forest Tiramisu Cake:
- Quick & Easy: Don’t let those gorgeous layers fool you—this cake comes together in under an hour (plus chilling time). It’s perfect for when you want something impressive but don’t want to spend all day in the kitchen.
- Simple Ingredients: No fancy specialty store runs required. Most items are pantry staples or easy to find at your local grocery store.
- Perfect for Parties: This Black Forest Tiramisu Cake is a total crowd-pleaser for birthdays, holiday gatherings, or any celebration where you want to wow your guests.
- Kid and Adult Approved: The combination of chocolate, cherries, and creamy mascarpone appeals to every age. My picky niece even asks for it every year!
- Flavor Explosion: The balance of tart cherries, bittersweet chocolate, and that signature espresso kick makes this cake unforgettable. It’s decadence in every bite.
What sets this version apart? I blend the mascarpone cream until it’s ultra-smooth and fluffy—no graininess here. The cherry layer uses both cherry syrup and whole cherries, so you get juicy pops of flavor throughout. Plus, a sprinkle of chocolate shavings between layers adds a little surprise in every forkful.
There’s something extra special about this Black Forest Tiramisu Cake—it’s not just a dessert, it’s a memory-maker. I love how it brings people together around the table, sparking conversation and a little bit of friendly competition for the biggest slice. It’s comfort food, but with a European twist that feels just a bit fancy. And honestly? It’s the kind of recipe you’ll want to make again and again, just for those oohs and ahhs when you bring it to the table.
Whether you’re baking for a birthday, a festive holiday, or just because you’re craving something sweet and stunning, this cake delivers every single time. Trust me, you’ll look like a pastry chef—no stress required.
What Ingredients You Will Need
This Black Forest Tiramisu Cake uses a mix of classic tiramisu and Black Forest flavors, all from easy-to-find ingredients. Nothing fussy, just a handful of staples that come together for something truly special. Here’s what you’ll need:
- Ladyfingers (savoiardi): About 24-30 pieces (200g). These sponge biscuits create that iconic tiramisu texture. I like the Matilde Vicenzi brand for their crispness.
- Espresso or Strong Coffee: 1 ½ cups (360 ml), cooled. Brew it strong for that signature kick—instant espresso works in a pinch.
- Dark Rum or Kirsch: 3 tbsp (45 ml). Kirsch is traditional for Black Forest, but dark rum gives a lovely warmth. You can skip the alcohol for a kid-friendly version.
- Mascarpone Cheese: 16 oz (450g), at room temperature. Go for a good-quality mascarpone for the creamiest filling.
- Heavy Whipping Cream: 1 cup (240 ml), cold. Whipped into the mascarpone for a light, airy texture.
- Powdered Sugar: ½ cup (60g), sifted. Sweetens the mascarpone layer without any grittiness.
- Vanilla Extract: 2 tsp (10 ml). Adds a subtle depth to the cream.
- Cherries: 2 cups (340g), pitted and halved. Fresh cherries are divine in summer, but jarred or frozen work beautifully year-round. I’ve used Morello cherries with great results.
- Cherry Syrup: ½ cup (120 ml). Use the syrup from jarred cherries or make your own by simmering cherries with a bit of sugar and water. This amps up the cherry flavor.
- Dark Chocolate Shavings: 3 oz (85g). For sprinkling between layers and on top. Use a vegetable peeler on a bar of dark chocolate—it’s oddly satisfying!
- Cocoa Powder: 1 tbsp (8g), for dusting. Gives that classic tiramisu finish.
Ingredient Tips: If you need gluten-free, swap in gluten-free ladyfingers. For a dairy-free version, use coconut cream and a dairy-free cream cheese alternative. If you’re all about chocolate, add a layer of mini chocolate chips with the cherries.
I’ve tried this recipe with fresh, frozen, and jarred cherries—each has its charm. Fresh cherries are perfect in season, but don’t hesitate to use thawed frozen cherries (drain them well first) or jarred in syrup for convenience. If you’re feeling extra, splash a bit of cherry liqueur over the cherries before layering.
All in all, the ingredients are flexible and forgiving. That’s the beauty of this Black Forest Tiramisu Cake—it works with whatever you have on hand!
Equipment Needed
You really don’t need anything fancy to pull off this Black Forest Tiramisu Cake, which is honestly one of my favorite things about it. Here’s what I use:
- 9-inch (23cm) Springform Pan or Deep Cake Pan: Makes for easy unmolding and beautiful layers. If you don’t have one, a deep baking dish works too—you’ll just serve it straight from the pan.
- Mixing Bowls: At least two—one for whipping the cream and another for the mascarpone mixture.
- Electric Mixer: Hand or stand mixer. Whipping by hand is possible, but it’s a workout!
- Spatula: For folding and smoothing the layers. A silicone spatula helps scrape every last bit of cream.
- Fine Mesh Sieve: For dusting cocoa powder on top. Not essential, but gives a pretty finish.
- Vegetable Peeler or Box Grater: For making those luscious chocolate shavings.
- Sharp Knife: For slicing cherries.
- Measuring Cups and Spoons: Accuracy helps, especially with the espresso and syrup.
If you don’t have a springform pan, don’t sweat it—I’ve made this in a regular 8×8 inch (20x20cm) baking dish with great results. Just line with parchment for easier serving. For the electric mixer, a trusty whisk and some elbow grease work in a pinch, though your arm might be a little sore afterwards (been there!).
Maintenance tip: If you use a springform pan, be sure to check the seal before pouring in the cream—nobody wants a leaky mess. And for budget-friendly options, dollar store spatulas and mixing bowls totally get the job done—I still use mine from years ago!
How to Make Black Forest Tiramisu Cake
-
Prep the Pan and Ingredients (5 minutes):
Line the base of a 9-inch (23cm) springform pan with parchment paper. Gather all ingredients and let the mascarpone come to room temperature for easier mixing. -
Brew Espresso and Prep Cherries (10 minutes):
Brew 1 ½ cups (360 ml) of strong espresso or coffee. Allow it to cool. Pit and halve 2 cups (340g) of cherries if using fresh. If using jarred, drain and reserve the syrup. -
Make Cherry Syrup (if needed) (5 minutes):
If you don’t have syrup, simmer 1 cup (170g) cherries with 2 tbsp (25g) sugar and 2 tbsp (30 ml) water for 5 minutes. Strain and cool. -
Whip the Cream (5 minutes):
In a cold mixing bowl, whip 1 cup (240 ml) heavy cream until stiff peaks form. Don’t overwhip or it’ll get grainy (stop as soon as the cream holds its shape). -
Prepare Mascarpone Mixture (5 minutes):
In another bowl, beat 16 oz (450g) mascarpone with ½ cup (60g) powdered sugar and 2 tsp (10 ml) vanilla extract until smooth. Gently fold in the whipped cream with a spatula—don’t rush, or you’ll deflate the mixture. -
Mix Espresso Soak (2 minutes):
Combine the cooled espresso with 3 tbsp (45 ml) kirsch or dark rum. Pour into a shallow dish for easy dipping. -
Layer the Ladyfingers (5 minutes):
Quickly dip each ladyfinger into the espresso mixture—just 1-2 seconds per side, or they’ll go soggy—and arrange in a single layer at the bottom of the pan. Break to fit if needed. -
Add the First Cream Layer (3 minutes):
Spread half of the mascarpone mixture over the ladyfingers, smoothing with a spatula. -
Add Cherries and Chocolate (3 minutes):
Scatter half of the cherries evenly over the cream. Drizzle with cherry syrup (about ¼ cup/60 ml). Sprinkle with a third of the chocolate shavings. -
Repeat Layers (5 minutes):
Add another layer of espresso-dipped ladyfingers, followed by the rest of the mascarpone cream. Top with remaining cherries, syrup, and chocolate shavings. -
Finish and Chill (at least 4 hours, overnight best):
Cover the pan with foil or plastic wrap. Chill in the refrigerator for at least 4 hours, or overnight. This allows the flavors to meld and the cake to set. -
Decorate Before Serving (5 minutes):
Run a thin knife around the pan edge and release the springform. Dust the top with 1 tbsp (8g) cocoa powder using a fine sieve. Add extra chocolate shavings and a few whole cherries for flair. -
Slice and Serve:
Use a sharp knife dipped in hot water for clean slices. Serve cold, and watch it vanish!
Troubleshooting: If your mascarpone looks curdled, it’s probably too cold—let it sit out for a bit and beat again. If ladyfingers get mushy, reduce soaking time. If the cake seems too soft when unmolding, pop it in the freezer for 20 minutes to firm up.
Personal tip: I like to prepare this cake a day ahead—the flavors become even more amazing. And don’t stress about picture-perfect layers; a bit of rustic charm adds to the homemade magic!
Top Tips & Techniques for Success
- Don’t Oversoak Ladyfingers: I’ve learned the hard way—too much espresso soak and you’ll end up with a mushy base. Just a quick dip is all you need.
- Room Temp Mascarpone: Cold mascarpone won’t blend smoothly and can get lumpy. Always let it sit out for 30 minutes before mixing.
- Gentle Folding: When mixing the whipped cream into the mascarpone, go slow and use a spatula. This keeps the cream light and airy—trust me, it makes a difference in texture.
- Layer Evenly: Spread the cream and cherries out to the edges of the pan for clean slices and balanced flavor in every bite.
- Chill Time: Patience pays off with this cake. Chilling for at least 4 hours (but overnight is best) lets the flavors meld and the cake set perfectly.
- Chocolate Shavings: Use a vegetable peeler on a cold chocolate bar for those gorgeous curls. If it gets melty, pop it in the fridge for a bit.
- Personal Fail: I once tried to rush and skipped chilling—big mistake! The cake was a soupy mess. Always allow time for it to firm up.
- Multitasking: While the coffee cools, whip your cream and prepare the cherries. Having everything ready makes assembly a breeze.
- Consistency: For the neatest layers, use an offset spatula to smooth the cream. Wipe the blade between spreads for sharp lines (a pastry chef trick I picked up at a bakery job).
Remember, baking isn’t just about following steps—it’s about tuning in to the look, feel, and even sound of your ingredients. If your cream feels too soft, pop it in the fridge for 10 minutes. And if you mess up a layer, just call it “rustic.” Nobody will mind once they taste it!
Variations & Adaptations
One of the best things about this Black Forest Tiramisu Cake is how customizable it is. Here are a few fun ways to make it your own:
- Gluten-Free Version: Swap out regular ladyfingers for gluten-free ones (Schar makes a great option). Everything else stays the same.
- Dairy-Free/Vegan Twist: Use coconut cream in place of heavy cream and a dairy-free cream cheese (like Violife). Make sure your ladyfingers are vegan, and you’re set.
- Berry Swap: Substitute raspberries, blackberries, or a mix of berries for the cherries. This is especially lovely in summer when berries are at their peak.
- Chocolate Lovers: Add a layer of chocolate ganache between the ladyfingers and mascarpone for a super-rich treat.
- No-Alcohol Version: Skip the kirsch/rum and just use coffee or cherry juice for soaking—perfect for kids or anyone avoiding spirits.
- Different Pan Shapes: Assemble in a trifle bowl for a stunning layered look, or use mason jars for individual desserts at a party.
- Personal Favorite: Once, I folded a little orange zest into the mascarpone mixture for a Black Forest-Orange Tiramisu. It was unexpectedly amazing and got rave reviews!
Don’t be afraid to play around—this cake is super forgiving. If you need to accommodate allergies, you can swap nuts for chocolate, use a nut-free liqueur, or leave out the cocoa powder. The key is to taste as you go and adjust to your crowd’s preferences.
Serving & Storage Suggestions
This Black Forest Tiramisu Cake is best served cold, straight from the fridge. The creamy layers hold up beautifully, and the flavors shine when chilled.
- Serving: Slice with a sharp, hot knife for clean edges. Garnish with extra cherries and chocolate curls for a “wow” effect. A dusting of cocoa right before serving adds a luxe touch.
- Pairings: Delicious with a cup of espresso, a glass of cherry liqueur, or even a splash of bubbly for celebrations. It also pairs well with vanilla ice cream for an extra treat.
- Storage: Cover leftovers with plastic wrap or store in an airtight container in the refrigerator for up to 4 days. The cake actually gets even better as it sits—the flavors meld and intensify.
- Freezing: You can freeze individual slices wrapped tightly in plastic and foil for up to 1 month. Thaw overnight in the fridge before serving.
- Reheating: No need! This dessert is meant to be enjoyed cold. If it’s a bit too firm from the fridge, let it sit at room temperature for 10-15 minutes before slicing.
One thing I’ve noticed: the cherry flavor deepens after a day or two, so don’t be shy about making this ahead. It travels well for potlucks, and everyone loves how the chocolate and cherries mingle over time.
Nutritional Information & Benefits
This Black Forest Tiramisu Cake is definitely a treat, but it does sneak in some redeeming qualities! Here’s a rough nutritional rundown (per slice, based on 12 servings):
- Calories: ~340
- Fat: 17g
- Carbohydrates: 39g
- Protein: 5g
- Sugar: 22g
Health Highlights: Cherries are loaded with antioxidants and Vitamin C, and dark chocolate brings some mood-boosting benefits. If you use less sugar or opt for light mascarpone, you can lighten it up a bit.
This recipe can be made gluten-free or dairy-free with easy swaps (see above). It does contain dairy, eggs (in ladyfingers), and possible alcohol, so watch for allergens as needed. Personally, I love that this cake feels indulgent, but isn’t as heavy as a traditional buttercream cake. Every bite is satisfying without being overly rich—just the way I like it!
Conclusion
If you’re searching for a dessert that’s as gorgeous as it is delicious, this Black Forest Tiramisu Cake is the answer, hands down. It’s got everything: creamy layers, juicy cherries, a hit of espresso, and those irresistible chocolate shavings. Whether you’re making it for a special occasion or just because, this cake has a way of turning any gathering into a celebration.
I hope you’ll give this recipe a try and make it your own—swap in your favorite berries, play with the chocolate, or keep it classic. For me, this cake is all about sharing joy (and maybe sneaking a slice for breakfast the next day). It’s become a family favorite, and I have a feeling it’ll be yours too.
If you make this Black Forest Tiramisu Cake, let me know in the comments or tag your creation on social! I’d love to hear your twists and see your beautiful cakes. Now, go on—grab those cherries and get layering. Happy baking!
Frequently Asked Questions
Can I make Black Forest Tiramisu Cake ahead of time?
Absolutely! In fact, it tastes even better after chilling overnight. Just keep it covered in the fridge until ready to serve.
What can I use instead of kirsch or rum?
If you want an alcohol-free version, swap in cherry juice, more espresso, or even a splash of almond extract for extra flavor.
Can I use frozen cherries?
Yes, just thaw and drain them well before layering. They’re a fantastic option when fresh cherries aren’t in season.
How do I get clean slices when serving?
Dip your knife in hot water and wipe it clean between cuts. A sharp blade helps keep those layers neat and tidy.
Is this recipe suitable for kids?
It sure can be! Just skip the alcohol and use extra coffee or cherry juice for soaking the ladyfingers. The flavor will still be amazing and completely kid-friendly.
Pin This Recipe!
Black Forest Tiramisu Cake
This Black Forest Tiramisu Cake combines the creamy richness of tiramisu with the bold, fruity punch of Black Forest cake. Layers of espresso-soaked ladyfingers, whipped mascarpone, juicy cherries, and chocolate shavings make it a showstopping dessert perfect for parties.
- Prep Time: 30 minutes
- Cook Time: 0 minutes
- Total Time: 4 hours 30 minutes (including chilling)
- Yield: 12 servings 1x
- Category: Dessert
- Cuisine: European
Ingredients
- 24–30 ladyfingers (savoiardi) (about 7 oz or 200g)
- 1 1/2 cups (12 fl oz or 360 ml) espresso or strong coffee, cooled
- 3 tbsp (1.5 fl oz or 45 ml) dark rum or kirsch (optional, or substitute cherry juice for alcohol-free)
- 16 oz (450g) mascarpone cheese, at room temperature
- 1 cup (8 fl oz or 240 ml) heavy whipping cream, cold
- 1/2 cup (2 oz or 60g) powdered sugar, sifted
- 2 tsp (10 ml) vanilla extract
- 2 cups (12 oz or 340g) cherries, pitted and halved (fresh, jarred, or thawed frozen)
- 1/2 cup (4 fl oz or 120 ml) cherry syrup (from jarred cherries or homemade)
- 3 oz (85g) dark chocolate shavings
- 1 tbsp (8g) cocoa powder, for dusting
Instructions
- Line the base of a 9-inch (23cm) springform pan with parchment paper. Let mascarpone come to room temperature.
- Brew 1 1/2 cups espresso or strong coffee and let cool. Pit and halve cherries if using fresh; drain jarred cherries and reserve syrup.
- If needed, make cherry syrup by simmering 1 cup cherries with 2 tbsp sugar and 2 tbsp water for 5 minutes. Strain and cool.
- In a cold mixing bowl, whip heavy cream until stiff peaks form.
- In another bowl, beat mascarpone with powdered sugar and vanilla extract until smooth. Gently fold in whipped cream with a spatula.
- Combine cooled espresso with kirsch or rum (if using). Pour into a shallow dish.
- Quickly dip each ladyfinger into the espresso mixture for 1-2 seconds per side and arrange in a single layer at the bottom of the pan.
- Spread half of the mascarpone mixture over the ladyfingers, smoothing with a spatula.
- Scatter half of the cherries evenly over the cream. Drizzle with about 1/4 cup cherry syrup. Sprinkle with a third of the chocolate shavings.
- Add another layer of espresso-dipped ladyfingers, followed by the rest of the mascarpone cream. Top with remaining cherries, syrup, and chocolate shavings.
- Cover the pan and chill in the refrigerator for at least 4 hours, or overnight.
- Before serving, run a thin knife around the pan edge and release the springform. Dust the top with cocoa powder using a fine sieve. Add extra chocolate shavings and whole cherries for garnish.
- Slice with a sharp knife dipped in hot water for clean slices. Serve cold.
Notes
For best results, chill the cake overnight to allow flavors to meld. Do not oversoak ladyfingers to avoid a mushy texture. Room temperature mascarpone blends more smoothly. For gluten-free, use gluten-free ladyfingers. For dairy-free, substitute coconut cream and dairy-free cream cheese. The cake can be made ahead and actually improves after a day in the fridge.
Nutrition
- Serving Size: 1 slice (1/12 of cake)
- Calories: 340
- Sugar: 22
- Sodium: 80
- Fat: 17
- Saturated Fat: 10
- Carbohydrates: 39
- Fiber: 2
- Protein: 5
Keywords: black forest tiramisu, cherry dessert, tiramisu cake, party dessert, easy tiramisu, black forest cake, mascarpone, cherries, chocolate, no bake cake


