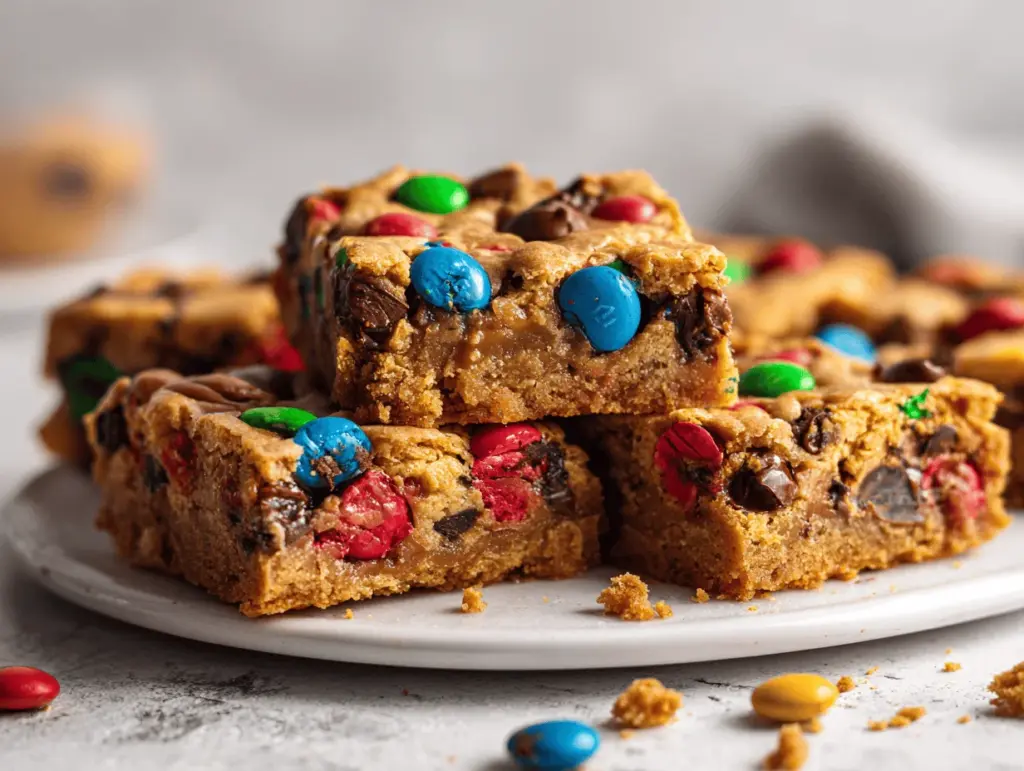
The gooey, chewy goodness of loaded monster cookie bars is honestly something I dream about. There’s just something magical about the way peanut butter, oats, M&Ms, and chocolate chips come together in one sweet, colorful bar. I remember the first time I made these loaded monster cookie bars—it was a rainy Saturday, my pantry was bursting with half-used baking supplies, and I wanted a dessert that would make everyone smile. Mission accomplished! These bars didn’t even last a full day in my house. If you’re after a dessert that’s fun, easy, and guaranteed to steal the show at any gathering, you’re in for a treat.
This loaded monster cookie bars recipe is my go-to when I want a peanut butter M&M dessert that’s both nostalgic and crowd-pleasing. Growing up, monster cookies were always my favorite, but turning them into bars makes the process even simpler—no scooping or chilling required! It’s perfect for busy families, bake sales, or when you want to whip up something outrageous for a movie night. Plus, let’s face it: nothing beats those colorful M&Ms peeking through a golden, soft cookie bar. These bars are sweet, salty, packed with texture, and honestly, I’ve never met a person who could resist them.
I’ve baked this loaded monster cookie bars recipe more times than I can count (I even have a secret stash of peanut butter just for emergencies like this). Whether you’re making them for a special treat or just because you need a little extra joy, I can promise you—once you try them, you’ll be hooked. There’s a reason they’re a staple in my kitchen, and I can’t wait for you to experience the magic, too!
Why You’ll Love This Recipe
- Quick & Easy: These loaded monster cookie bars come together in under an hour—no dough chilling, no fuss, just pure dessert bliss.
- Simple Ingredients: You probably have everything you need right in your pantry—think oats, peanut butter, chocolate chips, and classic M&Ms.
- Perfect for Every Occasion: Whether it’s a birthday party, potluck, or just a Tuesday night, these bars fit right in. They travel well and don’t require fancy presentation.
- Crowd-Pleaser: Kids love the colors and adults love the nostalgic, chewy texture. I can’t remember a time when someone didn’t ask for the recipe after trying them!
- Unbelievably Delicious: The combination of creamy peanut butter, hearty oats, melty chocolate, and crunchy M&Ms is just unbeatable. Each bite is loaded with flavor and texture.
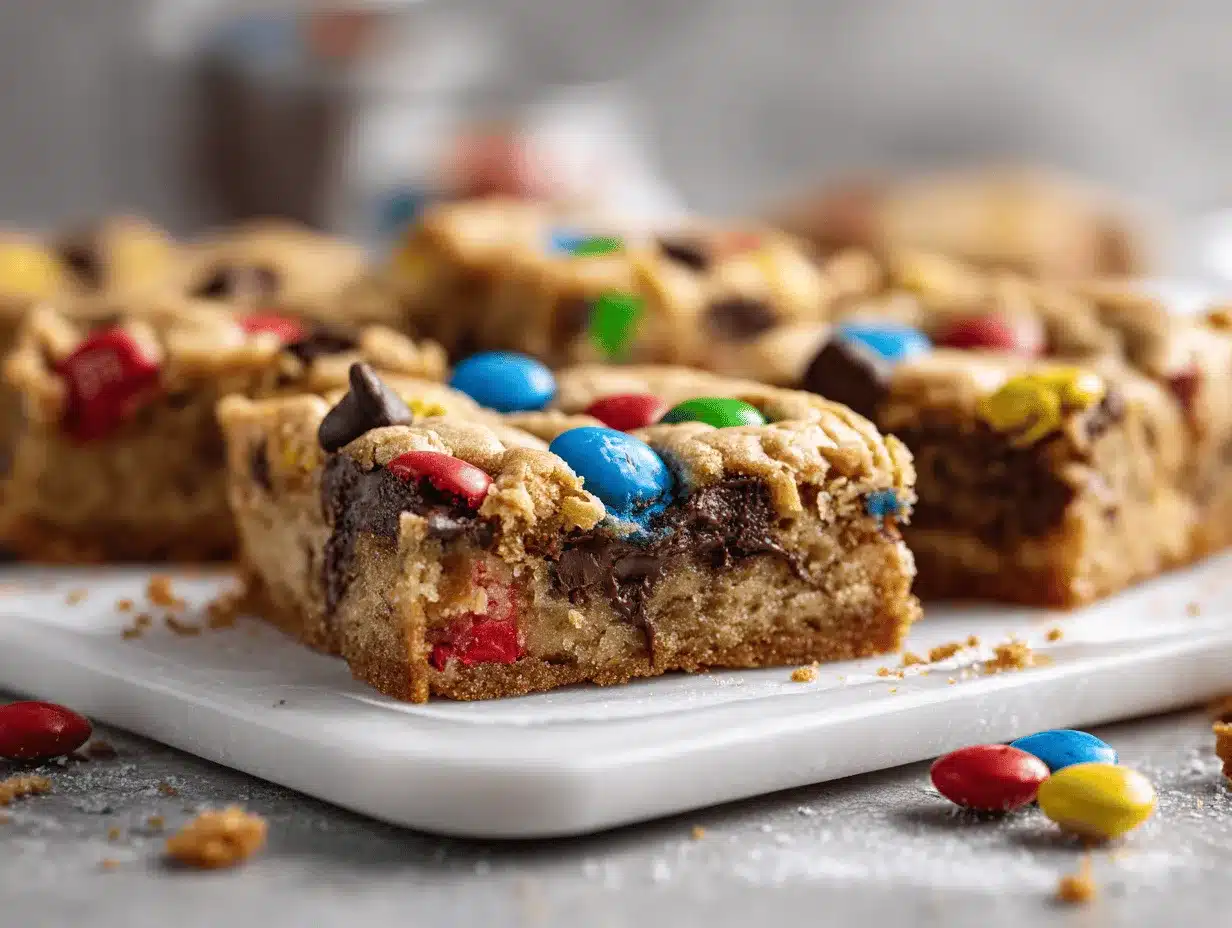
What really sets my loaded monster cookie bars recipe apart is the perfect balance of salty-sweet and soft-chewy. I blend the peanut butter until it’s super creamy (pro tip: don’t skimp on mixing!), and I always use old-fashioned rolled oats for a heartier bite. And while you can absolutely use any chocolate chips, I love a mix of semi-sweet and milk for depth. My kids like to help press in the M&Ms for extra color—honestly, it’s half the fun! These bars are also less crumbly than most, thanks to my not-so-secret ingredient: a touch of cornstarch for the perfect soft texture.
But let’s be real, the best part is how these bars make you feel. They’re comfort food at its finest—cheerful, playful, and a bit nostalgic. If you want dessert that makes people’s eyes light up, this loaded monster cookie bars recipe is it!
What Ingredients You Will Need
This loaded monster cookie bars recipe is all about big flavors with simple ingredients. I love that it calls for pantry basics and lets you get creative with mix-ins. Here’s what you’ll need:
- Unsalted butter, softened (1/2 cup / 115g): Adds richness and helps the bars stay tender. If you only have salted butter, just reduce the added salt a bit.
- Creamy peanut butter (1 cup / 240g): I always use a classic, no-stir peanut butter like Jif or Skippy for the best texture. Natural peanut butter works, but bars might be slightly crumblier.
- Brown sugar, packed (1 cup / 200g): Gives a deep, caramel-like sweetness and chewy texture.
- Granulated sugar (1/2 cup / 100g): Balances out the brown sugar and brings a little extra crispness to the edges.
- Large eggs, room temperature (2): Binds everything together and adds moisture.
- Vanilla extract (2 teaspoons): For that warm, bakery-fresh aroma—don’t skip it!
- All-purpose flour (1 1/2 cups / 190g): The foundation of our bars. I’ve made these with 1:1 gluten-free flour blends too with good results.
- Cornstarch (1 tablespoon): My secret for ultra-soft bars that hold together perfectly.
- Baking soda (1 teaspoon): Helps the bars rise and stay chewy.
- Salt (1/2 teaspoon): Just enough to balance the sweet and amplify flavors.
Mix-Ins:
- Old-fashioned rolled oats (1 cup / 90g): Adds heartiness and that classic monster cookie vibe. Quick oats work in a pinch, but I prefer rolled for texture.
- M&Ms candies (1 cup / 200g): The star of the show—use classic, mini, or even peanut M&Ms if you like more crunch. I love the color they bring!
- Semi-sweet chocolate chips (3/4 cup / 130g): Melty chocolate in every bite. You can use milk chocolate or dark if that’s your thing.
- Optional: Chopped pecans or walnuts (1/2 cup / 60g), shredded coconut (1/4 cup / 20g), or mini marshmallows for a fun twist.
Ingredient Tips:
- If you need to make these gluten-free, swap the flour for a 1:1 gluten-free blend and be sure your oats are certified gluten-free.
- Dairy-free? Use plant-based butter and check your chocolate chips/M&Ms for dairy content.
- No peanut butter? Almond butter or sunflower seed butter work, though the bars will taste a bit different (still delicious!).
Equipment Needed
You don’t need anything fancy to make these loaded monster cookie bars, which honestly is part of their charm. Here’s what I use every time:
- 9×13-inch baking pan: The bars bake up thick and chewy in this size. You can use metal or glass—just line it with parchment paper for easy removal.
- Mixing bowls (at least two): One for your wet ingredients and one for dry. I like sturdy glass bowls that are easy to clean.
- Electric hand mixer or stand mixer: Creaming the butter and sugars is much easier with a mixer, but you can do it by hand with a sturdy spoon if you have patience (and strong arms!).
- Measuring cups and spoons: For accurate results. I always level off my flour with the back of a knife.
- Spatula or large spoon: For folding in all those tasty mix-ins.
- Parchment paper: Makes lifting the bars out of the pan a breeze and helps with clean-up. Foil works in a pinch.
- Wire rack: For cooling the bars so they don’t get soggy on the bottom.
If you’re low on equipment, I’ve made these in a disposable foil tray before (great for potlucks!) and mixed by hand when my mixer was on the fritz. Just be sure to grease your tray well or use parchment—these bars are sticky in the best way.
To keep your mixer running smoothly, always wipe down the beaters after using peanut butter, and don’t forget to wash your measuring spoons right away or the sugar will stick like crazy.
Preparation Method
- Preheat and Prep:
- Preheat your oven to 350°F (175°C).
- Line a 9×13-inch (23x33cm) baking pan with parchment paper, leaving a little overhang for easy lifting. Lightly grease the paper if you want extra insurance against sticking.
- Cream Wet Ingredients:
- In a large mixing bowl, add 1/2 cup (115g) softened unsalted butter, 1 cup (240g) creamy peanut butter, 1 cup (200g) packed brown sugar, and 1/2 cup (100g) granulated sugar.
- Beat on medium speed for 2-3 minutes, until the mixture is light and fluffy. Don’t rush this step—the longer you mix, the softer your bars will be.
- Add Eggs and Vanilla:
- Add 2 large eggs, one at a time, beating well after each addition.
- Mix in 2 teaspoons vanilla extract.
- Combine Dry Ingredients:
- In a separate bowl, whisk together 1 1/2 cups (190g) all-purpose flour, 1 tablespoon cornstarch, 1 teaspoon baking soda, and 1/2 teaspoon salt.
- Gradually add the dry mixture to the wet ingredients, mixing on low speed or by hand just until combined. Don’t overmix; it’s okay if you see a few flour streaks.
- Mix in Oats and Goodies:
- Fold in 1 cup (90g) rolled oats, 1 cup (200g) M&Ms, and 3/4 cup (130g) chocolate chips. If using nuts or coconut, add them now.
- The dough will be thick—use a sturdy spatula and don’t be afraid to use a little elbow grease!
- Spread and Top:
- Transfer the dough to your prepared pan. Use the spatula or your hands (lightly greased) to press it evenly into the corners. Try to create an even thickness for perfect bars.
- Press a handful of extra M&Ms and chocolate chips on top for maximum color and melty goodness.
- Bake:
- Bake in the preheated oven for 22-26 minutes, or until the edges are golden brown and the center looks just set. Don’t overbake—these bars will continue to cook as they cool.
- If your oven runs hot, start checking at 20 minutes. The bars should still look a little soft in the center; that’s perfect.
- Cool and Slice:
- Remove the pan from the oven and let the bars cool completely in the pan on a wire rack—this helps them firm up for clean slices.
- Once cool, use the parchment overhang to lift the bars out. Use a sharp knife to cut into squares or rectangles (I usually get 24 bars).
Troubleshooting Tips:
- If your bars are too dry, check your oven temperature—some ovens run hotter than they say. Try reducing the bake time next time.
- If they’re falling apart, try letting them cool completely before slicing. Warm bars are extra gooey and can be tricky to cut.
- For extra gooey bars, pull them out of the oven at the first sign of golden edges, even if the center looks a bit underdone—it’ll set up as they cool.
I’ve rushed the cooling step before (impatience is real!) and ended up with a crumbly mess—still tasty, but not as pretty. Trust me, the wait is worth it!
Cooking Tips & Techniques
After many (many) batches, I’ve picked up a few tricks for the best loaded monster cookie bars every single time. Here’s what I’ve learned, sometimes the hard way:
- Room Temperature Matters: Make sure your butter and eggs aren’t cold. Cold butter won’t cream properly, and cold eggs can seize up the dough, making it hard to spread.
- Don’t Overbake: It’s tempting to let the bars get super brown, but they’ll dry out fast. Pull them when the center still looks soft—carryover heat finishes the job.
- Mix-Ins on Top: For that bakery-style look, always reserve a handful of M&Ms and chocolate chips for pressing on top. It makes a huge difference in presentation.
- Let Them Cool: I used to rush this and ended up with bars that crumbled or fell apart. Waiting until they’re fully cool makes slicing so much easier (and tidier!).
- Line Your Pan: If you skip parchment, you might spend forever scraping sticky bars out of the corners. Trust me—take the extra minute to line your pan!
- Customize the Size: For thicker bars, use a slightly smaller pan and add a few extra minutes to the bake time. For thinner bars, use a larger pan and reduce bake time.
One time, I forgot to add the oats until after I’d already pressed the dough in the pan—so I just sprinkled them on top and pressed them in with more M&Ms. The bars still turned out delicious but with a fun, toasty oat topping. Moral of the story: This recipe is super forgiving, so don’t panic if you miss a step!
For multitasking, I like to measure out all my mix-ins while the butter is softening. That way, everything’s ready to go and I’m not scrambling mid-recipe. And if you want perfectly even bars, use a ruler (or the edge of your spatula) to mark out the cuts before slicing.
Variations & Adaptations
Monster cookie bars are one of those recipes that beg for tweaking and playing around. Here are some of my favorite ways to switch things up:
- Gluten-Free: Use a 1:1 gluten-free flour blend and certified gluten-free oats. The texture might be a touch more tender, but the bars are still fantastic.
- Nut-Free: Swap peanut butter for sunflower seed butter or Wowbutter, and make sure your chocolate and candies are nut-safe. Great for school events!
- Holiday Twist: Use themed M&Ms (like red and green for Christmas, or pastels for Easter) and add festive sprinkles to the dough and on top.
- Double Chocolate: Add 1/3 cup unsweetened cocoa powder and use all chocolate M&Ms for an ultra-rich, brownie-like bar.
- Mix-Ins Galore: Play with combinations—mini pretzels, white chocolate chips, toffee bits, or chopped dried cranberries are all fun additions. My family loves mini marshmallows for a s’mores vibe.
If you want to bake these in a different vessel, you can use a 9×9-inch pan for super thick bars (increase bake time by 5-7 minutes) or a rimmed baking sheet for thinner, crispier ones (reduce baking time). I once swapped out half the chocolate chips for chopped peanut butter cups—no regrets, just extra peanut buttery goodness!
Don’t be afraid to make these loaded monster cookie bars your own. That’s half the fun!
Serving & Storage Suggestions
Monster cookie bars are at their absolute best slightly warm, with the chocolate still a little gooey and the M&Ms just starting to melt. If you want to go all out, serve them with a scoop of vanilla ice cream and a cold glass of milk—pure heaven!
For serving at a party, cut the bars into bite-sized squares and arrange them on a colorful platter. These bars also look adorable stacked in a mason jar or tied up in cellophane bags for gifting.
To store, keep the bars in an airtight container at room temperature for up to 5 days. They stay soft and chewy (if they last that long!). For longer storage, freeze the bars in a single layer in a zip-top bag for up to 2 months. Let them thaw at room temperature, or microwave for 10-15 seconds for that fresh-baked warmth.
Over time, the flavors meld together—the oats get even softer and the candies lend their sweetness throughout. I’ve found they’re just as good (maybe even better?) on day two or three.
Pro tip: If you want to reheat a whole batch, pop them in a low oven (300°F/150°C) for 5-7 minutes. The chocolate gets melty again and the bars taste like they just came out of the oven.
Nutritional Information & Benefits
Each loaded monster cookie bar (based on 24 bars per batch) is approximately:
- Calories: 220
- Fat: 10g
- Saturated Fat: 4g
- Carbohydrates: 30g
- Protein: 4g
- Fiber: 1g
- Sugar: 20g
These bars aren’t exactly health food, but they do have some redeeming features! The oats provide fiber and a bit of protein, while the peanut butter adds healthy fats and keeps you feeling satisfied. If you use dark chocolate chips, you’ll also get some antioxidants (hey, it counts!).
For those avoiding gluten or dairy, simple swaps make this recipe accessible for most diets. Just be aware of peanut and tree nut allergies, and always check your candies for hidden gluten or dairy.
Honestly, I view these as a fun treat—something to enjoy in moderation, but with enough protein and fiber to keep you from crashing after dessert. Life’s too short to skip the loaded monster cookie bars!
Conclusion
If you’re looking for a dessert that’s colorful, craveable, and utterly irresistible, this loaded monster cookie bars recipe is the one to try. With simple ingredients, gooey peanut butter, plenty of M&Ms, and melt-in-your-mouth chocolate chips, these bars are everything a peanut butter M&M dessert should be. They’ve become a staple in my home, and I bet they’ll be one in yours too.
Don’t be afraid to make these bars your own—swap in your favorite candies, change up the mix-ins, or bake them extra-thick for a special occasion. The most important thing is to have fun and enjoy every chewy, colorful, chocolatey bite.
I hope you love these loaded monster cookie bars as much as my family does! If you give them a try, please leave a comment, share a photo, or let me know how you made them your own. Happy baking and enjoy every sweet moment!
Frequently Asked Questions
Can I make loaded monster cookie bars without peanut butter?
Yes! Try using almond butter, cashew butter, or sunflower seed butter. The flavor will change slightly, but the bars will still be delicious and chewy.
How do I keep my bars from crumbling?
Let the bars cool completely before slicing, and make sure not to overbake. If needed, add an extra egg yolk for more moisture next time.
Can I use quick oats instead of rolled oats?
Absolutely! Quick oats will make the bars a bit softer and less chewy, but they’ll still work just fine.
How do I freeze these cookie bars?
Once the bars are cool, cut them into squares and place in a single layer in a zip-top freezer bag. Freeze for up to 2 months. Thaw at room temperature or microwave briefly to rewarm.
What’s the best way to add more mix-ins?
Fold in your favorite nuts, candies, or chocolate chips after the dough is mixed. Just don’t exceed about 2 cups total add-ins or the bars may not hold together as well.
PrintLoaded Monster Cookie Bars

These loaded monster cookie bars are gooey, chewy, and packed with peanut butter, oats, M&Ms, and chocolate chips. They’re easy to make, crowd-pleasing, and perfect for any occasion.
- Prep Time: 15 minutes
- Cook Time: 25 minutes
- Total Time: 40 minutes
- Yield: 24 bars 1x
- Category: Dessert
- Cuisine: American
Ingredients
- 1/2 cup (115g) unsalted butter, softened
- 1 cup (240g) creamy peanut butter
- 1 cup (200g) brown sugar, packed
- 1/2 cup (100g) granulated sugar
- 2 large eggs, room temperature
- 2 teaspoons vanilla extract
- 1 1/2 cups (190g) all-purpose flour
- 1 tablespoon cornstarch
- 1 teaspoon baking soda
- 1/2 teaspoon salt
- 1 cup (90g) old-fashioned rolled oats
- 1 cup (200g) M&Ms candies
- 3/4 cup (130g) semi-sweet chocolate chips
- Optional: 1/2 cup (60g) chopped pecans or walnuts
- Optional: 1/4 cup (20g) shredded coconut
- Optional: mini marshmallows
Instructions
- Preheat your oven to 350°F (175°C). Line a 9×13-inch baking pan with parchment paper, leaving overhang for easy lifting. Lightly grease the paper if desired.
- In a large mixing bowl, add softened butter, peanut butter, brown sugar, and granulated sugar. Beat on medium speed for 2-3 minutes until light and fluffy.
- Add eggs one at a time, beating well after each addition. Mix in vanilla extract.
- In a separate bowl, whisk together flour, cornstarch, baking soda, and salt.
- Gradually add the dry mixture to the wet ingredients, mixing on low speed or by hand just until combined. Do not overmix.
- Fold in rolled oats, M&Ms, and chocolate chips. If using nuts, coconut, or marshmallows, add them now. The dough will be thick.
- Transfer the dough to the prepared pan. Press evenly into the corners for an even thickness.
- Press extra M&Ms and chocolate chips on top for decoration.
- Bake for 22-26 minutes, or until edges are golden brown and the center looks just set. Do not overbake.
- Remove from oven and let cool completely in the pan on a wire rack.
- Once cool, lift the bars out using the parchment overhang and cut into squares or rectangles (about 24 bars).
Notes
For best results, use room temperature butter and eggs. Don’t overbake—the bars should look a little soft in the center when you take them out. Let them cool completely before slicing for clean bars. Customize with your favorite mix-ins, and use gluten-free flour and oats for a gluten-free version. Store in an airtight container for up to 5 days or freeze for up to 2 months.
Nutrition
- Serving Size: 1 bar (1/24 of recipe)
- Calories: 220
- Sugar: 20
- Fat: 10
- Saturated Fat: 4
- Carbohydrates: 30
- Fiber: 1
- Protein: 4
Keywords: monster cookie bars, peanut butter M&M dessert, easy cookie bars, loaded cookie bars, bake sale bars, chewy cookie bars, party dessert, oatmeal cookie bars, chocolate chip bars, M&M bars


