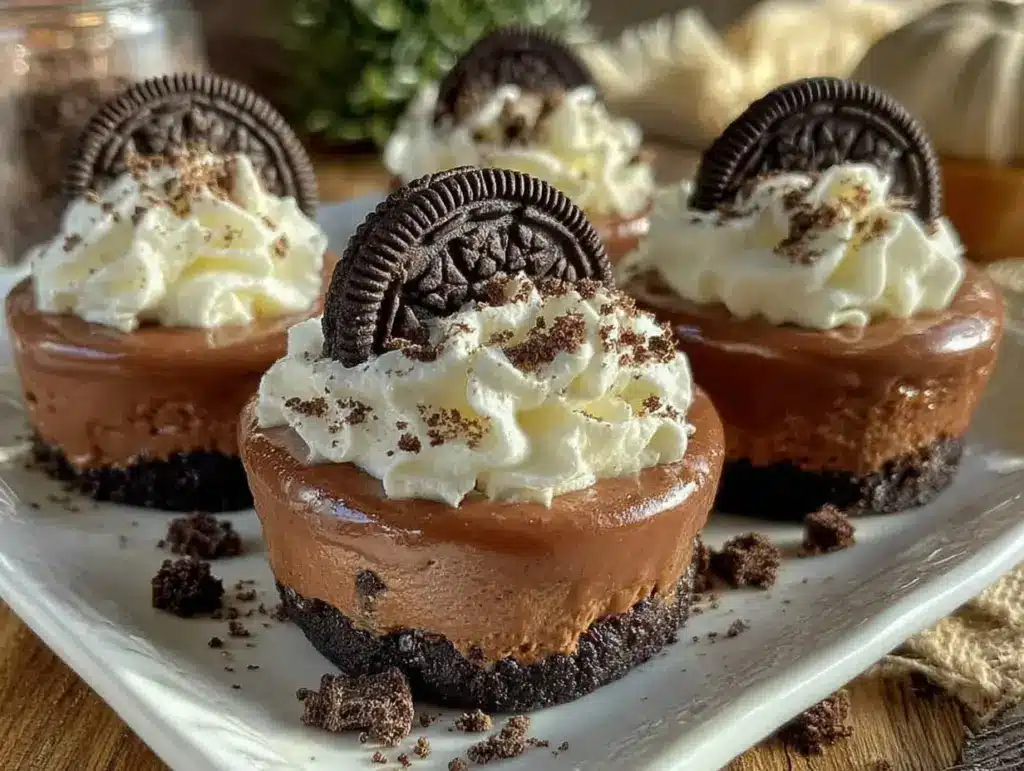
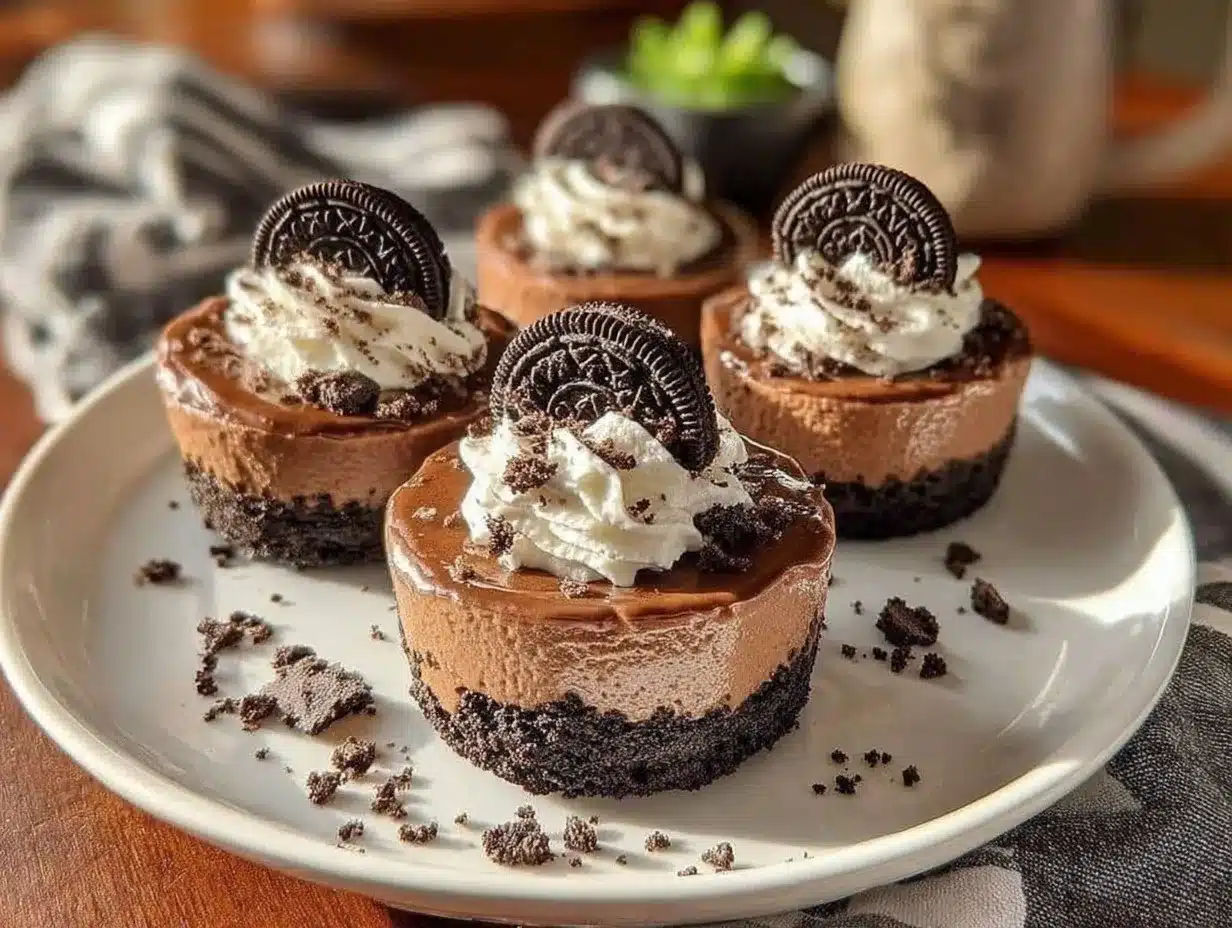
The rich, creamy layers of Oreo chocolate mousse cups are the stuff dessert dreams are made of. Imagine the crunch of Oreo crumbs paired with a velvety smooth chocolate mousse, topped with whipped cream and extra Oreo crumbles. It’s a dessert that feels fancy but is so simple to make! This is a recipe I’ve turned to time and time again, whether it’s for impressing guests or indulging in a late-night chocolate fix. Trust me, these Oreo chocolate mousse cups are about to become your favorite go-to treat for every occasion.
When I first made these, I was hosting a small get-together and wanted to whip up something that felt extravagant but wouldn’t take hours in the kitchen. That’s when the idea for Oreo chocolate mousse cups hit me. You get all the decadence of a layered dessert without the hassle of baking or complicated techniques. And let’s be real – who doesn’t love Oreos?
These are perfect for anyone who loves chocolate, Oreos, or just wants a dessert that looks impressive with minimal effort. Plus, they’re served in individual cups, which makes them ideal for parties or special occasions. Keep reading to learn how to make this easy yet show-stopping dessert!
Why You’ll Love This Recipe
- Quick & Easy: You’ll have these ready to chill in under 30 minutes. No baking required!
- Simple Ingredients: Everything you need can be found at your local grocery store – no specialty items required.
- Perfect for Any Occasion: Whether it’s a birthday party, a dinner date, or just a treat-yourself day, these mousse cups are a hit.
- Crowd-Pleaser: Kids love the Oreo layers while adults appreciate the rich chocolate mousse – everyone wins!
- Absolutely Delicious: The combination of crunchy Oreos, silky mousse, and fluffy whipped cream is pure perfection.
What sets this recipe apart is its simplicity and versatility. You don’t need fancy kitchen gadgets or advanced skills to make these Oreo chocolate mousse cups look and taste incredible. The mousse is light and airy yet indulgent, and the Oreo base gives it just the right amount of crunch. Plus, serving them in individual cups makes them feel extra special. Honestly, they’re the kind of dessert you’ll crave long after they’re gone!
What Ingredients You Will Need
This recipe uses everyday ingredients to create a dessert that feels indulgent and luxurious. Here’s what you’ll need:
- Oreos: About 20 cookies, crushed finely (reserve a few for garnish).
- Unsalted Butter: Melted, to mix with the crushed Oreos for the base.
- Heavy Cream: Cold, for whipping into a fluffy mousse.
- Powdered Sugar: Adds sweetness to the whipped cream and mousse.
- Dark Chocolate Chips: Melted for the rich chocolate mousse layer.
- Vanilla Extract: Just a splash for flavor depth.
- Whipped Cream: For topping (store-bought or homemade).
If you want to mix things up, you can use flavored Oreos, different types of chocolate, or even add a splash of coffee to amplify the chocolate flavor. These ingredients are flexible enough to make substitutions without compromising the overall taste.
Equipment Needed
Here’s the gear you’ll need to whip up these Oreo chocolate mousse cups:
- Food Processor: For crushing the Oreos (or use a rolling pin and zip-top bag).
- Mixing Bowls: One for the mousse and another for the whipped cream.
- Hand Mixer or Stand Mixer: To whip the cream into soft peaks effortlessly.
- Spatula: For folding the mousse and layering the dessert.
- Individual Serving Cups: Small glasses or ramekins work perfectly.
If you don’t have a food processor, don’t worry! Crushing Oreos manually works just as well. For the serving cups, any small container will work – even mason jars make a cute presentation.
Preparation Method
- Prepare the Oreo Base: Crush the Oreos into fine crumbs using a food processor or by placing them in a zip-top bag and smashing with a rolling pin. Mix the crumbs with melted butter until combined. Divide the mixture evenly among your serving cups, pressing it down gently to create a firm base.
- Melt the Chocolate: Place the dark chocolate chips in a microwave-safe bowl and heat in 30-second intervals, stirring between each, until fully melted and smooth. Set aside to cool slightly.
- Make the Chocolate Mousse: In a mixing bowl, whip the heavy cream until soft peaks form. Add powdered sugar and vanilla extract, and continue whipping until stiff peaks form. Fold in the melted chocolate gently until fully incorporated. Be careful not to deflate the mousse.
- Layer the Mousse: Spoon the chocolate mousse over the Oreo base, dividing it evenly among the cups. Smooth the surface with a spatula.
- Add Whipped Cream: Top each cup with a generous dollop of whipped cream. If you’re using store-bought whipped cream, pipe it on for a decorative touch.
- Garnish: Sprinkle crushed Oreos over the whipped cream and add a mini Oreo on top for a playful finish.
- Chill and Serve: Refrigerate the dessert for at least 1-2 hours to allow the mousse to set. Serve chilled and enjoy!
Pro tip: If your mousse seems too thick when folding in the chocolate, add a splash of heavy cream to loosen it up. And don’t forget to taste-test the layers as you go – it’s part of the fun!
Cooking Tips & Techniques
- Use Cold Ingredients: Make sure your heavy cream is chilled for the fluffiest results.
- Don’t Overmix: When folding the melted chocolate into the whipped cream, be gentle to maintain the mousse’s airy texture.
- Layer Neatly: Use a piping bag or small spoon for cleaner layers, especially if presentation matters.
- Chill Properly: Allow enough time for the mousse cups to set in the fridge – patience pays off!
- Experiment with Garnishes: Add chocolate shavings, fresh fruit, or even a drizzle of caramel for a unique twist.
One mistake I made early on was rushing the chilling process. Trust me, the mousse is so much better when it’s properly set. Also, don’t skimp on the garnish – it’s not just for looks; it adds extra flavor and texture!
Variations & Adaptations
- Gluten-Free Version: Use gluten-free chocolate sandwich cookies in place of Oreos.
- Flavor Twists: Try using mint-flavored Oreos and adding a splash of peppermint extract to the mousse for a festive treat.
- Seasonal Adaptations: Add crushed candy canes for a holiday-inspired dessert or fresh berries for a summer vibe.
- Dairy-Free Option: Use coconut cream instead of heavy cream and dairy-free dark chocolate.
- Kid-Friendly Fun: Let kids layer the dessert themselves for a fun and interactive activity!
One of my favorite personal twists is adding a layer of salted caramel between the Oreo base and mousse. The combination of salty and sweet takes these cups to the next level!
Serving & Storage Suggestions
Serve these Oreo chocolate mousse cups cold, straight from the fridge. They’re perfect with a cup of coffee or a glass of milk. For a fancier touch, you can serve them with a drizzle of chocolate sauce or a sprig of mint on top.
To store leftovers, cover the cups tightly with plastic wrap and keep them in the refrigerator for up to 3 days. If you want to make them ahead, prepare the Oreo base and mousse layers, refrigerate, and add the whipped cream and toppings just before serving.
If you’re reheating (although they’re best cold), let them sit at room temperature for 20-30 minutes before serving. The flavors meld beautifully as they rest, making them even better the next day!
Nutritional Information & Benefits
Here’s a rough breakdown of the nutritional info per serving:
- Calories: Approximately 350
- Fat: 20g
- Sugar: 25g
- Protein: 4g
- Carbohydrates: 40g
While these Oreo chocolate mousse cups are definitely indulgent, the portion-controlled servings make it easy to enjoy a sweet treat without going overboard. Plus, the dark chocolate provides antioxidants, and using homemade whipped cream lets you control the sugar content.
Conclusion
If you’re looking for a show-stopping dessert that’s easy to make, these decadent Oreo chocolate mousse cups are your answer. The layers of Oreo crunch, creamy chocolate mousse, and fluffy whipped cream are pure bliss in every bite. Plus, they’re customizable, so you can tweak the flavors to suit any occasion or dietary need.
I personally love how these cups can make any day feel special. Whether it’s a celebration or a simple family dinner, they’re always a hit. I’m excited for you to try this recipe and make it your own!
If you give these Oreo chocolate mousse cups a try, let me know in the comments how they turned out. Don’t forget to share the recipe with friends who love easy desserts – they’ll thank you later!
FAQs
Can I make these Oreo chocolate mousse cups ahead of time?
Absolutely! Prepare the Oreo base and mousse layers, then refrigerate. Add whipped cream and garnishes just before serving.
Can I use milk chocolate instead of dark chocolate?
Yes, but the mousse will be sweeter and less rich. Adjust the sugar to taste if using milk chocolate.
How do I crush the Oreos without a food processor?
Place the cookies in a zip-top bag and use a rolling pin to crush them into fine crumbs. It’s simple and effective!
Can I make this recipe dairy-free?
Yes! Use coconut cream instead of heavy cream and dairy-free chocolate for the mousse.
How long do these mousse cups need to chill?
At least 1-2 hours to allow the mousse to set properly. Overnight chilling works too!
Pin This Recipe!

Decadent Oreo Chocolate Mousse Cups

Rich, creamy layers of Oreo crumbs paired with velvety chocolate mousse, topped with whipped cream and extra Oreo crumbles. A simple yet fancy dessert perfect for any occasion.
- Prep Time: 15 minutes
- Cook Time: 15 minutes
- Total Time: 30 minutes
- Yield: 6 servings 1x
- Category: Dessert
- Cuisine: American
Ingredients
- 20 Oreos, crushed finely (reserve a few for garnish)
- 2 tablespoons unsalted butter, melted
- 1 cup heavy cream, cold
- 2 tablespoons powdered sugar
- 1 cup dark chocolate chips, melted
- 1 teaspoon vanilla extract
- Whipped cream (store-bought or homemade)
Instructions
- Crush the Oreos into fine crumbs using a food processor or by placing them in a zip-top bag and smashing with a rolling pin. Mix the crumbs with melted butter until combined. Divide the mixture evenly among your serving cups, pressing it down gently to create a firm base.
- Place the dark chocolate chips in a microwave-safe bowl and heat in 30-second intervals, stirring between each, until fully melted and smooth. Set aside to cool slightly.
- In a mixing bowl, whip the heavy cream until soft peaks form. Add powdered sugar and vanilla extract, and continue whipping until stiff peaks form. Fold in the melted chocolate gently until fully incorporated.
- Spoon the chocolate mousse over the Oreo base, dividing it evenly among the cups. Smooth the surface with a spatula.
- Top each cup with a generous dollop of whipped cream. If you’re using store-bought whipped cream, pipe it on for a decorative touch.
- Sprinkle crushed Oreos over the whipped cream and add a mini Oreo on top for garnish.
- Refrigerate the dessert for at least 1-2 hours to allow the mousse to set. Serve chilled and enjoy!
Notes
Ensure heavy cream is chilled for best results. Be gentle when folding the melted chocolate into the whipped cream to maintain the mousse’s airy texture. Allow enough time for the mousse cups to chill properly before serving.
Nutrition
- Serving Size: 1 cup
- Calories: 350
- Sugar: 25
- Fat: 20
- Carbohydrates: 40
- Protein: 4
Keywords: Oreo dessert, chocolate mousse, easy dessert, no-bake dessert, party dessert, individual cups


