The smell of roasted peanuts mixed with sweet honey instantly takes me back to childhood afternoons, when snacks were simple but oh-so satisfying. That’s exactly why I fell head over heels for this no-bake peanut butter granola bars recipe. Honestly, it’s like catching that nostalgic vibe and packing it into a quick, wholesome snack you can whip up in under 15 minutes. No oven, no fuss—just pure, chewy goodness.
I first stumbled upon this recipe during a hectic week when I desperately needed something fast, nutritious, and delicious for my kids’ lunchboxes. After tweaking the balance of peanut butter and honey a few times, it became a staple in our kitchen. What’s great is that these no-bake peanut butter granola bars aren’t just for kids; they’re perfect for anyone who needs a grab-and-go snack that doesn’t skimp on flavor or energy.
Whether you’re fueling up for a hike, packing snacks for busy school days, or just craving a sweet but satisfying bite, this recipe fits the bill. Plus, as someone who’s tested it over a dozen times (not that I’m complaining!), I can say it’s reliably delicious and surprisingly flexible. So, let’s get you set up to make your own batch of these no-bake peanut butter granola bars that might just become your new favorite snack hack.
Why You’ll Love This Recipe
After making these no-bake peanut butter granola bars repeatedly, here’s what keeps me coming back—and why I think you’ll adore them, too:
- Quick & Easy: Ready in roughly 10 to 15 minutes, these bars are perfect for when you’re short on time but need a filling snack.
- Simple Ingredients: You won’t need to hunt down anything fancy. Most of the ingredients are pantry basics, which means no extra trips to the store.
- Perfect for Any Occasion: Whether it’s a school lunch, a mid-morning pick-me-up, or a post-workout bite, these bars fit right in.
- Crowd-Pleaser: I swear, friends and family always ask for the recipe after tasting these—kids and adults alike.
- Unbelievably Delicious: The creamy peanut butter pairs with honey’s sweetness and the crunch of oats for a texture and flavor combo that’s just right.
What sets these bars apart? It’s all about the balance—mixing peanut butter that’s just smooth enough with a lightly toasted oat base, plus a dash of vanilla to round things out. I like to gently toast the oats beforehand for a subtle nuttiness that really kicks it up a notch. Plus, skipping the baking means the peanut butter stays luscious and soft, making each bite melt in your mouth.
Honestly, these no-bake peanut butter granola bars feel like a treat you can feel good about. They’re not overly sweet but still hit that comfort food spot—without wrecking your healthy-eating goals. Whether you’re feeding a crowd or just treating yourself, these bars always impress without the stress.
What Ingredients You Will Need
This recipe calls for straightforward, wholesome ingredients that come together quickly to create those chewy, nutty granola bars you’ll want to reach for again and again.
- Rolled oats (2 cups / 180g): Use old-fashioned oats for the best chewy texture. I prefer Bob’s Red Mill brand for consistent quality.
- Peanut butter (1 cup / 250g): Creamy or chunky, your call! Creamy peanut butter makes the bars smooth, while chunky adds a nice crunch. Natural peanut butter with no added sugar is my go-to.
- Honey (1/3 cup / 113g): Acts as a natural sweetener and binder. Organic honey tastes best but any good quality honey will do.
- Vanilla extract (1 teaspoon): Adds warmth and depth to the flavor.
- Chia seeds (2 tablespoons): Optional but great for a nutritional boost and extra texture.
- Mini chocolate chips (1/4 cup / 43g): Optional, but trust me, a little chocolate magic never hurts.
- Salt (a pinch): Balances the sweetness and enhances the peanut butter flavor.
- Flaxseed meal (2 tablespoons): Optional, adds fiber and helps bind the bars slightly.
If you want to switch things up, you can swap peanut butter for almond or cashew butter. For gluten-free needs, make sure to use certified gluten-free oats. I’ve also experimented replacing honey with maple syrup for a vegan-friendly twist—just keep in mind the bars might be a touch softer.
Equipment Needed
- Mixing bowl: A large bowl to combine all your ingredients easily.
- Wooden spoon or spatula: For mixing; I prefer silicone spatulas because they’re flexible and easy to scrape the sides.
- Measuring cups and spoons: Precision helps, especially with sticky ingredients like honey and peanut butter.
- Baking pan or tray (8×8 inch / 20×20 cm): To press the mixture into shape. If you don’t have an 8×8 pan, a similar-sized dish or even a loaf pan works fine.
- Parchment paper: Essential for lining the pan to prevent sticking and ease removal.
- Microwave-safe bowl or small saucepan: For gently warming peanut butter and honey if needed.
Personally, I don’t bother with fancy gadgets here—just these basics. If you want, a food processor can pulse the oats for a finer texture, but I find that a rustic, chunky oat texture is part of the charm. For cleanup, parchment paper is a lifesaver, trust me!
Detailed Preparation Method
- Toast the oats (optional but recommended): Preheat your oven to 350°F (175°C). Spread the oats evenly on a baking sheet and toast for 7-8 minutes, stirring halfway through. You’ll know they’re ready when they smell nutty and turn a light golden color. This step brings out a deeper flavor but you can skip it if you’re pressed for time.
- Warm the peanut butter and honey: In a microwave-safe bowl, combine 1 cup (250g) peanut butter and 1/3 cup (113g) honey. Microwave in 20-second bursts, stirring in between, until the mixture is smooth and pourable—usually about 40-60 seconds total. Alternatively, warm gently in a small saucepan over low heat. This helps everything blend beautifully.
- Mix wet ingredients: Stir in 1 teaspoon vanilla extract and a pinch of salt into the warm peanut butter and honey mixture. Mix until well combined.
- Combine dry ingredients: In your large mixing bowl, add the toasted oats, 2 tablespoons chia seeds, 2 tablespoons flaxseed meal (if using), and 1/4 cup (43g) mini chocolate chips (optional).
- Mix wet and dry together: Pour the peanut butter mixture over the dry ingredients. Using a wooden spoon or spatula, stir thoroughly until every oat is coated and the mixture looks sticky and holds together. If it feels too dry, add a teaspoon of honey or peanut butter at a time.
- Press mixture into pan: Line your 8×8 inch (20×20 cm) pan with parchment paper, leaving some overhang to lift the bars out easily later. Transfer the mixture to the pan and press down firmly with the back of a spoon or your hands (clean hands are best!) to create an even, compact layer.
- Chill and set: Place the pan in the fridge for at least 1 hour, or until the bars are firm to the touch. This chilling step is crucial for the bars to hold together well.
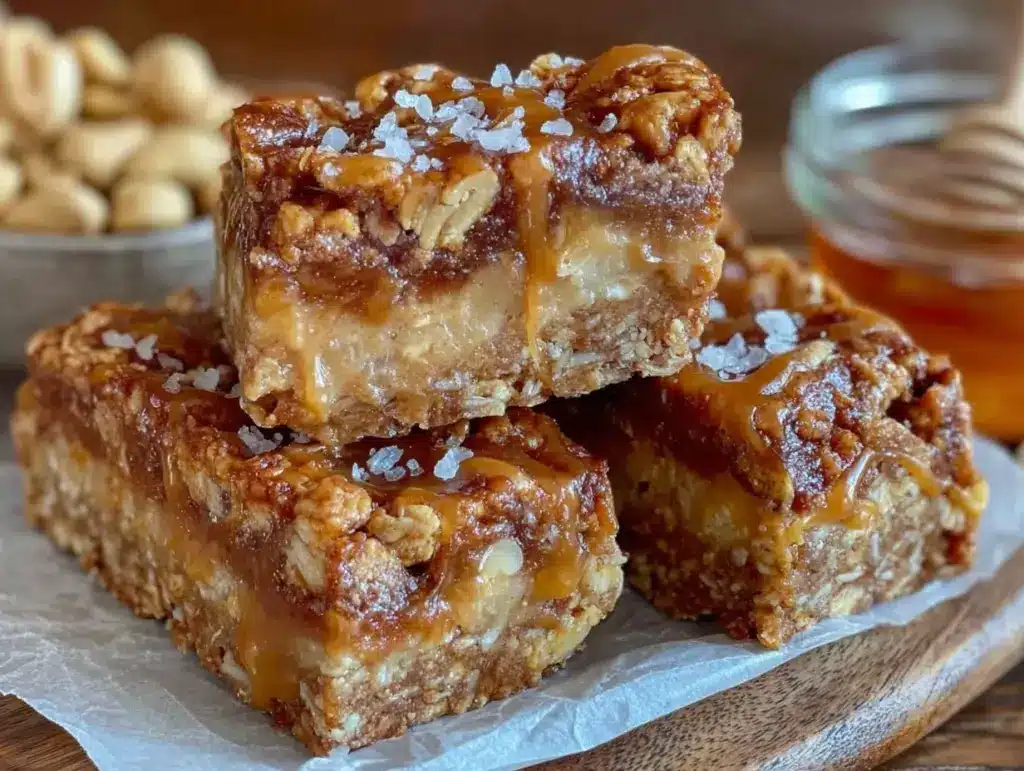
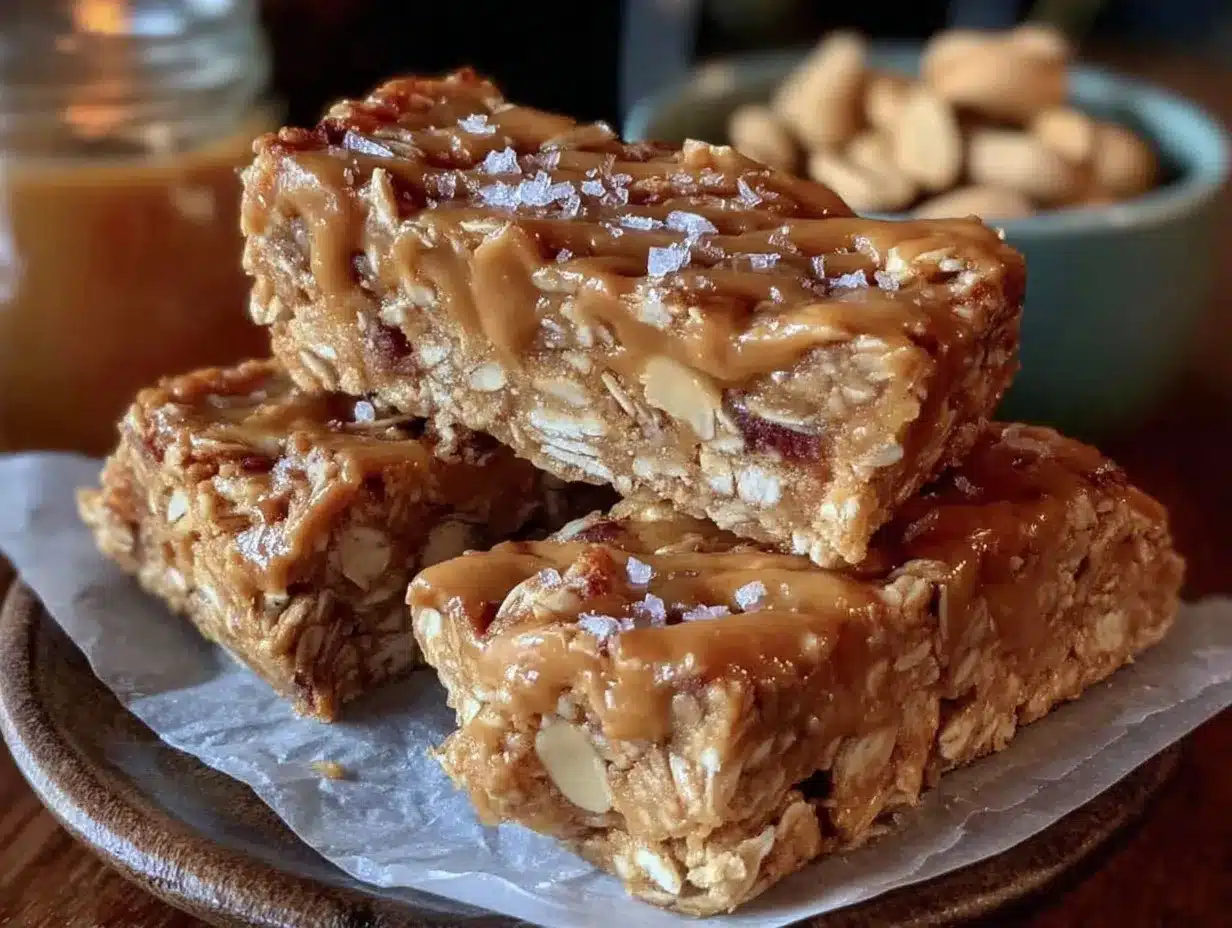
- Cut and serve: Lift the set mixture out using the parchment paper edges. Place on a cutting board and slice into 10-12 bars, depending on your preferred size.
If the bars crumble when cutting, pop them back in the fridge to firm up a bit longer. These bars keep best refrigerated but can be stored at room temperature for a day or so if needed.
Cooking Tips & Techniques
Let me share some nuggets I’ve picked up while making these no-bake peanut butter granola bars:
- Don’t skip toasting the oats if you can. It’s a small step that adds a ton of flavor and a pleasant crunch.
- Warm the peanut butter and honey just enough to stir easily. Too hot, and it might loosen the bars and make them sticky; too cold, and the mixture won’t blend well.
- Press firmly into the pan. The firmer you press, the less crumbly your bars will be. I find using the bottom of a glass or measuring cup works wonders for even pressure.
- Use parchment paper. It’s easier to remove bars cleanly and cuts down on sticky messes.
- Don’t overdo the mix-ins. Too many add-ins like nuts or chocolate chips can make the bars fragile. Keep it balanced.
- Store in an airtight container in the fridge to keep bars fresh and firm. They soften a bit at room temperature but still taste great.
Also, I learned the hard way that rushing the chilling stage leads to crumbly bars. Patience here pays off big time.
Variations & Adaptations
These no-bake peanut butter granola bars are a fantastic base to tweak to your tastes or dietary needs:
- Nut-free version: Swap peanut butter for sunflower seed butter or tahini to avoid nuts entirely.
- Vegan adaptation: Use maple syrup or agave nectar instead of honey for a plant-based sweetener.
- Flavor twists: Add cinnamon, pumpkin pie spice, or a splash of almond extract for a seasonal flair.
- Add dried fruit: Toss in chopped dried cranberries, raisins, or chopped apricots for extra chewiness.
- Protein boost: Mix in a scoop of your favorite protein powder (vanilla or unflavored) to make these bars gym-friendly.
One personal favorite variation is adding shredded coconut and swapping chocolate chips for chopped dark chocolate. It makes for a tropical vibe that’s just as irresistible. Also, if you want a crunchy variation, try adding a handful of chopped nuts right before pressing the mixture into the pan.
Serving & Storage Suggestions
These no-bake peanut butter granola bars are best served chilled or at room temperature. I usually grab one straight from the fridge for a quick energy boost that’s perfectly chewy and not too sticky on the fingers.
They pair beautifully with a glass of cold milk, a cup of coffee, or even a fresh fruit smoothie for a balanced snack. For a fun twist, break the bars into chunks and use them as topping for yogurt or ice cream.
Storage-wise, keep the bars in an airtight container in the refrigerator where they’ll stay fresh for up to a week. You can also freeze them for longer storage—just wrap bars individually in parchment paper and place in a freezer-safe bag or box. When ready to enjoy, thaw at room temperature for 10-15 minutes.
Over time, the flavors meld together, making the bars taste even better after a day or two in the fridge. So, if you can resist snacking right away, they’re a little gem waiting to be enjoyed later.
Nutritional Information & Benefits
Each bar (assuming 10 bars per recipe) roughly contains:
| Calories | Protein | Fat | Carbohydrates | Fiber |
|---|---|---|---|---|
| ~180 kcal | 5 g | 9 g | 20 g | 3 g |
Thanks to peanut butter and oats, these bars provide a solid dose of plant-based protein and fiber to keep you full. The chia seeds and flaxseed meal add omega-3 fatty acids and antioxidants, supporting heart health. And since there’s no refined sugar, just natural honey, the sweetness is controlled and balanced.
If you have nut allergies, just remember to swap ingredients as mentioned in variations. These bars are naturally gluten-free if you use certified oats, making them friendly for many dietary needs.
From a wellness perspective, these bars give you lasting energy without the crash, which is why they’ve become my go-to mid-afternoon snack during busy days.
Conclusion
If you’re looking for a snack that’s quick, tasty, and easy to make, these no-bake peanut butter granola bars hit all the right notes. They’re a no-fuss way to satisfy hunger and cravings with wholesome ingredients you can feel good about. What I love most is how flexible this recipe is—you can customize it endlessly to suit your taste and dietary needs.
Give it a try, tweak it your way, and let me know how you like to mix things up! I’d love to hear your tips, variations, or even your snack stories. Don’t forget to share this recipe with friends who need a snack upgrade, and happy no-baking!
FAQs
Can I use crunchy peanut butter instead of creamy?
Absolutely! Crunchy peanut butter adds a nice texture contrast to the bars, making them even more interesting to bite into.
How long do these bars last?
Stored in an airtight container in the fridge, they last about one week. You can freeze them for up to three months for longer storage.
Can I substitute honey with another sweetener?
Yes, maple syrup or agave nectar work well, especially for a vegan option. Just note the bars may be a bit softer.
Will these bars hold together without chilling?
Chilling is key for firm bars. Without refrigeration, they’ll be too soft and crumbly to hold their shape well.
Can I add other mix-ins like nuts or dried fruit?
Definitely! Just keep the quantities balanced so the bars don’t become too fragile. I recommend adding about 1/2 cup total of mix-ins.
Pin This Recipe!
No-Bake Peanut Butter Granola Bars
Quick and easy no-bake granola bars combining creamy peanut butter, honey, and toasted oats for a chewy, wholesome snack perfect for any occasion.
- Prep Time: 10 minutes
- Cook Time: 8 minutes (toasting oats, optional)
- Total Time: 1 hour 18 minutes
- Yield: 10-12 bars 1x
- Category: Snack
- Cuisine: American
Ingredients
- 2 cups (180g) rolled oats (old-fashioned)
- 1 cup (250g) peanut butter (creamy or chunky)
- 1/3 cup (113g) honey
- 1 teaspoon vanilla extract
- 2 tablespoons chia seeds (optional)
- 1/4 cup (43g) mini chocolate chips (optional)
- Pinch of salt
- 2 tablespoons flaxseed meal (optional)
Instructions
- Toast the oats (optional): Preheat oven to 350°F (175°C). Spread oats on a baking sheet and toast for 7-8 minutes, stirring halfway through until light golden and nutty.
- Warm the peanut butter and honey: Combine peanut butter and honey in a microwave-safe bowl. Microwave in 20-second bursts, stirring until smooth and pourable (about 40-60 seconds). Alternatively, warm gently in a small saucepan over low heat.
- Mix wet ingredients: Stir in vanilla extract and a pinch of salt into the warm peanut butter and honey mixture until well combined.
- Combine dry ingredients: In a large mixing bowl, add toasted oats, chia seeds, flaxseed meal, and mini chocolate chips if using.
- Mix wet and dry together: Pour peanut butter mixture over dry ingredients and stir thoroughly until every oat is coated and mixture is sticky. Add more honey or peanut butter by teaspoon if too dry.
- Press mixture into pan: Line an 8×8 inch (20×20 cm) pan with parchment paper. Transfer mixture and press firmly into an even, compact layer.
- Chill and set: Refrigerate for at least 1 hour until bars are firm to the touch.
- Cut and serve: Lift bars out using parchment paper edges and slice into 10-12 bars.
Notes
[‘Toasting oats adds a deeper flavor and pleasant crunch but can be skipped if short on time.’, ‘Warm peanut butter and honey just enough to blend smoothly; too hot can loosen bars.’, ‘Press mixture firmly into pan to avoid crumbly bars; using the bottom of a glass or measuring cup helps.’, ‘Use parchment paper for easy removal and less mess.’, ‘Store bars in an airtight container in the fridge for up to one week or freeze for up to three months.’, ‘Add-ins like nuts or dried fruit should be balanced to avoid fragile bars.’, ‘Chilling is essential for bars to hold shape well.’]
Nutrition
- Serving Size: 1 bar (assuming 10 b
- Calories: 180
- Fat: 9
- Carbohydrates: 20
- Fiber: 3
- Protein: 5
Keywords: no-bake, peanut butter, granola bars, quick snack, healthy snack, homemade, easy recipe, kid-friendly, gluten-free


