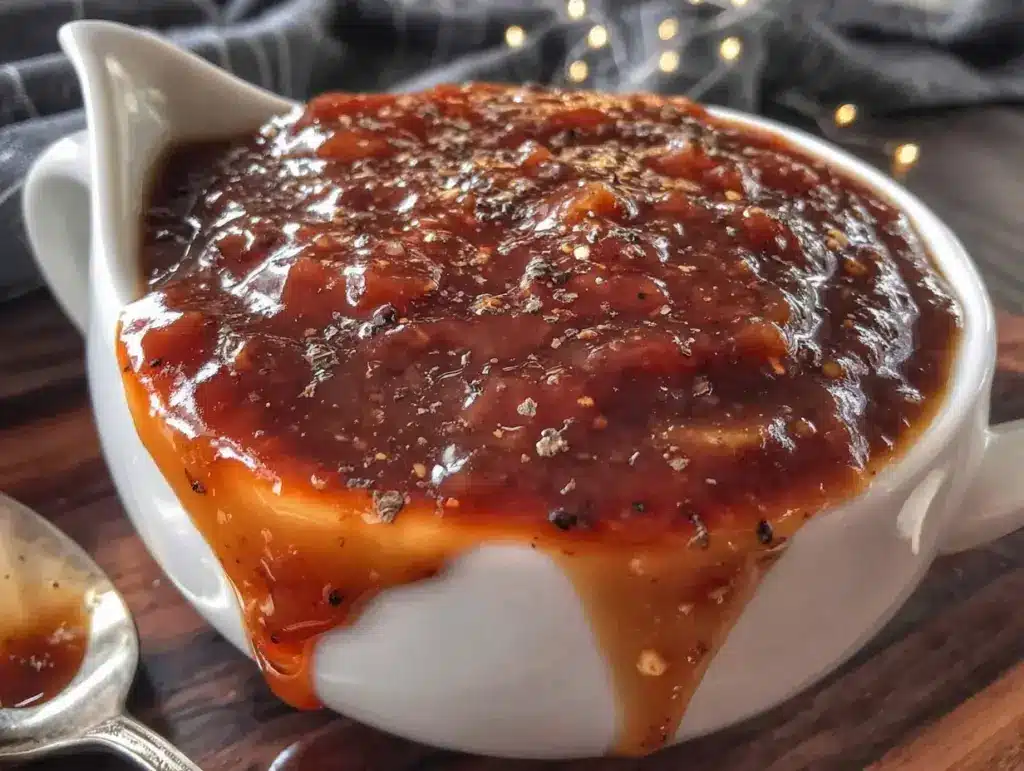
The smell of roasted garlic mingling with rich, savory drippings — honestly, few things in the kitchen can match that aroma. I first stumbled upon this irresistible roasted garlic gravy recipe from drippings when I was craving something that felt both comforting and a little fancy, without hours of fuss. It’s the kind of gravy that turns a simple roast dinner into a memorable feast, you know? After making it over a dozen times, I can say with confidence it’s become my go-to sauce for everything from Sunday roasts to holiday spreads.
What really hooked me about this roasted garlic gravy is how it uses those natural pan drippings — the magic leftover from roasting meat — and transforms them into a luscious, flavorful sauce. Plus, the roasted garlic adds a mellow sweetness and depth that bottles of gravy just can’t compete with. If you love gravies that taste homemade and rich, but hate complicated recipes, this one’s definitely for you. It’s perfect for busy home cooks, food lovers who appreciate simple techniques, and anyone who wants to savor a classic dish with a little twist.
After multiple tests, tweaks, and happy dinner table moments, I’m excited to share this easy homemade roasted garlic gravy recipe made right from drippings. Let’s get your kitchen smelling incredible!
Why You’ll Love This Recipe
- Quick & Easy: This roasted garlic gravy comes together in under 20 minutes, making it perfect for last-minute meals or holiday dinners.
- Simple Ingredients: You won’t need anything fancy—just the drippings from your roast, garlic, some pantry staples, and you’re set.
- Perfect for Any Occasion: Whether it’s a cozy family dinner, a festive gathering, or just a comforting meal, this gravy adds that extra wow factor.
- Crowd-Pleaser: Everyone from picky kids to seasoned foodies loves the deep, garlicky richness it brings to the table.
- Unbelievably Delicious: The roasted garlic mellows out the sharpness you might expect, giving the gravy a smooth, almost buttery flavor that’s downright addictive.
This isn’t just another gravy recipe. The secret is roasting the garlic alongside your meat so it caramelizes gently in those drippings. That step alone makes all the difference — the flavor is balanced, not overpowering, and it blends seamlessly with the natural juices. Plus, instead of a plain flour roux, I like to whisk in a little butter first, then slowly add broth to get that perfect velvety texture. It’s comfort food with a homemade heart, every time.
What Ingredients You Will Need
This recipe uses simple, wholesome ingredients to deliver bold flavor and satisfying texture without the fuss. Most are pantry staples, and you might already have them on hand.
- Pan drippings: The golden-browned fat and juices left from roasting your meat (turkey, chicken, beef, or pork all work well).
- Roasted garlic cloves: Roasted alongside your meat or separately until soft and caramelized, adding mellow sweetness.
- Unsalted butter (2 tbsp): Adds richness and helps create the roux base for the gravy.
- All-purpose flour (2 tbsp): For thickening the gravy; use gluten-free flour if needed.
- Chicken or beef broth (2 cups / 480 ml): Adds depth; low sodium options like Swanson are great for controlling salt.
- Salt and freshly ground black pepper: To taste, enhance the natural flavors.
- Fresh thyme or rosemary (optional): Adds a fragrant herbal note, especially great if you roasted those herbs with your meat.
- Optional splash of heavy cream (2 tbsp): For a silkier finish, if you like your gravy a bit creamier.
Pro tip: For the best texture, I recommend using firm, golden drippings without burnt bits. If your drippings are too thick, add a little extra broth. And if you don’t have roasted garlic ready, roasting a whole head in foil at 400°F (205°C) for 35-40 minutes until soft works wonders.
Equipment Needed
- Roasting pan or skillet: To catch the drippings from your roast. A sturdy pan with a bit of depth works best.
- Saucepan or small skillet: For making the gravy itself, especially if you prefer to separate the drippings from the pan to avoid burnt bits.
- Whisk: Essential for blending the roux and gradually adding broth without lumps.
- Spoon or spatula: For stirring and scraping the pan.
- Measuring cups and spoons: To get your flour, broth, and butter just right.
If you don’t have a whisk, no worries—a fork or wooden spoon can work, but whisking helps keep the gravy smooth. Also, a fine mesh strainer is handy if you want a perfectly silky gravy without any solids, though I usually skip that step for more rustic texture.
Detailed Preparation Method
- Collect your drippings: After roasting your meat, carefully pour the drippings into a heatproof container. Let it sit a few minutes so the fat separates and rises to the top. Skim off 2 tablespoons of fat to use for the roux, reserving the rest for flavor.
- Roast your garlic: If you haven’t roasted garlic with your meat, preheat your oven to 400°F (205°C). Cut the top off a head of garlic, drizzle with a little olive oil, wrap in foil, and roast for 35-40 minutes until soft and golden. Squeeze out the cloves and mash them gently.
- Make the roux: In your saucepan over medium heat, melt the reserved fat with 2 tablespoons of unsalted butter. Once melted and frothy, whisk in 2 tablespoons of all-purpose flour. Stir constantly for about 2-3 minutes, until the mixture turns a light golden color—this cooks out the raw flour taste.
- Add the broth and roasted garlic: Slowly whisk in 2 cups (480 ml) of chicken or beef broth, adding it in a steady stream to avoid lumps. Stir in the mashed roasted garlic and any herbs you like. Bring the mixture to a gentle simmer.
- Simmer and thicken: Let the gravy simmer for 5-7 minutes, stirring occasionally, until it thickens to your desired consistency. If it gets too thick, add a splash more broth. Taste and season with salt and freshly ground black pepper accordingly.
- Optional finishing touch: For a richer gravy, stir in 2 tablespoons of heavy cream at the end and warm through (don’t boil after adding cream).
- Serve: Pour the gravy over your roast, mashed potatoes, or favorite sides. Enjoy immediately for best flavor and texture!
Quick tips: Keep your heat moderate to prevent burning the roux. If lumps form, whisk vigorously or strain. Don’t rush the simmer; those few extra minutes deepen the flavor and smooth out the texture. Trust me, the roasted garlic is worth every second of waiting!
Cooking Tips & Techniques
Making gravy from drippings can be a little intimidating, but here are some tips I’ve learned along the way that make it foolproof:
- Skim the fat carefully: Too much fat makes gravy greasy, but you need just enough to make a smooth roux. I usually aim for about 2 tablespoons of fat, plus a little butter for richness.
- Cook your roux gently: Stir constantly and keep the heat at medium to avoid burning the flour. A burnt roux makes the gravy bitter.
- Add broth slowly: Don’t dump it all at once. Adding it gradually while whisking keeps lumps from forming.
- Use a whisk, not a spoon: Whisks really help blend the roux and liquid smoothly.
- Don’t forget to taste: Every batch of drippings is different. Salt and pepper your gravy toward the end and adjust as needed.
- Roasted garlic is magic: Don’t skip roasting the garlic. It softens the bite and adds a mellow, sweet undertone that rounds out the gravy beautifully.
- Multitasking tip: While your roast is resting, start the gravy. It’s a perfect time to get the sauce ready while meat juices settle.
My first few attempts were a bit lumpy or thin, but once I paid attention to the roux color and gradually added broth, things smoothed out. Honestly, it’s a simple technique with a big payoff.
Variations & Adaptations
This roasted garlic gravy is wonderfully versatile and easy to tweak based on your pantry, diet, or flavor cravings.
- Gluten-Free Version: Swap all-purpose flour with a gluten-free flour blend or cornstarch slurry to thicken the gravy.
- Dairy-Free Option: Use olive oil or dairy-free margarine instead of butter, and substitute broth for cream.
- Herb Infusions: Add fresh sage, thyme, or rosemary while simmering the gravy for extra aroma. You can remove the herbs before serving or leave them in for rustic charm.
- Vegetarian Adaptation: Skip the meat drippings and roast garlic with olive oil, then use vegetable broth instead of meat broth for a savory, garlicky gravy.
- Spicy Kick: Stir in a pinch of smoked paprika or cayenne for a subtle heat twist.
One variation I love is mixing in a splash of dry white wine just after the roux forms—adds a gentle tang that pairs beautifully with chicken or turkey gravy. Feel free to experiment; this recipe welcomes creativity!
Serving & Storage Suggestions
Serve this roasted garlic gravy hot, right from the stovetop, over your favorite roast, mashed potatoes, stuffing, or even roasted vegetables. It’s especially fantastic drizzled over turkey on Thanksgiving or Sunday roast dinners.
If you have leftovers, store the gravy in an airtight container in the refrigerator for up to 3 days. To reheat, warm gently over low heat, whisking occasionally. If it thickens too much in the fridge, stir in a splash of broth or water to loosen it back up.
Freezing is possible too—just portion into freezer-safe containers and thaw overnight in the fridge before reheating. Flavors actually deepen after resting, so sometimes leftover gravy tastes even better the next day!
For presentation, sprinkle a little fresh chopped parsley or thyme on top. It adds a pop of color and freshness to the rich, velvety gravy.
Nutritional Information & Benefits
While exact nutritional values will vary based on your ingredients and portion sizes, this roasted garlic gravy is generally moderate in calories and fat, especially if you skim excess fat from drippings. Garlic brings antioxidants and potential immune-boosting properties, and using homemade broth means you’re avoiding preservatives often found in store-bought gravies.
This gravy fits well into a balanced diet, especially when paired with lean meats and veggies. You can easily adjust the recipe to be gluten-free or dairy-free depending on your needs. Just be mindful of the sodium content in your broth and add salt sparingly.
From a wellness perspective, making gravy from scratch means you control every ingredient, keeping it clean and wholesome while still indulging in a rich, comforting sauce.
Conclusion
If you’re looking for an easy way to turn your roast drippings into something truly special, this irresistible roasted garlic gravy recipe is the answer. It’s simple, flavorful, and brings that homemade touch that store-bought gravies just can’t match. Plus, the roasted garlic adds a subtle sweetness and depth that will have everyone asking for seconds.
Feel free to tweak the herbs, thickness, or seasoning to suit your taste—it’s a flexible recipe that welcomes your personal flair. I love this gravy because it’s dependable, quick, and makes every meal feel like a celebration.
Give it a try, then come back and share your thoughts or any unique spins you’ve made. Happy cooking and gravy loving!
FAQs
Can I make roasted garlic gravy without pan drippings?
Yes! Simply roast garlic with olive oil and use broth as the base to make a flavorful vegetarian-friendly gravy without drippings.
How do I prevent lumps in my gravy?
Whisk constantly when adding broth to the roux and add the liquid slowly in a steady stream. Using a whisk instead of a spoon helps keep it smooth.
Can I prepare this gravy ahead of time?
You can make it a day in advance and store in the fridge. Reheat gently with a splash of broth to loosen it before serving.
What if my gravy is too thick or too thin?
If too thick, stir in more broth or water to thin. If too thin, continue simmering until it reduces and thickens.
Is roasted garlic necessary for this gravy?
It’s definitely a game-changer. Roasting garlic mellows the flavor and adds a subtle sweetness that plain garlic can’t match, but you can use sautéed garlic if you’re in a pinch.
PrintIrresistible Roasted Garlic Gravy Recipe Easy Homemade from Drippings

A quick and easy roasted garlic gravy made from pan drippings, perfect for enhancing roast dinners with rich, savory flavor and a mellow garlic sweetness.
- Prep Time: 10 minutes
- Cook Time: 15 minutes
- Total Time: 25 minutes
- Yield: 6 servings 1x
- Category: Sauce
- Cuisine: American
Ingredients
- Pan drippings from roasted meat (turkey, chicken, beef, or pork)
- Roasted garlic cloves, mashed
- 2 tablespoons unsalted butter
- 2 tablespoons all-purpose flour (or gluten-free flour blend)
- 2 cups (16 fl oz) chicken or beef broth (low sodium preferred)
- Salt, to taste
- Freshly ground black pepper, to taste
- Fresh thyme or rosemary (optional)
- 2 tablespoons heavy cream (optional)
Instructions
- Collect your drippings: After roasting your meat, pour the drippings into a heatproof container. Let sit a few minutes to separate fat. Skim off 2 tablespoons of fat for the roux, reserving the rest for flavor.
- Roast your garlic: If not roasted with meat, preheat oven to 400°F. Cut top off a head of garlic, drizzle with olive oil, wrap in foil, and roast 35-40 minutes until soft. Squeeze out cloves and mash gently.
- Make the roux: In a saucepan over medium heat, melt reserved fat with 2 tablespoons butter. Whisk in 2 tablespoons flour and stir constantly for 2-3 minutes until light golden.
- Add broth and roasted garlic: Slowly whisk in 2 cups broth, stirring to avoid lumps. Stir in mashed garlic and herbs if using. Bring to a gentle simmer.
- Simmer and thicken: Let simmer 5-7 minutes, stirring occasionally until thickened. Add more broth if too thick. Season with salt and pepper to taste.
- Optional finishing touch: Stir in 2 tablespoons heavy cream and warm through without boiling.
- Serve immediately over roast, mashed potatoes, or favorite sides.
Notes
Use firm, golden drippings without burnt bits for best texture. Add broth gradually to avoid lumps. Roasting garlic adds mellow sweetness and depth. For gluten-free, substitute flour with gluten-free blend or cornstarch slurry. For dairy-free, use olive oil or dairy-free margarine instead of butter and omit cream.
Nutrition
- Serving Size: Approximately 1/4 cu
- Calories: 70
- Sugar: 0.5
- Sodium: 300
- Fat: 5
- Saturated Fat: 3
- Carbohydrates: 4
- Protein: 1
Keywords: roasted garlic gravy, homemade gravy, pan drippings gravy, easy gravy recipe, garlic sauce, roast dinner sauce


