The smell of warm apples mingled with buttery pastry and a drizzle of salted caramel takes me right back to cozy autumn afternoons. Honestly, there’s something magical about this salted caramel apple tart recipe that makes it a total crowd favorite in my kitchen. I first whipped this up during a chilly weekend when I was craving something sweet but a little fancy—yet still easy enough to whip together without stressing. Since then, it’s become my go-to dessert, especially when I want to impress guests without spending hours baking.
This tart isn’t just about looking pretty (though it does!)—it’s the perfect marriage of tart apples, flaky crust, and that luscious salted caramel that keeps you coming back for more. If you love desserts that feel like a warm hug but aren’t overloaded with sugar, this recipe is definitely your jam. It’s ideal for busy families, casual dinner parties, or even a comforting treat after a long day.
Over the years, I’ve tested this salted caramel apple tart recipe multiple times, tweaking the caramel’s saltiness and the apple slices’ thickness until it hit just the right balance. The flaky crust is something I perfected through trial and error, because, let’s face it—there’s nothing worse than a soggy bottom! I can honestly say this tart delivers on flavor, texture, and that comforting feeling you want from a homemade dessert.
Why You’ll Love This Recipe
After baking this salted caramel apple tart so many times, I can say with certainty why it stands out in the sea of apple desserts:
- Quick & Easy: Comes together in about 45 minutes, so it’s perfect for last-minute dessert cravings or weekend gatherings.
- Simple Ingredients: No need for specialty items—just apples, basic pantry staples, and a little love.
- Perfect for Every Occasion: Whether it’s a cozy fall brunch, holiday dinner, or casual weekend treat, this tart fits right in.
- Crowd-Pleaser: Both kids and adults rave about the combination of tart apples and rich salted caramel.
- Unbelievably Delicious: The flaky crust paired with the silky caramel and fresh apples creates a texture and flavor combo that’s pure comfort food.
What really makes this recipe different? Well, it’s the way the salted caramel isn’t just an afterthought—it’s made from scratch and perfectly balances sweet and salty. Plus, I take care to slice the apples just right so they hold their shape but stay tender after baking. Honestly, this tart is the kind of dessert that makes you close your eyes after the first bite and sigh with satisfaction. It’s comfort food, sure, but with a bit of flair that feels special without being complicated.
What Ingredients You Will Need
This salted caramel apple tart recipe uses simple, wholesome ingredients to deliver bold flavor and satisfying texture without the fuss. Most of these are pantry staples, and you probably have many hanging out in your kitchen right now.
- For the Tart Crust:
- 1 ¼ cups (160g) all-purpose flour – I like to use King Arthur for consistent results
- ½ teaspoon fine sea salt
- ½ cup (115g) unsalted butter, cold and cubed – using cold butter helps create that flaky texture
- 3 to 4 tablespoons ice-cold water
- For the Filling:
- 4 large apples (about 2 pounds/900g) – I recommend Granny Smith or Honeycrisp for that perfect balance of tartness and sweetness
- 2 tablespoons granulated sugar
- 1 teaspoon ground cinnamon
- 1 tablespoon lemon juice (to prevent browning and add brightness)
- For the Salted Caramel Sauce:
- ¾ cup (150g) granulated sugar
- 3 tablespoons (45g) unsalted butter, cut into pieces
- ½ cup (120ml) heavy cream, warmed slightly
- 1 teaspoon flaky sea salt – Maldon salt works beautifully for that finishing touch
Feel free to swap the all-purpose flour for almond flour if you want a gluten-free crust, though the texture will be a bit different. If you prefer a vegan version, you can use coconut oil instead of butter and a dairy-free cream for the caramel. Just keep in mind that the flavor and texture will shift slightly.
Equipment Needed
- 9-inch (23 cm) tart pan with removable bottom – makes transferring the tart easier and gives nice edges
- Mixing bowls – one large for dough, one medium for apple filling
- Rolling pin – a basic one works fine, but a non-stick or silicone rolling pin can help with the dough
- Sharp knife or mandoline – for evenly slicing the apples; I’ve found a mandoline speeds things along and gives consistent slices
- Heavy-bottomed saucepan – for making the salted caramel sauce without burning
- Wooden spoon or heatproof spatula – for stirring the caramel
- Pastry brush (optional) – helps to brush the crust with egg wash or melted butter for a golden finish
If you don’t have a tart pan, a regular pie dish works, though the presentation will differ slightly. For rolling out dough on a budget, parchment paper can act as a handy non-stick surface. I’ve learned to keep my rolling pin and knives sharp – it really makes the prep smoother and safer.
Detailed Preparation Method
- Make the Tart Crust: In a large bowl, whisk together the flour and salt. Add the cold, cubed butter. Using a pastry cutter or your fingertips, cut the butter into the flour until the mixture looks like coarse crumbs with pea-sized bits of butter. (This usually takes about 5 minutes.)
- Add Ice Water: Sprinkle 3 tablespoons of ice-cold water over the mixture and gently mix with a fork. Add more water, a teaspoon at a time, until the dough just comes together when pressed. Don’t overwork it! The dough should be slightly crumbly but hold when pinched.
- Chill the Dough: Shape the dough into a flat disc, wrap in plastic wrap, and refrigerate for at least 30 minutes. This step helps relax the gluten and keeps the butter cold for flakiness.
- Prepare the Apples: While the dough chills, peel, core, and thinly slice the apples (about ⅛-inch or 3mm thick). Toss them in a bowl with sugar, cinnamon, and lemon juice. This coating helps balance the tartness and prevents browning.
- Roll Out the Dough: On a lightly floured surface, roll the chilled dough into a 12-inch (30 cm) circle, about ⅛-inch (3mm) thick. Carefully transfer it to your tart pan, pressing it into the edges. Trim any excess dough. If you like, prick the bottom lightly with a fork to prevent bubbles.
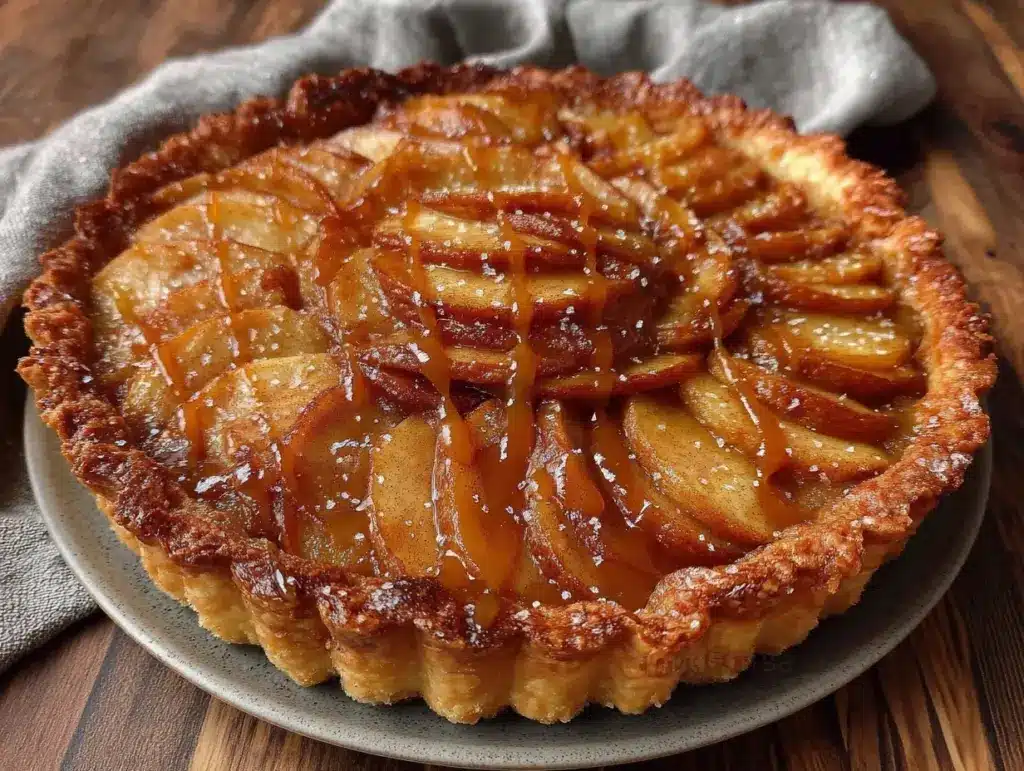
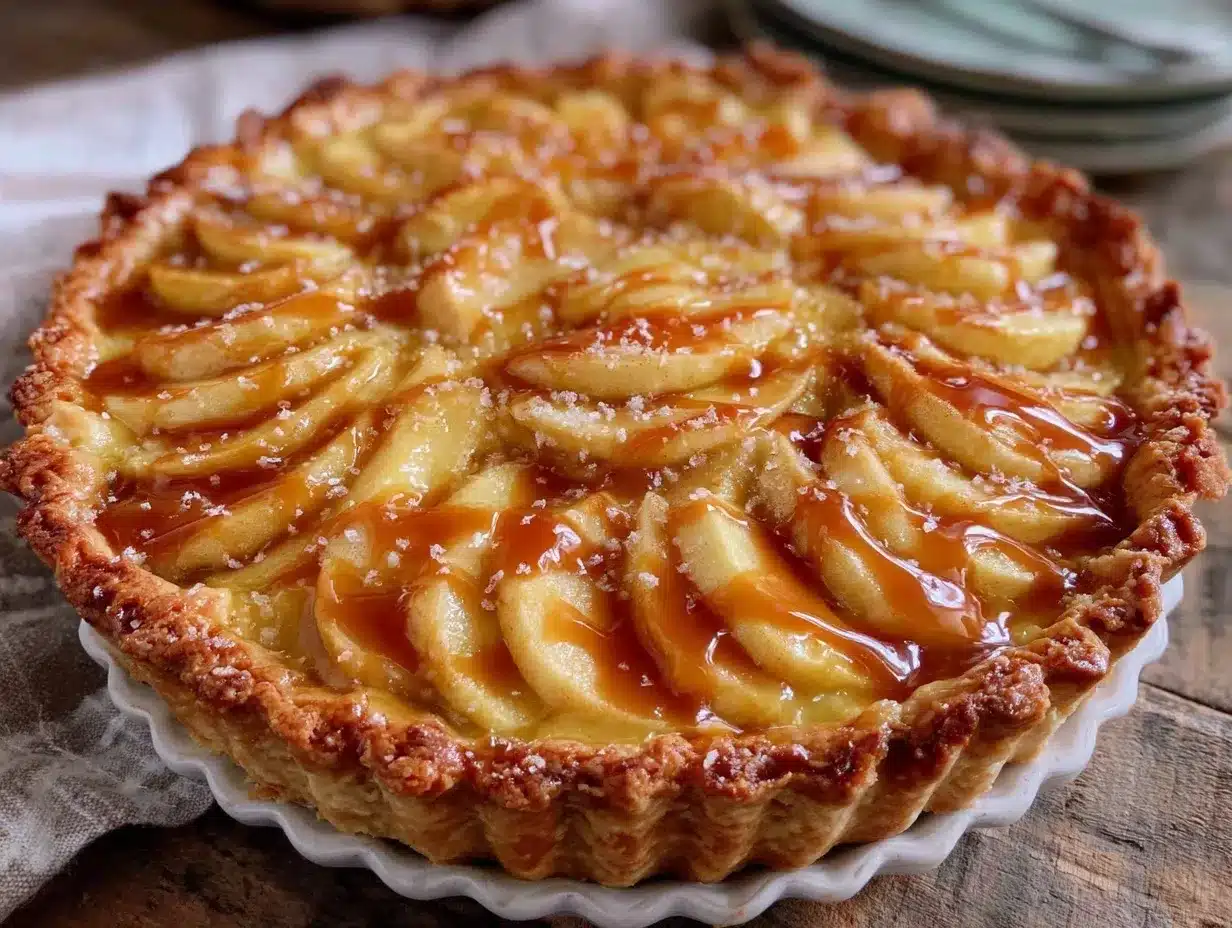
- Arrange the Apples: Starting from the outer edge, layer the apple slices in concentric circles, overlapping slightly, until the whole tart is covered. You’ll want a pretty tight spiral for that classic look.
- Bake the Tart: Preheat your oven to 375°F (190°C). Place the tart on a baking sheet (to catch any drips) and bake for 35-40 minutes, or until the crust is golden and the apples are tender but still hold their shape.
- Make the Salted Caramel Sauce: While the tart bakes, add the sugar to a heavy-bottomed saucepan over medium heat. Let it melt without stirring, swirling the pan occasionally until it turns a deep amber color (about 5-7 minutes). Remove from heat and quickly stir in the butter—be careful, it bubbles up! Slowly whisk in the warm cream until smooth. Stir in flaky sea salt and set aside to cool slightly.
- Drizzle and Serve: Once the tart is out of the oven and slightly cooled (about 10 minutes), drizzle the salted caramel over the apples. Serve warm or at room temperature. Honestly, it’s hard to resist right away!
Cooking Tips & Techniques
Making a perfect salted caramel apple tart involves a few tricks I’ve picked up through some trial and error. First, keep your butter cold when making the crust—that’s key to flaky layers. Also, don’t overwork the dough; a light touch keeps it tender.
When slicing apples, aim for uniform thickness to help them cook evenly. If the slices vary too much, some parts can turn mushy while others stay crunchy. Using a mandoline makes this easier, but a sharp knife works fine too.
For the caramel, patience is everything. Don’t stir the sugar as it melts—it can cause clumping. Instead, swirl the pan gently for even melting. And when adding butter and cream, remove from heat to avoid burning and be ready for bubbling action.
Another little tip: bake the tart on a baking sheet to catch drips and protect your oven. If the crust edges start to brown too fast, loosely cover them with foil halfway through baking.
Finally, let the tart cool a bit before drizzling caramel. If it’s too hot, the sauce can run off too quickly. But don’t wait too long—warm tart plus warm caramel is just heavenly!
Variations & Adaptations
This salted caramel apple tart is easy to tweak based on what you have or prefer:
- Dietary: Swap regular flour for almond or oat flour for gluten-free options. Use coconut oil and coconut cream for a dairy-free version. Maple syrup can replace sugar in the caramel for a different sweetness profile.
- Seasonal: In summer, try swapping apples for fresh peaches or plums, paired with the salted caramel for a delightful twist.
- Flavor: Add a teaspoon of vanilla extract to the caramel sauce or sprinkle chopped toasted pecans on top for crunch.
- Cooking Method: You can prepare the tart crust and filling in advance and bake fresh when ready. Alternatively, make mini tarts using muffin tins for individual servings.
Personally, I once added a handful of dried cranberries between the apple layers for a tart contrast that was surprisingly delicious. Experimenting with spices like nutmeg or ginger in the filling also adds warmth and depth if you’re feeling adventurous.
Serving & Storage Suggestions
This tart is best served warm or at room temperature—though I won’t judge if you sneak a cold slice! For presentation, a dollop of whipped cream or vanilla ice cream on the side pairs beautifully. I like to add a sprinkle of flaky sea salt on top just before serving to amplify the caramel’s flavor.
Leftovers can be stored covered in the refrigerator for up to 3 days. To reheat, gently warm slices in a 350°F (175°C) oven for 8-10 minutes or microwave briefly (about 20 seconds) to bring back that fresh-baked feeling.
Flavors actually meld and deepen after a day or so, so it’s a great make-ahead dessert if you want to impress guests without last-minute fuss.
Nutritional Information & Benefits
Each slice of this salted caramel apple tart (assuming 8 servings) contains roughly 320 calories, 15g fat, 45g carbohydrates, and 2g protein. While it’s definitely an indulgence, the apples provide fiber and vitamins like C and A, and the homemade caramel avoids added preservatives and artificial ingredients common in store-bought sauces.
If you choose gluten-free flour and dairy alternatives, this tart can fit gluten-free or vegan diets with a few adjustments. Just keep an eye on the caramel’s ingredients to maintain the right consistency.
From a wellness standpoint, I love that this recipe balances comfort with real ingredients—no weird additives or mystery sugars. It’s a treat that feels like a special occasion but isn’t off-limits.
Conclusion
So, if you’re looking for a dessert that’s easy, delicious, and guaranteed to impress, this salted caramel apple tart recipe is the one to try. It’s a little bit rustic, a little bit fancy, and totally satisfying. I love how it brings together the crispness of apples, the buttery flakiness of a homemade crust, and that smooth, salty caramel that makes every bite special.
Don’t be afraid to make it your own—add your favorite spices, nuts, or fruits to customize the flavor. And please, let me know how your tart turns out! Comments, questions, or your own twists on the recipe are always welcome.
Happy baking, friends—this tart is sure to become a new favorite in your dessert rotation!
Frequently Asked Questions
Can I make the tart crust ahead of time?
Absolutely! You can prepare the crust dough and chill it for up to 2 days before rolling it out. Just wrap it tightly in plastic wrap and keep it refrigerated.
What’s the best type of apple for this tart?
I recommend tart and firm apples like Granny Smith or Honeycrisp. They hold their shape well and balance the sweetness of the caramel.
How do I avoid a soggy crust?
Make sure to pre-chill your dough, roll it evenly, and bake the tart on a baking sheet to catch drips. You can also brush the crust with a thin layer of beaten egg before adding the apples to create a moisture barrier.
Can I store leftovers in the freezer?
Yes, you can freeze the baked tart wrapped tightly in plastic wrap and foil for up to 2 months. Thaw overnight in the fridge and warm gently before serving.
Is there a way to make the caramel less sweet?
Sure! You can add a pinch more sea salt or reduce the sugar slightly when making the caramel. Just be careful not to overcook it, as burnt caramel tastes bitter.
Pin This Recipe!

Salted Caramel Apple Tart

A cozy autumn dessert featuring tart apples, flaky crust, and homemade salted caramel sauce. Perfect for easy homemade dessert that impresses without stress.
- Prep Time: 15 minutes
- Cook Time: 40 minutes
- Total Time: 55 minutes
- Yield: 8 servings 1x
- Category: Dessert
- Cuisine: American
Ingredients
- 1 ¼ cups (160g) all-purpose flour
- ½ teaspoon fine sea salt
- ½ cup (115g) unsalted butter, cold and cubed
- 3 to 4 tablespoons ice-cold water
- 4 large apples (about 2 pounds/900g), preferably Granny Smith or Honeycrisp
- 2 tablespoons granulated sugar
- 1 teaspoon ground cinnamon
- 1 tablespoon lemon juice
- ¾ cup (150g) granulated sugar
- 3 tablespoons (45g) unsalted butter, cut into pieces
- ½ cup (120ml) heavy cream, warmed slightly
- 1 teaspoon flaky sea salt
Instructions
- In a large bowl, whisk together the flour and salt. Add the cold, cubed butter. Using a pastry cutter or your fingertips, cut the butter into the flour until the mixture looks like coarse crumbs with pea-sized bits of butter (about 5 minutes).
- Sprinkle 3 tablespoons of ice-cold water over the mixture and gently mix with a fork. Add more water, a teaspoon at a time, until the dough just comes together when pressed. Do not overwork it.
- Shape the dough into a flat disc, wrap in plastic wrap, and refrigerate for at least 30 minutes.
- Peel, core, and thinly slice the apples about ⅛-inch (3mm) thick. Toss them in a bowl with sugar, cinnamon, and lemon juice.
- On a lightly floured surface, roll the chilled dough into a 12-inch (30 cm) circle, about ⅛-inch (3mm) thick. Transfer it to a 9-inch tart pan, pressing into the edges and trimming excess dough. Prick the bottom lightly with a fork.
- Arrange the apple slices in concentric circles, overlapping slightly, covering the entire tart.
- Preheat oven to 375°F (190°C). Place the tart on a baking sheet and bake for 35-40 minutes until crust is golden and apples are tender but hold shape.
- While baking, make the salted caramel sauce: melt sugar in a heavy-bottomed saucepan over medium heat without stirring, swirling occasionally until deep amber (5-7 minutes). Remove from heat and stir in butter carefully. Slowly whisk in warm cream until smooth. Stir in flaky sea salt and let cool slightly.
- Once tart is out of oven and cooled about 10 minutes, drizzle salted caramel over the apples. Serve warm or at room temperature.
Notes
Keep butter cold for flaky crust. Do not overwork dough. Use uniform apple slices for even cooking. Swirl pan gently when melting sugar for caramel. Bake tart on a baking sheet to catch drips. Cover crust edges with foil if browning too fast. Let tart cool slightly before drizzling caramel.
Nutrition
- Serving Size: 1 slice (1/8 of tart
- Calories: 320
- Fat: 15
- Carbohydrates: 45
- Protein: 2
Keywords: salted caramel, apple tart, homemade dessert, autumn dessert, easy tart recipe, flaky crust, caramel sauce


