
“You brought what? A frozen s’mores pie?” My friend’s eyebrow shot up the moment I pulled the dish out of the freezer. Truthfully, I was half-expecting some skepticism — s’mores have that campfire-night vibe that feels more autumnal than summer dessert. But hey, that’s exactly why this creamy frozen s’mores pie with crispy chocolate crust was such a hit at our last backyard hangout.
It all started on a scorching day when the idea of turning on the oven was about as appealing as a sunburn. I wanted to capture that nostalgic s’mores magic without the usual roasting marshmallows and sticky fingers. So, I improvised — layering a crunchy chocolate crust with a luscious, cool marshmallow filling and a hint of graham cracker crunch. Honestly, I wasn’t sure it would work (or if it would taste like a sad, melted mess), but by the time it was sliced and served, the room was quiet except for the soft “Mmm”s and requests for seconds.
There’s something about that contrast — the crisp chocolate base against the dreamy, smooth filling, all chilled just right — that feels like classic comfort food given a refreshingly cool twist. And the best part? It’s easy enough to whip up on a whim, without the usual marshmallow-toasting chaos. This pie quickly became my go-to for summer get-togethers when the heat makes baking feel like a punishment.
Looking back, it’s funny how a simple craving turned into a recipe that now gets texted around and even inspired me to try some creative tweaks — like swapping the crust for a cookie crust or adding a drizzle of homemade caramel. But at its core, this pie captures that smoky-sweet nostalgia with a texture and chill factor that’s pure summertime bliss.
It’s the kind of dessert that quietly promises to turn any ordinary afternoon into something a little more special — and honestly, that’s why I keep coming back to it.
Why You’ll Love This Creamy Frozen S’mores Pie Recipe
After making this pie multiple times (three times in one week, no kidding), I can say it’s a real crowd-pleaser that ticks all the boxes for a fuss-free, impressive dessert. From my kitchen trials and feedback from friends and neighbors, here’s why this recipe stands out:
- Quick & Easy: Comes together in under 30 minutes, no oven required, which makes it perfect for those days when you want dessert but not the heat.
- Simple Ingredients: Uses pantry staples like graham crackers, chocolate, and marshmallow fluff — no hunting down fancy items needed.
- Perfect for Summer Gatherings: Whether it’s a casual barbecue or an impromptu potluck, this frozen pie fits right in with the relaxed vibe.
- Crowd-Pleaser: Kids and adults alike love the creamy texture paired with the crispy chocolate crust — it’s that combo of familiar flavors but new enough to feel special.
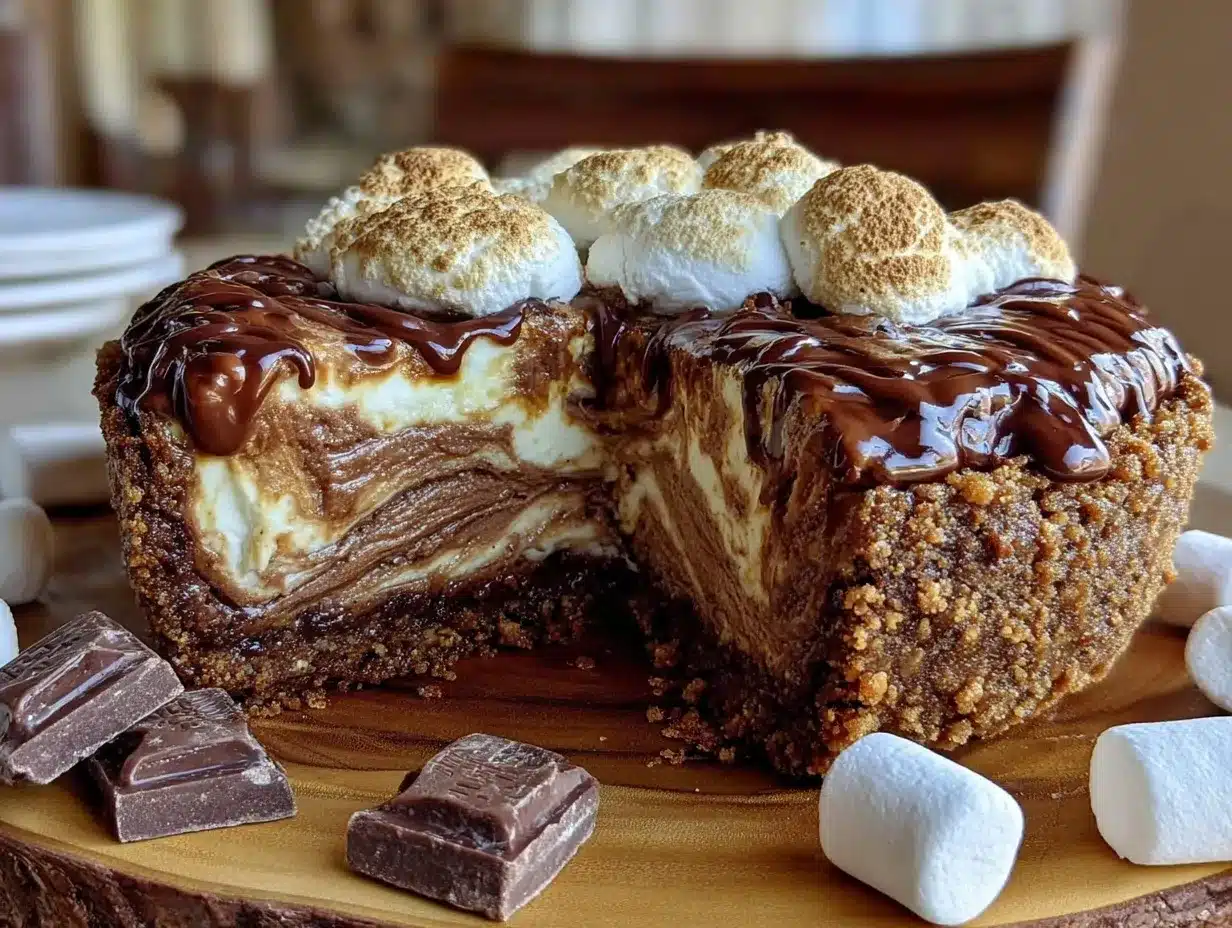
- Unbelievably Delicious: The chocolate crust stays crisp even after freezing, and the filling is silky smooth with just the right marshmallow sweetness.
What really sets this recipe apart is the way the crispy chocolate crust is made — a no-bake, crumbly base with a touch of butter that holds up beautifully against the creamy filling. Plus, blending the marshmallow fluff with cream cheese and whipped cream creates a filling that’s rich yet airy, not sticky or overly sweet like some s’mores desserts.
Honestly, this isn’t just another s’mores pie — it’s the version that makes you pause and savor every bite, the kind you’ll want to bring to every summer get-together. If you’re looking for a dessert that feels both nostalgic and refreshingly cool, this pie is your new best friend.
What Ingredients You Will Need
This recipe uses simple, wholesome ingredients to deliver bold flavor and a satisfying texture without the fuss. Most of these are pantry staples, and substitutions are easy if you want to tweak things a bit.
- For the Crispy Chocolate Crust:
- 1 ½ cups chocolate cookie crumbs (like Oreos, finely crushed; you can remove filling if you prefer less sweetness)
- 4 tbsp unsalted butter, melted (I like using Land O’Lakes for consistency)
- 2 tbsp granulated sugar (balances the bitterness of dark crumbs)
- For the Creamy Filling:
- 8 oz cream cheese, softened (room temperature for smooth mixing)
- 1 cup marshmallow fluff (the star for that s’mores sweetness)
- 1 cup heavy whipping cream, cold (whipped to soft peaks)
- ½ cup powdered sugar (adds sweetness without graininess)
- 1 tsp vanilla extract (pure vanilla, if possible)
- For the Topping:
- ½ cup mini marshmallows (optional, for extra texture)
- 2 oz semi-sweet chocolate, chopped or chips (for garnish or melting)
- Graham cracker crumbs, a handful (sprinkled on top for crunch)
If you want to switch things up, using almond flour in the crust is a great gluten-free option, and you can swap the heavy cream for coconut cream to make it dairy-free (though the texture changes slightly). For the marshmallow fluff, store-bought or homemade versions both work well.
Equipment Needed
- 9-inch (23cm) pie pan or springform pan — springform is handy for neat slices
- Mixing bowls — at least two: one for crust, one for filling
- Electric mixer or stand mixer — for whipping cream and blending filling smoothly
- Measuring cups and spoons — accuracy helps with texture
- Rubber spatula — for folding whipped cream into the filling
- Food processor or resealable bag and rolling pin — for crushing cookies (alternatively, pulse in a blender)
If you don’t have an electric mixer, a strong whisk and some patience can do the trick, but the texture might not be as light. For budget-friendly options, I recommend silicone spatulas and glass pie dishes — easier to clean and last forever. Keeping the cream cheese and bowl cold helps speed up whipping too.
Preparation Method
- Prepare the Crust: Combine the chocolate cookie crumbs and sugar in a medium bowl. Pour in the melted butter and stir until the mixture resembles wet sand. Press the crumbs firmly into the bottom and up the sides of your pie pan (about 9 inches/23 cm). Use the back of a spoon or a flat-bottomed glass for even compression. Place the crust in the freezer to chill while you make the filling. (About 10 minutes)
- Whip the Cream: In a chilled mixing bowl, beat the cold heavy cream until soft peaks form. Be careful not to overbeat or it will turn grainy. Set aside.
- Mix Cream Cheese and Marshmallow Fluff: In a separate bowl, beat the softened cream cheese until smooth and fluffy, about 2-3 minutes on medium speed. Add the marshmallow fluff, powdered sugar, and vanilla extract, and continue beating until combined and silky.
- Fold in Whipped Cream: Gently fold the whipped cream into the cream cheese mixture using a rubber spatula. Use slow, sweeping motions to keep the mixture airy and light. This step is key — if you stir too vigorously, you’ll lose the fluffiness.
- Assemble the Pie: Remove the crust from the freezer. Spoon the creamy filling into the crust and smooth the top with a spatula. Sprinkle mini marshmallows and graham cracker crumbs evenly on top.
- Freeze: Place the pie in the freezer for at least 4 hours, preferably overnight, to set fully. For best texture, cover loosely with plastic wrap to prevent freezer burn.
- Optional Garnish: Just before serving, melt the semi-sweet chocolate and drizzle over the top or use a kitchen torch to lightly toast the mini marshmallows for that campfire effect. (If you love a little extra flair!)
- Serving: Let the pie sit at room temperature for 5-10 minutes before slicing to make cutting easier and creamier on the palate.
If you notice any separation or watery spots in the filling, it usually means the cream wasn’t whipped enough or was overfolded. Keep ingredients cold and fold gently — this recipe rewards patience!
Cooking Tips & Techniques
One thing I learned the hard way: rushing the crust chilling step often leads to a soggy base. Give it at least 10 minutes in the freezer before filling, and press those crumbs firmly — that’s how you get that satisfying crunch that contrasts with the creamy filling.
When whipping the cream, start slow and gradually increase speed to avoid splattering. Also, chilling your bowl and beaters beforehand helps the cream whip faster and hold its shape longer.
Folding the whipped cream into the cream cheese mixture is where the magic happens — and where many people accidentally deflate the filling. Imagine folding a letter: gentle and deliberate. It keeps the airy texture intact, which makes the pie feel light rather than heavy.
Pro Tip: If you want to add a smoky note like traditional s’mores, a quick torch of the marshmallow topping right before serving is a game changer. Just be sure to watch closely so they don’t burn.
Also, if you want to pre-make this for a party, it freezes beautifully and can be stored for up to 5 days. Just remember to thaw for about 10 minutes before serving to regain that creamy softness.
Variations & Adaptations
Here are some ways I’ve played around with this creamy frozen s’mores pie recipe to suit different tastes and occasions:
- Peanut Butter Twist: Swirl in a ¼ cup of peanut butter into the filling for a rich, nutty surprise that pairs amazingly with the chocolate crust.
- Berry Boost: Fold in fresh or frozen raspberries into the filling before freezing for a tart contrast that brightens the dessert.
- Dairy-Free Version: Use coconut cream instead of heavy cream and dairy-free cream cheese alternatives for a vegan-friendly take.
- Grilled Crust: For a smoky flavor, try lightly grilling the crust crumbs with a bit of butter before pressing into the pan.
- Chocolate Ganache Topping: Swap the mini marshmallows for a glossy chocolate ganache if you want a more elegant finish.
One personal favorite is combining the berry boost with a slightly less sweet crust for a summer brunch dessert — it reminds me a bit of the fresh fruit elements in the pink and green ombre birthday cake I made last year. It’s a fun way to bring some color and freshness into the mix.
Serving & Storage Suggestions
This pie shines served cold — just out of the freezer or after a 5-10 minute thaw at room temperature. It’s creamy but firm enough to hold shape, making it easy to slice neat portions. A sharp knife dipped in hot water helps for cleaner cuts.
For presentation, garnish with a few toasted mini marshmallows or a drizzle of melted chocolate. Pair it with a cup of cold milk or a simple iced coffee for a refreshing combo.
Store leftovers tightly covered in the freezer for up to 5 days. Avoid storing uncovered or wrapped in loose plastic, as the crust can absorb moisture and lose its crispness. When reheating, just let the pie sit out for a few minutes rather than microwaving — the texture is best preserved this way.
Flavors tend to meld and mellow after a day or two, so if you can wait, the pie develops a richer, more harmonious taste. But honestly, it rarely lasts that long in my house!
Nutritional Information & Benefits
This creamy frozen s’mores pie isn’t exactly a health food, but it’s a fun treat made with real ingredients you can feel good about enjoying occasionally. A typical slice (1/8 of the pie) contains roughly:
| Calories | 350-400 kcal |
|---|---|
| Fat | 25g (mostly from cream and butter) |
| Carbohydrates | 35g (includes sugars from marshmallow and cookie crumbs) |
| Protein | 4g |
The cream cheese provides calcium and protein, while the dark chocolate crumbs offer antioxidants. Choosing quality ingredients, like real vanilla and unsweetened cocoa-based cookies, helps reduce unnecessary additives. This dessert fits well into a balanced lifestyle when enjoyed in moderation.
For those with dietary restrictions, the recipe adapts well for gluten-free or dairy-free diets, as I mentioned earlier, making it more accessible for different needs.
Conclusion
All in all, this creamy frozen s’mores pie with crispy chocolate crust is a refreshing way to enjoy a classic flavor combo with less fuss and more fun. It’s easy to customize, quick to assemble, and endlessly satisfying — the perfect excuse to keep your freezer stocked for last-minute summer cravings.
Whether you’re planning a backyard party or just want a cool treat after a long day, this pie delivers that cozy, nostalgic feel with a modern, chilled twist. Trust me, once you try it, it’ll become one of those recipes you find yourself making again and again. I know I can’t stop coming back to it.
And hey, if you’re ever in the mood for a savory fix afterward, you might enjoy the classic tuna melt on sourdough bread I recently perfected — it’s a great way to balance out sweet and savory cravings.
Give this pie a shot, tweak it your way, and I’d love to hear what variations you come up with!
FAQs About Creamy Frozen S’mores Pie
Can I make this pie ahead of time?
Yes! In fact, it’s best made a day ahead to allow the filling to fully set. Keep it covered in the freezer until ready to serve.
What’s the best way to slice the frozen pie?
Let it sit at room temperature for 5-10 minutes before slicing. Use a sharp knife dipped in hot water for cleaner cuts.
Can I use store-bought graham crackers instead of cookie crumbs for the crust?
Absolutely! Graham cracker crust works well and gives a more traditional s’mores base. Just crush them finely and mix with butter the same way.
Is the marshmallow fluff necessary or can I substitute something else?
The marshmallow fluff adds signature sweetness and texture. You could try melted marshmallows or marshmallow creme, but fluff is easiest and most consistent.
How do I prevent the crust from getting soggy?
Press the crust firmly and chill it well before adding the filling. Avoid letting the pie sit at room temp too long before freezing.
Pin This Recipe!
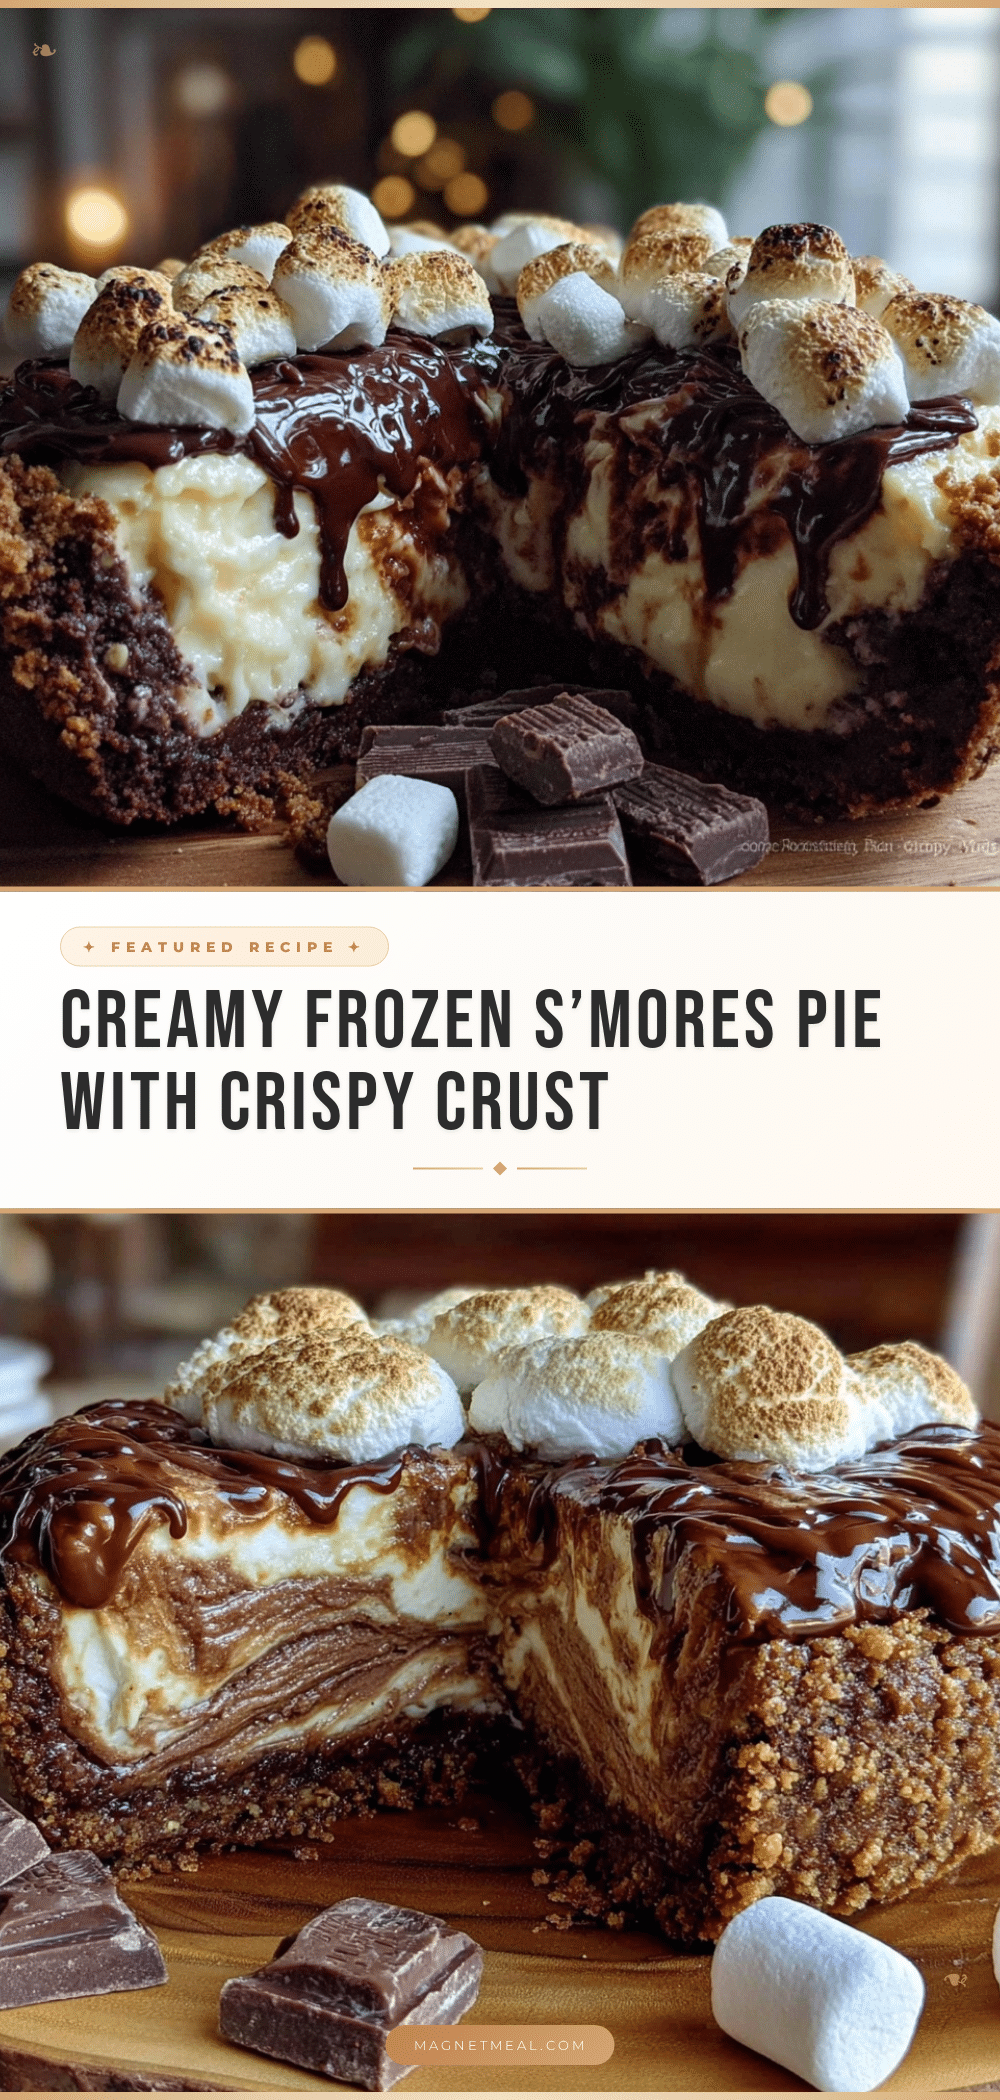
Creamy Frozen S’mores Pie with Crispy Chocolate Crust

A refreshing frozen s’mores pie featuring a no-bake crispy chocolate crust and a smooth, airy marshmallow cream cheese filling. Perfect for summer gatherings without the oven heat.
- Prep Time: 20 minutes
- Cook Time: 0 minutes
- Total Time: 4 hours 20 minutes
- Yield: 8 servings 1x
- Category: Dessert
- Cuisine: American
Ingredients
- 1 ½ cups chocolate cookie crumbs (like Oreos, finely crushed; filling removed if preferred)
- 4 tbsp unsalted butter, melted
- 2 tbsp granulated sugar
- 8 oz cream cheese, softened
- 1 cup marshmallow fluff
- 1 cup heavy whipping cream, cold
- ½ cup powdered sugar
- 1 tsp vanilla extract
- ½ cup mini marshmallows (optional)
- 2 oz semi-sweet chocolate, chopped or chips
- Graham cracker crumbs, a handful
Instructions
- Combine chocolate cookie crumbs and sugar in a medium bowl. Pour in melted butter and stir until mixture resembles wet sand.
- Press crumbs firmly into bottom and up sides of a 9-inch pie pan. Use back of spoon or flat-bottomed glass for even compression. Freeze crust for about 10 minutes.
- In a chilled bowl, beat cold heavy cream until soft peaks form. Set aside.
- In a separate bowl, beat softened cream cheese until smooth and fluffy (2-3 minutes). Add marshmallow fluff, powdered sugar, and vanilla extract; beat until silky.
- Gently fold whipped cream into cream cheese mixture using a rubber spatula with slow sweeping motions to keep mixture airy.
- Remove crust from freezer. Spoon creamy filling into crust and smooth top. Sprinkle mini marshmallows and graham cracker crumbs evenly on top.
- Freeze pie for at least 4 hours or overnight to set. Cover loosely with plastic wrap to prevent freezer burn.
- Optional: Just before serving, melt semi-sweet chocolate and drizzle over top or lightly toast mini marshmallows with a kitchen torch.
- Let pie sit at room temperature for 5-10 minutes before slicing for easier cutting and creamier texture.
Notes
Press crust firmly and chill well to avoid sogginess. Fold whipped cream gently to maintain airy texture. Let pie thaw 5-10 minutes before slicing for best texture. Can be stored in freezer up to 5 days. For gluten-free crust, substitute almond flour; for dairy-free, use coconut cream and dairy-free cream cheese.
Nutrition
- Serving Size: 1 slice (1/8 of pie)
- Calories: 375
- Sugar: 25
- Sodium: 150
- Fat: 25
- Saturated Fat: 15
- Carbohydrates: 35
- Fiber: 2
- Protein: 4
Keywords: frozen s’mores pie, no-bake dessert, summer dessert, creamy pie, chocolate crust, marshmallow filling, easy dessert


