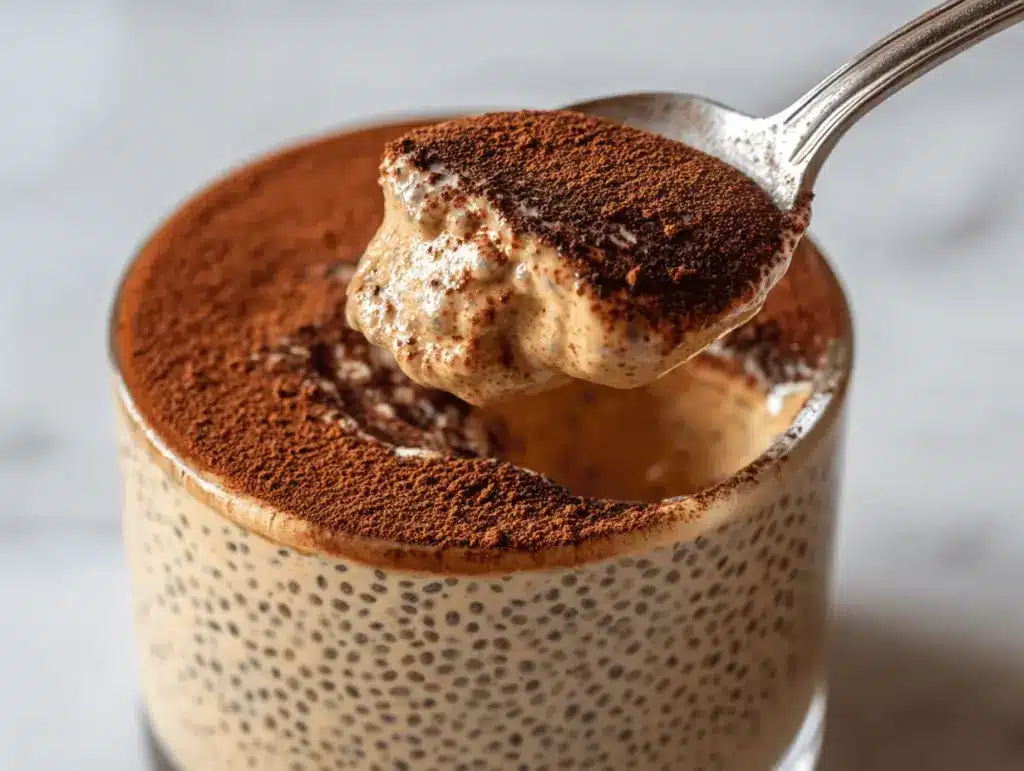
The first spoonful of this tiramisu chia pudding is like sinking into a cloud – creamy, cool, and full of that unmistakable coffee-kissed flavor. You know, the kind that instantly makes you close your eyes and smile. Honestly, I never thought a classic Italian dessert could be transformed into something so healthy and easy, yet here we are, with a pudding that checks all the boxes: luscious texture, bold espresso notes, and that signature cocoa dusting. The best part? It’s actually good for you (and your waistline won’t even notice).
My obsession with tiramisu started on a rainy night in Rome, where the dessert just melted on my tongue. Fast-forward a few years, and I needed something a bit lighter for my weekday treats. That’s how this tiramisu chia pudding was born – out of a craving and a kitchen full of chia seeds. After testing (and eating) way too many batches, I finally nailed a version that’s rich, satisfying, and surprisingly simple. It’s now my go-to for breakfast, snack, or, let’s face it, a midnight pick-me-up.
This tiramisu chia pudding recipe blends the best of both worlds: the classic, coffee-soaked flavor of tiramisu and the nutritional punch of chia seeds. It’s perfect for busy folks, dessert lovers watching their calories, or anyone who needs a little pick-me-up without the sugar crash. Plus, if you’re a meal prep fan, you’ll love how easy it is to whip up a batch ahead of time. Trust me, nobody will believe this creamy treat is actually low-cal – not even your picky eaters.
I’ve made this recipe dozens of times, tweaking the ratios and trying different milks and sweeteners, just to get it right. Whether you’re a seasoned home chef or a total newbie, you’ll find this tiramisu chia pudding forgiving, flexible, and totally craveable. Let me show you all my tricks for making every spoonful perfect!
Why You’ll Love This Tiramisu Chia Pudding Recipe
There are a million reasons to fall head over heels for this tiramisu chia pudding (and believe me, I’ve gone through most of them). Here’s why it’s become a favorite in my kitchen—and why I think you’ll keep coming back for more:
- Quick & Easy: This pudding comes together in just 10 minutes of prep (plus a little chill time), making it a lifesaver for busy mornings or when those dessert cravings hit out of nowhere.
- Simple Ingredients: No fancy or hard-to-find stuff here—just chia seeds, coffee, cocoa, milk, and a few other pantry basics. You probably already have everything you need.
- Perfect for Any Occasion: Serve it up at brunch for a wow factor, stash it in the fridge for a healthy weekday breakfast, or dress it up for a dinner party dessert. It’s fancy enough for guests, but laid-back enough for lazy Sundays.
- Crowd-Pleaser: Both kids and adults love it. My family requests this version more than the classic tiramisu these days, and that’s saying something.
- Unbelievably Delicious: Creamy, rich, and layered with coffee and cocoa, every bite feels like a treat. The texture is so dreamy, you’ll never guess it’s packed with healthy chia seeds.
What really sets this tiramisu chia pudding apart is the way all the flavors balance out—the slight bitterness of espresso, the natural sweetness from your choice of sweetener, and that light, fluffy “cream” layer. I blend part of the chia pudding for ultra-smoothness, a trick I stumbled on after a few chunky attempts. If you’ve ever found chia pudding too seedy, this will totally change your mind.
Honestly, it’s the kind of recipe you reach for when you need comfort food, but don’t want to feel weighed down. I even like it as a late-night snack because it satisfies my tiramisu cravings without the sugar overload. There’s a reason this is my most-shared recipe with friends and family—it’s just that good. Give it a try, and you’ll see why I always keep a jar in my fridge!
What Ingredients You Will Need
This tiramisu chia pudding uses simple, wholesome ingredients to deliver that iconic flavor and creamy texture, minus all the fuss (or guilt). Most of these are pantry staples, and you can easily swap things to fit your taste or dietary needs.
- Chia seeds – whole black or white, whatever you have on hand (these little guys make the pudding thick and add a fiber boost)
- Milk of choice – unsweetened almond, oat, coconut, or dairy (I usually go with unsweetened almond for the lightest result—use what works for you)
- Espresso or strong brewed coffee – cooled (the heart of tiramisu flavor; instant espresso works fine in a pinch)
- Maple syrup or honey – for sweetness (can sub with your favorite sugar-free syrup or stevia for a lower-calorie option)
- Vanilla extract – for that classic tiramisu aroma (pure vanilla is best, but imitation works if that’s what you have)
- Salt – just a pinch to bring out the flavors (trust me, it makes a difference!)
For the Cream Layer:
- Greek yogurt – plain or vanilla, for tang and richness (dairy-free or plant-based yogurt works too)
- Mascarpone cheese or cream cheese – softened, for that unmistakable tiramisu creaminess (go for mascarpone if you want the most authentic flavor, but cream cheese is a great stand-in)
- Powdered sugar – just a little, to sweeten the cream layer (use your preferred sweetener if you’d like)
- Cocoa powder – for dusting and layering (unsweetened is best; Dutch-process or natural cocoa both work)
Optional Add-Ins & Swaps:
- Dark chocolate shavings – for a little extra indulgence
- Rum or coffee liqueur – just a splash, if you want to go all-in on the tiramisu vibe (skip for a kid-friendly version)
- Protein powder – for an added protein boost; vanilla or unflavored blends in well
- Dairy-free alternatives – coconut yogurt, dairy-free cream cheese, and plant-based milk all work beautifully
Ingredient Notes: For the best pudding texture, I recommend using small, fresh chia seeds (they keep things smooth and don’t get mushy). If you’re feeling fancy, try layering with a bit of crushed gluten-free ladyfinger or vanilla cookie—so yummy, but totally optional. And if you’re watching your sugar, go for monk fruit or erythritol-based sweeteners; I’ve tested them and they work just fine.
Equipment Needed
You really don’t need much to make this tiramisu chia pudding. Here’s what I use every time:
- Medium mixing bowl – for whisking together the chia pudding base. A large liquid measuring cup works too.
- Whisk or fork – for breaking up clumps and ensuring the chia seeds disperse evenly. I prefer a small silicone whisk for easy mixing.
- Measuring cups and spoons – accuracy matters for that perfect pudding consistency.
- Small blender or food processor – optional, but I like to blend half the pudding for a smoother texture (a stick blender does the job too).
- Spatula – for scraping every last bit of cream and pudding from the bowl.
- Serving jars, glasses, or ramekins – mason jars look cute and make portioning easy, but you can use any small glass or bowl.
- Fine-mesh sieve or small sifter – for dusting cocoa powder on top (if you want that classic tiramisu finish).
If you don’t have a blender, just stir well and enjoy a more rustic texture (still delicious!). For budget-friendly tools, I’ve used thrifted glass jars and dollar-store measuring spoons for years—no need to go fancy. Clean your whisk and blender right after using, or the chia seeds can get stuck (trust me, learned that the hard way).
How to Make Tiramisu Chia Pudding
-
Mix the chia pudding base.
In a medium bowl, whisk together 1/2 cup (80g) chia seeds, 2 cups (480ml) milk of choice, 1/2 cup (120ml) cooled espresso or strong coffee, 1/4 cup (60ml) maple syrup or honey, 1 teaspoon (5ml) vanilla extract, and a pinch of salt. Whisk really well for about a minute to break up any clumps.
Tip: Let the mixture sit for 5 minutes and whisk again—this prevents the seeds from sinking or sticking together. -
Chill to set.
Cover the bowl and refrigerate for at least 2 hours, or overnight for best results. The mixture will thicken to a pudding-like consistency.
Sensory cue: It should look glossy and jiggle slightly when you tilt the bowl. If it’s too runny, let it chill longer. -
Blend for smoothness (optional).
For a creamier pudding, transfer half (or all) of the mixture to a blender and blend for 30 seconds until mostly smooth. Stir blended and unblended portions together for a layered texture. -
Make the cream layer.
In a small bowl, combine 1/2 cup (120g) Greek yogurt, 1/4 cup (60g) mascarpone or cream cheese (softened), and 2 tablespoons (15g) powdered sugar. Whisk until smooth and fluffy.
Note: Taste and add more sweetener if you prefer a sweeter cream. -
Assemble the pudding.
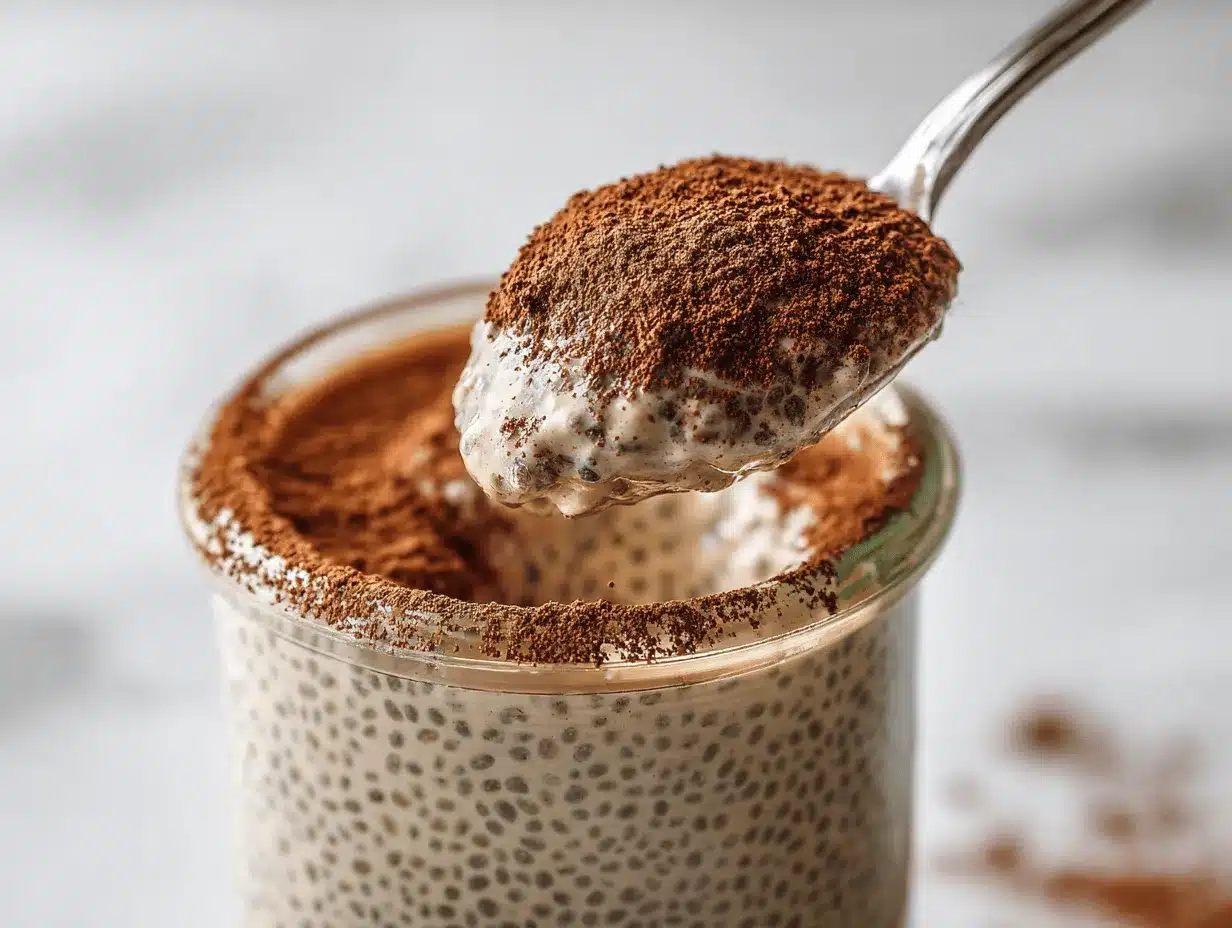
Spoon a layer of chia pudding into each serving jar or glass (about 1/3 of the way up). Add a layer of the cream mixture, then repeat with remaining pudding and cream until jars are full. Finish with a thick dusting of unsweetened cocoa powder. -
Chill before serving.
For best flavor and texture, let the assembled puddings chill for at least 30 minutes (or up to 2 days). This allows the flavors to meld and the layers to set. -
Serve and enjoy!
Garnish with extra cocoa powder, dark chocolate shavings, or a sprinkle of coffee granules. Grab a spoon and dig in—tastes just like tiramisu, but lighter!
Troubleshooting: If your pudding is too thin, stir in 1-2 more tablespoons (15-30g) chia seeds and chill for another hour. Too thick? Add a splash of milk and stir well. If you notice a bitter aftertaste, double-check your coffee isn’t overly strong or burnt (been there, fixed that!).
Prep note: You can make both the pudding and cream layer up to two days in advance and assemble just before serving. For a speedy breakfast, assemble jars the night before and grab one on the go!
Top Cooking Tips & Techniques for Perfect Tiramisu Chia Pudding
Making tiramisu chia pudding is easy, but a few pro tips can take it from good to “wow, can I have another jar?” Here’s what I’ve learned from all my attempts (including the less-than-perfect ones):
- Whisk, then whisk again: Chia seeds love to clump together. Whisk once, let it sit for a few minutes, then whisk again to keep the texture even and smooth.
- Don’t skimp on chill time: Chia pudding needs at least 2 hours to thicken, but I find overnight is best for both texture and flavor. The coffee and vanilla get deeper, and the seeds soften perfectly.
- Adjust sweetness to taste: Coffee can vary in bitterness, and everyone’s sweet tooth is different. Taste the pudding and cream before assembling, and add more sweetener if needed. (I once forgot, and let’s just say it was a little… intense.)
- Use quality coffee: Since coffee is the backbone of tiramisu flavor, use one you love. Instant works, but fresh espresso or strong brewed coffee really makes a difference.
- Layer creatively: For that classic tiramisu look, alternate layers of pudding and cream. I sometimes use a piping bag for super-neat layers, but a spoon works just fine.
- Dust with cocoa just before serving: Cocoa can get soggy if it sits too long, so wait until you’re ready to eat before giving your pudding that classic finish.
- Multitask while chilling: Prep the cream layer or clean up your kitchen while the pudding sets. It’s a great time-saver, especially if you’re meal prepping.
Common mistakes? Not letting the pudding set long enough (you’ll end up with chia soup, not pudding), or using too much coffee (it can overwhelm the other flavors). If you’re new to chia pudding, don’t stress—this recipe is pretty forgiving. I once dropped a whole jar, and it still tasted great! Just keep an eye on texture and flavor, and you’ll be golden.
Variations & Adaptations
One of the reasons I love this tiramisu chia pudding so much is how easy it is to tweak for different tastes, diets, or whatever you have on hand. Here are my favorite ways to switch things up:
- Vegan/Dairy-Free: Swap Greek yogurt and mascarpone for coconut yogurt and vegan cream cheese. Use plant-based milk for the pudding base. Totally plant-powered and just as creamy!
- High-Protein: Add a scoop of vanilla protein powder to the pudding base, or use high-protein Greek yogurt in the cream layer. Great for post-workout snacks.
- Gluten-Free: The recipe is naturally gluten-free, but if you layer with cookies or ladyfingers, make sure they’re gluten-free varieties.
- Mocha Version: Add 1 tablespoon (6g) cocoa powder to the chia pudding base for a rich chocolatey twist—seriously, it tastes like a fancy coffee shop drink.
- Keto/Low-Carb: Use unsweetened almond milk and a sugar-free sweetener like monk fruit or erythritol. Opt for full-fat Greek yogurt and cream cheese to keep carbs low.
- Nut-Free: Choose oat or rice milk, and a nut-free yogurt if needed.
- Kid-Friendly: Skip any alcohol or liqueur, use decaf coffee, and maybe add a touch more sweetener for little palates.
Personally, my favorite twist is adding a splash of spiced rum and a few dark chocolate chips to the cream layer for a grown-up, party-ready version. I’ve also tried layering with fresh raspberries in summer—highly recommend for a fruity twist!
Serving & Storage Suggestions
This tiramisu chia pudding is best served chilled, straight from the fridge. I love layering it in small mason jars or clear glasses so the gorgeous layers show through—very Pinterest-worthy, if you ask me. Sprinkle a thick layer of cocoa powder on top just before serving, and if you’re feeling extra, a few chocolate shavings or a coffee bean look super cute.
Pair it with a hot espresso or iced coffee for the ultimate treat. For brunch, serve alongside fresh berries and a crisp green salad. It also holds its own as a light dessert after heavy meals—nobody ever feels too full for a jar of this.
For storage, keep assembled puddings covered in the refrigerator for up to 4 days. The flavors deepen over time, and the texture just gets creamier. If you want to prep ahead, store the pudding and cream layers separately, then assemble right before serving.
To freeze, portion the pudding (without the cream layer) into airtight containers for up to 1 month—thaw in the fridge overnight, give it a good stir, and add cream and cocoa before serving. Reheat? Honestly, this one’s best enjoyed cold, but if you want a warm twist, let it sit at room temp for 15 minutes before eating.
Fun fact: The coffee flavor actually intensifies after a day or two, so leftovers are even more delicious. Don’t be surprised if you find yourself sneaking a spoonful for breakfast and dessert!
Nutritional Information & Benefits
This tiramisu chia pudding is a lightened-up take on the classic dessert, with all the flavor and none of the heaviness. Here’s the scoop (pun intended):
- Estimated Nutrition (per serving): 220 calories, 8g protein, 6g fat, 29g carbs, 8g fiber, 10g sugar (using almond milk and Greek yogurt; numbers may vary)
- Health Benefits: Chia seeds are rich in fiber, omega-3s, and plant-based protein, which means this pudding is satisfying and filling. Coffee adds antioxidants, and using Greek yogurt bumps up the protein and gut-friendly probiotics.
- Dietary Considerations: Naturally gluten-free, easily adapted to vegan, low-carb, or nut-free diets. Just swap your favorite alternatives and you’re set.
- Potential Allergens: Dairy (if using Greek yogurt and mascarpone), nuts (if using almond milk). Simple swaps make it friendly for all.
From a wellness point of view, I love that this dessert gives me lasting energy without a sugar crash. It’s sweet enough to feel indulgent, but packed with nutrients to keep me going. Who says dessert can’t be good for you?
Conclusion
So there you have it—my favorite tiramisu chia pudding recipe, creamy, crave-worthy, and shockingly low-cal. Whether you’re a tiramisu diehard or just looking for a healthier sweet treat, this pudding is sure to hit the spot. Customize it to your heart’s content, and don’t be afraid to play with flavors or swap ingredients.
I keep coming back to this recipe for its convenience, flavor, and how happy it makes everyone who tries it (including me—it’s a regular in my breakfast rotation). If you make it, I’d love to hear what twists you try or how you serve it up. Drop a comment, share your photos, or tag me with your version—let’s spread the chia love!
Remember, dessert doesn’t have to be complicated or heavy to be totally satisfying. Grab your chia seeds and coffee, and treat yourself to something special this week. You deserve it!
Frequently Asked Questions
How long does tiramisu chia pudding need to chill?
It needs at least 2 hours to set, but overnight is best for the creamiest texture and deepest flavor. The longer it chills, the more the flavors meld together.
Can I make tiramisu chia pudding ahead of time?
Absolutely! You can prepare the pudding and cream layers up to 2 days in advance. Assemble the jars when you’re ready to serve, or store them fully assembled for up to 4 days in the fridge.
What can I use instead of mascarpone cheese?
Cream cheese is a great substitute—just use the same amount. For a dairy-free version, try a thick coconut yogurt or vegan cream cheese.
Is this recipe suitable for kids?
Yes, just make sure to use decaf coffee and skip any alcohol or liqueur in the cream layer. You might want to add a little extra sweetener for younger palates.
Can I freeze tiramisu chia pudding?
You can freeze the pudding (without the cream layer) for up to 1 month. Thaw overnight in the fridge, stir well, and add the cream and cocoa before serving for the best texture.
Pin This Recipe!
Tiramisu Chia Pudding
This easy, creamy tiramisu chia pudding delivers all the classic Italian dessert flavors in a light, healthy, and low-calorie treat. Perfect for breakfast, snack, or dessert, it’s packed with coffee-kissed flavor and luscious texture.
- Prep Time: 10 minutes
- Cook Time: 0 minutes
- Total Time: 2 hours 40 minutes
- Yield: 4 servings 1x
- Category: Dessert
- Cuisine: Italian
Ingredients
- 1/2 cup (80g) chia seeds
- 2 cups (480ml) milk of choice (unsweetened almond, oat, coconut, or dairy)
- 1/2 cup (120ml) cooled espresso or strong brewed coffee
- 1/4 cup (60ml) maple syrup or honey (or sugar-free syrup/stevia)
- 1 teaspoon (5ml) vanilla extract
- Pinch of salt
- 1/2 cup (120g) Greek yogurt (plain or vanilla, or dairy-free alternative)
- 1/4 cup (60g) mascarpone cheese or cream cheese (softened, or vegan alternative)
- 2 tablespoons (15g) powdered sugar (or preferred sweetener)
- Unsweetened cocoa powder, for dusting and layering
- Optional: Dark chocolate shavings
- Optional: Rum or coffee liqueur (for adult version)
- Optional: Protein powder (vanilla or unflavored)
- Optional: Gluten-free ladyfinger or vanilla cookie for layering
Instructions
- In a medium bowl, whisk together chia seeds, milk, cooled espresso or coffee, maple syrup or honey, vanilla extract, and a pinch of salt. Whisk well for about a minute to break up any clumps.
- Let the mixture sit for 5 minutes, then whisk again to prevent seeds from sinking or sticking together.
- Cover the bowl and refrigerate for at least 2 hours, or overnight for best results, until thickened to a pudding-like consistency.
- For a creamier pudding, blend half (or all) of the mixture for 30 seconds until mostly smooth. Stir blended and unblended portions together.
- In a small bowl, combine Greek yogurt, mascarpone or cream cheese, and powdered sugar. Whisk until smooth and fluffy. Taste and adjust sweetness if desired.
- To assemble, spoon a layer of chia pudding into each serving jar or glass (about 1/3 full). Add a layer of the cream mixture, then repeat with remaining pudding and cream until jars are full. Finish with a thick dusting of unsweetened cocoa powder.
- Chill assembled puddings for at least 30 minutes (or up to 2 days) before serving to allow flavors to meld and layers to set.
- Garnish with extra cocoa powder, dark chocolate shavings, or a sprinkle of coffee granules before serving.
Notes
For best results, whisk the chia pudding base twice to prevent clumping. Chill for at least 2 hours, but overnight is best for flavor and texture. Adjust sweetness to taste, and use quality coffee for the best tiramisu flavor. For vegan or dairy-free, use coconut yogurt and vegan cream cheese. Store assembled puddings in the fridge for up to 4 days, or freeze the pudding (without cream) for up to 1 month.
Nutrition
- Serving Size: 1 jar (about 1/4 of recipe)
- Calories: 220
- Sugar: 10
- Sodium: 90
- Fat: 6
- Saturated Fat: 2
- Carbohydrates: 29
- Fiber: 8
- Protein: 8
Keywords: tiramisu chia pudding, healthy tiramisu, chia pudding, low calorie dessert, gluten free tiramisu, meal prep dessert, Italian dessert, easy chia pudding, vegan tiramisu option, high protein dessert


