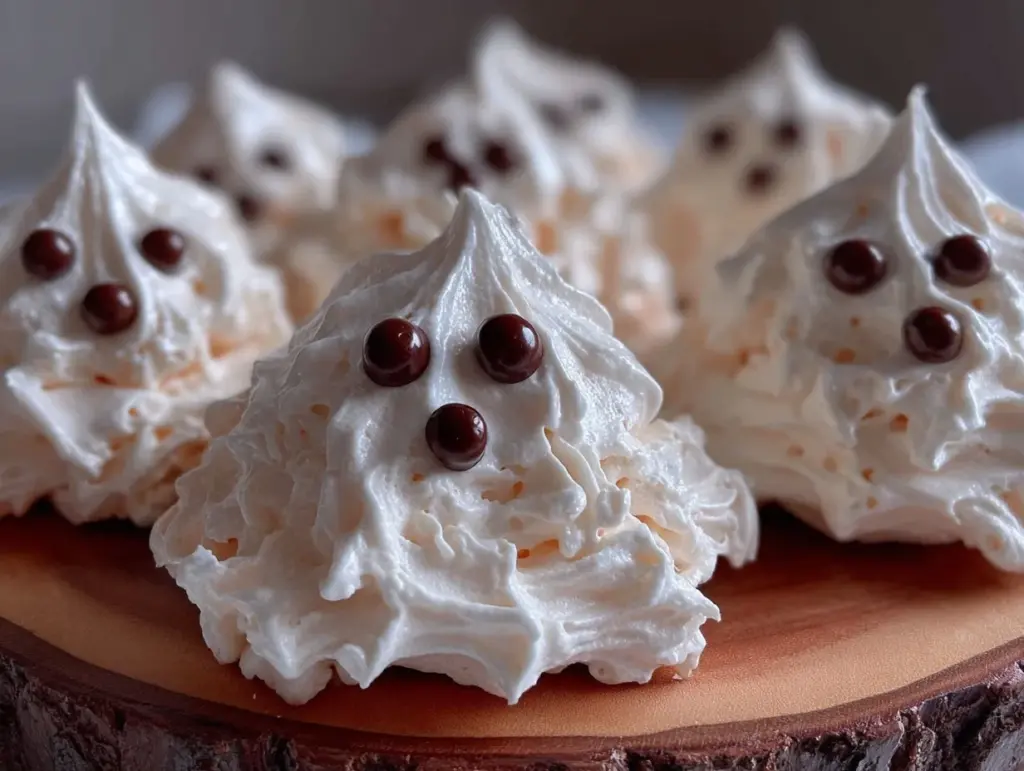
The smell of sweet sugar and vanilla wafting through the kitchen always gets me excited, but when I first made these ghost meringue cookies, it was a whole different kind of fun. Honestly, watching those delicate little ghosts form on the baking sheet brought back memories of childhood Halloween excitement—sugar highs and spooky smiles all around. I stumbled upon this recipe while looking for a light, airy treat that could double as a festive decoration. After baking these ghost meringue cookies a handful of times, I can say they’re a sure hit for anyone wanting to add a bit of whimsy to their spooky celebrations.
These ghost meringue cookies aren’t just cute; they’re surprisingly simple to make and perfect for impressing guests without the stress of complicated baking. I love how the crispy exterior melts into a sweet cloud of vanilla inside. Plus, they’re naturally gluten-free, which makes them a safe bet for many diets. If you’re like me and enjoy creating treats that are as fun to make as they are to eat, this recipe is going to be your new go-to for Halloween parties, classroom treats, or even just a sweet snack that feels festive.
Having tried various meringue recipes, these ghost meringue cookies stand out because of their perfect texture and the playful design that’s easy enough for bakers of any level to nail. Whether you’re baking with kids or just need a last-minute spooky treat, this recipe has you covered. Trust me, after baking these ghosts over a dozen times, I’m convinced they’re the ultimate way to bring a little Halloween magic to your kitchen.
Why You’ll Love This Recipe
- Quick & Easy: These ghost meringue cookies come together in about 20 minutes of prep, plus baking time, making them ideal for last-minute party planning or a fun weekend project.
- Simple Ingredients: You probably have everything in your pantry already—egg whites, sugar, cream of tartar, and a splash of vanilla. No fancy ingredients needed!
- Perfect for Halloween: They’re ideal for spooky gatherings, trick-or-treat bags, or even as a decorative edible centerpiece that guests will love.
- Crowd-Pleaser: Kids and adults alike rave about these meringue cookies—their light crunch and sweet flavor hit the spot every time.
- Unbelievably Delicious: The crisp outer shell and soft, melt-in-your-mouth center create that perfect meringue texture that’s just irresistible.
What really sets this recipe apart is the ease of piping the ghost shapes and the foolproof technique to get the right peaks and swirls. I’ve played around with different piping tips and found a simple round tip works best to create those classic ghostly figures. Plus, a tiny dot of melted chocolate or black icing for eyes finishes the look without any fuss.
This recipe isn’t just about baking—it’s about creating memories. I love how these ghost meringue cookies turn a simple batch of sweet treats into a playful, festive experience. They’re the kind of cookies that make you pause, smile, and maybe sneak one before the party even starts!
What Ingredients You Will Need
This recipe uses simple, wholesome ingredients to create ghost meringue cookies with that perfect balance of crispness and melt-in-your-mouth softness. Most of these are pantry staples, so no need for a special trip to the store!
- Egg whites (3 large): Use room temperature egg whites for better volume and stability.
- Granulated sugar (3/4 cup / 150g): Regular white sugar works best for that classic crisp finish.
- Cream of tartar (1/4 teaspoon): This helps stabilize the egg whites and keep the meringue fluffy.
- Pure vanilla extract (1 teaspoon): Adds a warm, sweet aroma that complements the sugar perfectly.
- Mini chocolate chips or melted dark chocolate: For the ghost eyes—adds a cute, spooky touch.
Optional but nice to have for a little extra flair:
- Powdered sugar (for dusting): Gives a soft, snowy effect if you want to get fancy.
- Food coloring (white or very pale gray): Usually not necessary, but can enhance the ghostly look if your meringue has a slight tint.
Quick tip: I prefer using a trusted brand like Organic Valley for eggs because the whites whip better and taste fresher. Also, fresh eggs make a world of difference in the final texture of your meringue cookies.
Equipment Needed
- Electric mixer (stand or handheld): Vital for whipping the egg whites into stiff peaks. I’ve tried hand whisking, but honestly, it’s a workout and not worth the effort here.
- Mixing bowl: Use a clean, dry metal or glass bowl—plastic bowls can hold onto grease, which deflates your meringue.
- Baking sheet: A standard 9×13 inch (23×33 cm) sheet works well for piping multiple cookies at once.
- Parchment paper or silicone baking mat: Prevents sticking and makes cleanup a breeze.
- Piping bag with round tip: A 1/2 inch (12mm) round tip is perfect for creating the ghost shape. If you don’t have one, you can snip the corner off a sturdy plastic bag.
- Spoon or small offset spatula: Useful for transferring chocolate dots or smoothing out any small imperfections.
If you’re on a budget or new to baking, a handheld electric mixer is a great starter tool and much cheaper than a stand mixer. Just make sure the beaters are clean and dry before you start. Also, I keep my piping bags reusable silicone ones—they’re eco-friendly and easy to clean!
Detailed Preparation Method
- Preheat your oven to 200°F (95°C) and line a baking sheet with parchment paper or a silicone mat. This low temperature is key for drying out the meringues without browning them.
- Separate the egg whites carefully from 3 large eggs, making sure no yolk gets in. Room temperature whites whip better, so if you forgot to take them out earlier, place the bowl in warm (not hot) water for a couple of minutes.
- In your clean mixing bowl, start whipping the egg whites on medium speed until they become frothy. Add 1/4 teaspoon of cream of tartar to stabilize the mixture.
- Gradually add 3/4 cup (150g) granulated sugar, one tablespoon at a time, while continuing to whip at high speed. This slow addition helps the sugar dissolve fully, preventing graininess.
- Whip until stiff, glossy peaks form. This usually takes about 5-7 minutes. To test, lift the beaters—if the peaks hold firm without drooping, you’re good to go. Be careful not to overwhip, or the meringue can become dry and crumbly.
- Gently fold in 1 teaspoon of vanilla extract with a spatula—don’t overmix or you’ll deflate those perfect peaks.
- Transfer the meringue to your piping bag fitted with a round tip. If you don’t have a piping bag, spooning dollops is okay, but piping gives you those classic ghost shapes.
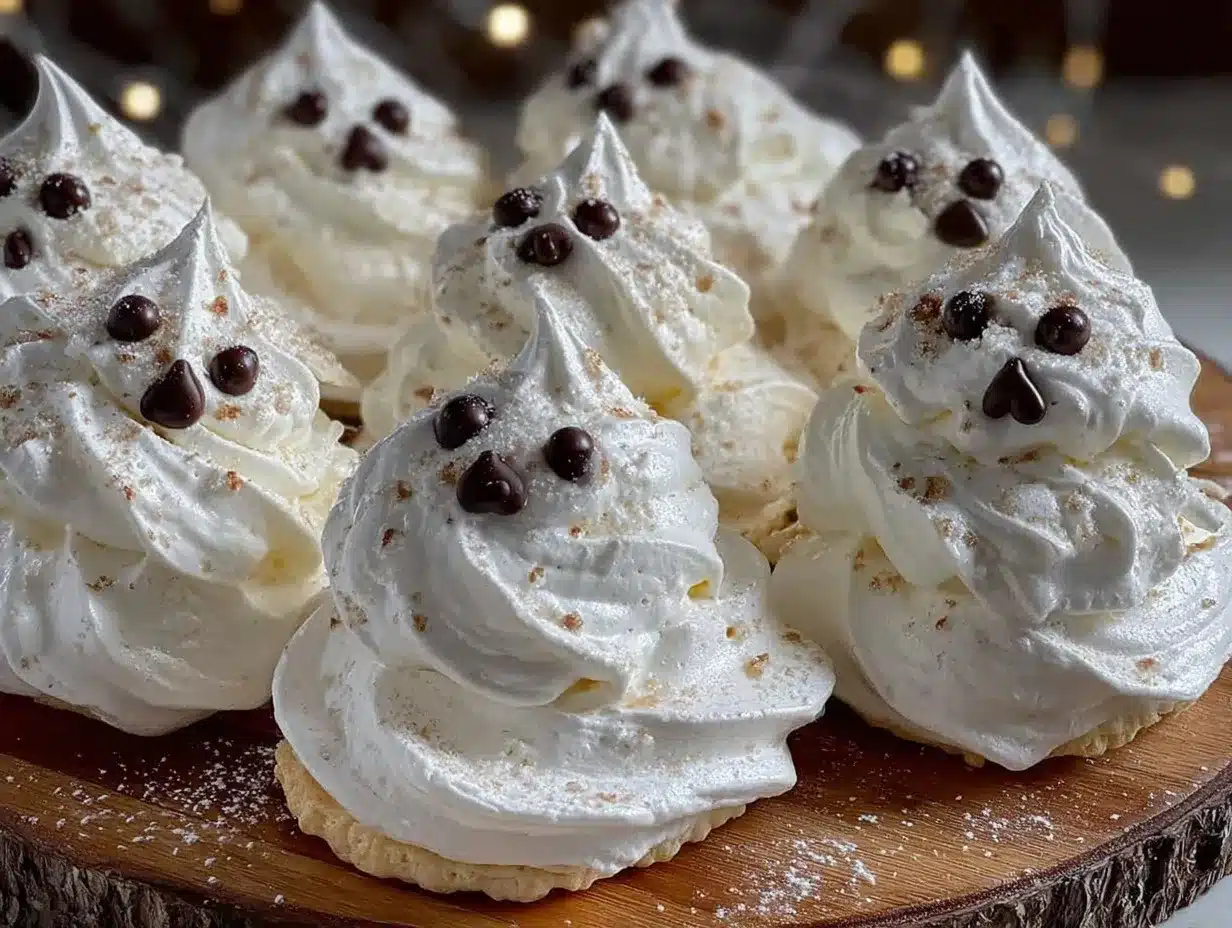
- Pipe the ghosts onto the prepared baking sheet. Start with a small base swirl (about 1 1/2 inches / 4 cm wide), then taper into a peak at the top to form the ghost “head.” The size can vary, but aim for about 2-3 inches tall.
- Add two small dots of mini chocolate chips or drop tiny melted chocolate spots for the eyes using a toothpick or small spoon.
- Bake for 1.5 to 2 hours at 200°F (95°C), or until the meringues easily lift off the parchment and feel dry to the touch. Avoid opening the oven door too often—gentle heat is essential for drying rather than browning.
- Turn off the oven and leave the meringues inside with the door slightly ajar for another hour to cool completely and dry out further. This step helps prevent cracking and keeps them crisp.
- Carefully remove and store in an airtight container once fully cooled.
Pro tip: If your meringue is sticky or glossy on the bottom after baking, it didn’t dry long enough. Just pop it back in the oven for a bit more time at low heat.
Cooking Tips & Techniques
One of the trickiest parts of making ghost meringue cookies is getting the egg whites whipped just right. I’ve learned the hard way that any grease in your bowl or on your tools will stop the whites from whipping properly. So, always rinse your bowl and beaters with hot water and dry them thoroughly before starting.
Patience is key here—don’t rush adding the sugar. Adding it too fast can cause your meringue to collapse or become grainy. Also, use superfine sugar if you have it; if not, regular granulated sugar works fine but takes a bit longer to dissolve.
When piping, keep a steady hand and use gentle pressure to form those classic ghost shapes. I find it helpful to practice a few on a spare sheet to get the feel before piping the whole batch. The peaks should be soft but defined.
Oven temperature matters a lot. Too hot, and your ghosts will brown or crack; too low, and they’ll never dry out properly. I use an oven thermometer to double-check, because ovens can be off by 25°F (15°C) or more.
Finally, don’t skip the cooling step inside the oven with the door ajar. This allows the meringues to finish drying out slowly, reducing cracks and keeping that melt-in-your-mouth texture. Trust me, it makes a big difference!
Variations & Adaptations
Want to switch things up? These ghost meringue cookies are surprisingly versatile:
- Chocolate Ghosts: Add 1 tablespoon of cocoa powder to the meringue before whipping for a spooky dark twist. Just be sure to sift it well so the meringue stays light and fluffy.
- Vegan Version: Use aquafaba (the liquid from a can of chickpeas) instead of egg whites. It whips up similarly, though it might take a bit longer, and bake at the same low temperature.
- Colored Ghosts: Add a few drops of natural food coloring (like beet juice for pink or spirulina for green) to the meringue before piping to make a colorful ghost army.
For different cooking methods, you can try dehydrating these at 175°F (80°C) for 3-4 hours if you have a dehydrator. It gives a slightly different texture but still very tasty.
Personally, I tried adding a tiny hint of peppermint extract instead of vanilla once—it was surprisingly festive and fun, especially for holiday variations of this recipe. Just a few drops, or it can overpower the delicate sweetness.
Serving & Storage Suggestions
Serve these ghost meringue cookies at room temperature for the best texture—crisp on the outside, soft inside. They look adorable arranged on a platter with other Halloween treats like pumpkin cookies or candy corn for a festive spread.
Pair them with a warm drink like hot chocolate or spiced apple cider to balance their sweetness. They also make great edible decorations on cakes or cupcakes if you want to get creative.
Store the cookies in an airtight container at room temperature for up to two weeks. Avoid humid environments, or they’ll soften and lose that perfect crunch. If you want to keep them longer, they freeze well for up to a month—just thaw at room temp before serving.
The flavors actually deepen a bit after a day or two as they settle, so if you can resist, let them rest for a day for extra deliciousness.
Nutritional Information & Benefits
These ghost meringue cookies are a light treat, with about 30 calories per cookie (depending on size). They’re naturally gluten-free and fat-free, making them a good option for those watching their fat intake or avoiding gluten.
Egg whites are high in protein but low in calories and fat, so these cookies offer a sweet treat without a big calorie hit. The recipe contains no dairy or nuts, so it’s suitable for many allergies, though be cautious if you add chocolate eyes.
From a wellness perspective, I love that these cookies satisfy my sweet tooth with minimal ingredients and no artificial additives. They’re a nice alternative to heavier, butter-laden Halloween treats and offer a bit of guilt-free indulgence.
Conclusion
If you’re looking for a fun, spooky treat that’s light and sweet, these ghost meringue cookies are exactly what you need. I adore how easy they are to make, how impressive they look, and how delicious they taste. You can customize the size, add colors, or keep them classic—it’s all about having fun in the kitchen.
Personally, these cookies have become a Halloween tradition for me—a simple recipe that brings a lot of joy and smiles. I can’t wait to hear how you make them your own! Don’t forget to leave a comment sharing your spooky variations or any tips you discover.
Happy baking, and may your treats be as sweet and spirited as these little ghostly delights!
FAQs About Ghost Meringue Cookies
Can I make ghost meringue cookies ahead of time?
Absolutely! They keep well in an airtight container at room temperature for up to two weeks. Just make sure they’re completely cool and dry before storing.
What if I don’t have cream of tartar?
You can substitute 1/2 teaspoon of lemon juice or white vinegar to stabilize the egg whites, though cream of tartar is preferred for best results.
Why did my meringue turn out sticky?
This usually means it wasn’t baked or dried long enough. Try baking at low heat a bit longer, and avoid opening the oven door too often during baking.
Can I use powdered sugar instead of granulated sugar?
It’s best to use granulated sugar for this recipe because it dissolves slowly, creating the right texture. Powdered sugar can make the meringue too soft.
How do I store leftover ghost meringue cookies?
Store them in an airtight container at room temperature, away from humidity. If you live in a humid climate, consider freezing them in a sealed bag and thawing before serving.
Pin This Recipe!
Ghost Meringue Cookies Recipe Easy Homemade Spooky Treats to Make
Light, airy ghost-shaped meringue cookies with a crisp exterior and melt-in-your-mouth vanilla center, perfect for Halloween celebrations and gluten-free diets.
- Prep Time: 20 minutes
- Cook Time: 2 hours 30 minutes
- Total Time: 2 hours 50 minutes
- Yield: About 24 cookies 1x
- Category: Dessert
- Cuisine: American
Ingredients
- 3 large egg whites (room temperature)
- 3/4 cup granulated sugar (150g)
- 1/4 teaspoon cream of tartar
- 1 teaspoon pure vanilla extract
- Mini chocolate chips or melted dark chocolate for eyes
- Optional: powdered sugar for dusting
- Optional: white or very pale gray food coloring
Instructions
- Preheat your oven to 200°F (95°C) and line a baking sheet with parchment paper or a silicone mat.
- Separate the egg whites carefully from 3 large eggs, ensuring no yolk gets in. Use room temperature whites.
- In a clean mixing bowl, whip the egg whites on medium speed until frothy. Add 1/4 teaspoon cream of tartar.
- Gradually add 3/4 cup granulated sugar, one tablespoon at a time, while whipping at high speed.
- Whip until stiff, glossy peaks form, about 5-7 minutes. Test by lifting beaters; peaks should hold firm.
- Gently fold in 1 teaspoon vanilla extract with a spatula without deflating the meringue.
- Transfer the meringue to a piping bag fitted with a 1/2 inch round tip.
- Pipe ghost shapes onto the prepared baking sheet, about 2-3 inches tall with a 1.5 inch base swirl.
- Add two small dots of mini chocolate chips or melted chocolate for eyes using a toothpick or small spoon.
- Bake for 1.5 to 2 hours at 200°F (95°C) until meringues lift easily and feel dry to the touch.
- Turn off the oven and leave meringues inside with the door slightly ajar for another hour to cool and dry.
- Remove carefully and store in an airtight container once fully cooled.
Notes
Use room temperature egg whites for better volume. Avoid grease in bowl and beaters. Add sugar slowly to prevent graininess. Use an oven thermometer to maintain low temperature. Cool meringues in oven with door ajar to prevent cracking and keep crisp. If sticky after baking, dry longer at low heat.
Nutrition
- Serving Size: 1 cookie
- Calories: 30
- Sugar: 7
- Carbohydrates: 7
- Protein: 1
Keywords: ghost meringue cookies, Halloween cookies, meringue recipe, gluten-free cookies, spooky treats, homemade meringue, easy Halloween dessert


