
“You don’t just bake these, you kind of live through them,” I muttered, fingers dusted with flour, while wrestling with the royal icing piping bag that stubbornly refused to cooperate. It was a quiet Saturday afternoon, the kind where the house feels too empty and the urge to create something sweet hits hard. I’d meant to bake just a dozen simple sugar cookies, but somehow ended up with a small army of perfectly shaped bunnies, each patiently waiting for their pastel coats and delicate details. Honestly, I wasn’t sure if I’d pulled it off at first—royal icing can be tricky, and I’m not exactly a professional decorator—but the first bite told me otherwise.
This recipe for perfect cut-out sugar cookies with royal icing bunny shapes didn’t come from a fancy cookbook or a Pinterest board obsession. It was born from a last-minute need to craft something festive and fun for a friend’s spring gathering. I remember her text: “Got any cute cookie ideas for Easter?” I thought, “Well, why not bunnies?” The whole project turned into a bit of a creative marathon, and as I sat back with that first tender, buttery cookie, I realized how much joy a simple recipe can bring when it’s done just right.
There’s something quietly satisfying about rolling out dough, pressing those cookie cutters down, and then patiently decorating each little bunny with glossy, smooth royal icing. It’s a sweet little ritual that turns ordinary ingredients into something special—something that brings smiles (and maybe a little mess) to the kitchen. This recipe stuck with me because it’s approachable, yet it delivers that “wow” factor without the stress. And if you’re wondering about mastering the royal icing part, trust me, there’s a way to make it work, even if you’re not a pro.
So, if you’re ready to make cut-out sugar cookies that impress every time, and want to bring a bit of playful charm to your baking, this recipe might just be the one you keep coming back to—bunny shapes and all.
Why You’ll Love This Recipe
I’ve baked a lot of sugar cookies over the years, but this recipe for perfect cut-out sugar cookies with royal icing bunny shapes stands out for a few solid reasons. After testing and tweaking, it’s become my go-to whenever I want that flawless balance of soft, buttery cookie and smooth, vibrant icing. Here’s the lowdown on why you’ll want to give it a try:
- Quick & Easy: The dough comes together in about 15 minutes, and chilling it for 30 minutes makes cutting and rolling a breeze. Perfect for last-minute baking plans or weekend fun.
- Simple Ingredients: No fancy extras here—just basics you probably have on hand like butter, sugar, flour, and eggs. For the icing, just powdered sugar, meringue powder, and water. Nothing intimidating.
- Perfect for Spring & Easter: Those bunny shapes are just the right touch for seasonal celebrations, school parties, or even a cozy afternoon treat.
- Crowd-Pleaser: Kids love decorating their own bunnies, and adults can’t resist the buttery sweetness paired with that smooth icing finish.
- Unbelievably Delicious: The cookies stay soft but hold their shape beautifully, which means you get a tender bite with every decorated bunny. The royal icing dries hard enough to stack but melts in your mouth.
- What Makes It Different: Unlike many recipes that yield cookies that spread too much or turn rock-hard, this one uses a little cream cheese in the dough for extra tenderness and flavor. Plus, the royal icing recipe is tested to pipe smoothly without cracking or bleeding colors.
This recipe isn’t just a cookie; it’s a little project that brings people together—whether it’s decorating with friends or gifting a box full of sweet, festive bunnies. It’s that kind of baking that feels like a warm hug, and honestly, it’s the kind of treat that makes you close your eyes and savor every bite.
What Ingredients You Will Need
This recipe uses simple, wholesome ingredients to deliver bold flavor and satisfying texture without fuss. Most of these are pantry staples, and the royal icing components are easy to find at any baking supply store or online. Here’s what you’ll need:
For the Cookie Dough:
- Unsalted butter, softened (1 cup / 227 g) – I prefer Land O Lakes for consistent quality and flavor
- Granulated sugar (3/4 cup / 150 g)
- Large egg, room temperature (1)
- Vanilla extract (1 tsp / 5 ml) – pure vanilla makes all the difference
- Cream cheese, softened (2 tbsp / 30 g) – adds moisture and tenderness
- All-purpose flour (2 1/2 cups / 312 g)
- Baking powder (1/2 tsp / 2 g)
- Salt (1/4 tsp / 1.5 g)
For the Royal Icing:
- Powdered sugar (4 cups / 480 g), sifted
- Meringue powder (3 tbsp / 21 g) – this is key for stable, glossy icing
- Warm water (6-8 tbsp / 90-120 ml)
- Food coloring (gel-based recommended) – pastel shades for those adorable bunny designs
If you want to swap out anything, here are a couple of tips: use almond flour for a slightly nutty, gluten-free twist (though the texture will be different), or substitute Greek yogurt for cream cheese, but expect a firmer dough. For icing, if you prefer a dairy-free option, meringue powder is naturally vegan-friendly, just double-check brands.
Equipment Needed
To make these perfect cut-out sugar cookies with royal icing bunny shapes, you don’t need a fancy kitchen arsenal, but a few tools will make life easier.
- Stand mixer or hand mixer: For creaming butter and sugar smoothly. Honestly, my trusty Kitchenaid has saved me on many occasions.
- Mixing bowls: Medium to large, for dough and icing prep.
- Rolling pin: A smooth, sturdy one works best. I keep a silicone one for easy cleanup.
- Bunny-shaped cookie cutters: Essential, of course! If you don’t have a bunny, any spring-themed cutter works fine.
- Baking sheets: Lined with parchment paper or silicone mats to prevent sticking.
- Cooling racks: To let cookies cool evenly and avoid sogginess.
- Piping bags and tips: I recommend disposable piping bags with a small round tip (Wilton #2 or #3) for fine details in the royal icing.
- Sifter: For powdered sugar—it keeps the icing smooth and lump-free.
Don’t fret if you don’t own piping bags; a small zip-top plastic bag with a tiny corner snipped off works in a pinch. Also, keeping your tools clean and dry is important—especially for royal icing—to get that perfect consistency. Avoid metal bowls for mixing royal icing; plastic or glass is kinder on meringue powder.
Preparation Method
- Make the cookie dough (about 15 minutes): In your mixer bowl, beat 1 cup softened unsalted butter and 3/4 cup granulated sugar on medium speed until creamy and light, about 3-4 minutes. Add 1 large egg, 1 tsp vanilla extract, and 2 tbsp softened cream cheese; mix until fully combined.
- Combine dry ingredients: In a separate bowl, whisk together 2 1/2 cups all-purpose flour, 1/2 tsp baking powder, and 1/4 tsp salt.
- Gradually add dry to wet: Slowly mix the flour mixture into the wet ingredients on low speed until the dough just comes together. Avoid overmixing; you want it soft but not sticky.
- Chill the dough (at least 30 minutes): Shape dough into a disk, wrap tightly in plastic wrap, and refrigerate. Chilling firms the dough, making it easier to roll and cut without spreading too much during baking.
- Preheat oven to 350°F (177°C): Line baking sheets with parchment paper or silicone mats.
- Roll out dough: On a lightly floured surface, roll dough to about 1/4 inch (6 mm) thickness. Keep your rolling pin moving evenly to avoid sticking or tearing.
- Cut out bunny shapes: Press your cookie cutters firmly into the dough, transfer shapes to baking sheets using a thin spatula if needed. Leave a little space between cookies to prevent sticking.
- Bake cookies: Bake for 8-10 minutes, until edges just start turning golden but centers remain pale. Overbaking leads to hard cookies, so watch closely.
- Cool completely: Move cookies to wire racks to cool fully before decorating. This stops the icing from melting or sliding off.
- Prepare royal icing: In a clean bowl, combine 4 cups sifted powdered sugar, 3 tbsp meringue powder, and 6 tbsp warm water. Beat on medium-high speed until stiff peaks form and icing is glossy—about 5-7 minutes. Adjust water or sugar for desired consistency: thicker for outlines, thinner for flooding.
- Color your icing: Divide icing into small bowls and tint with gel food colors for pastel bunny designs. Use a toothpick to add color gradually.
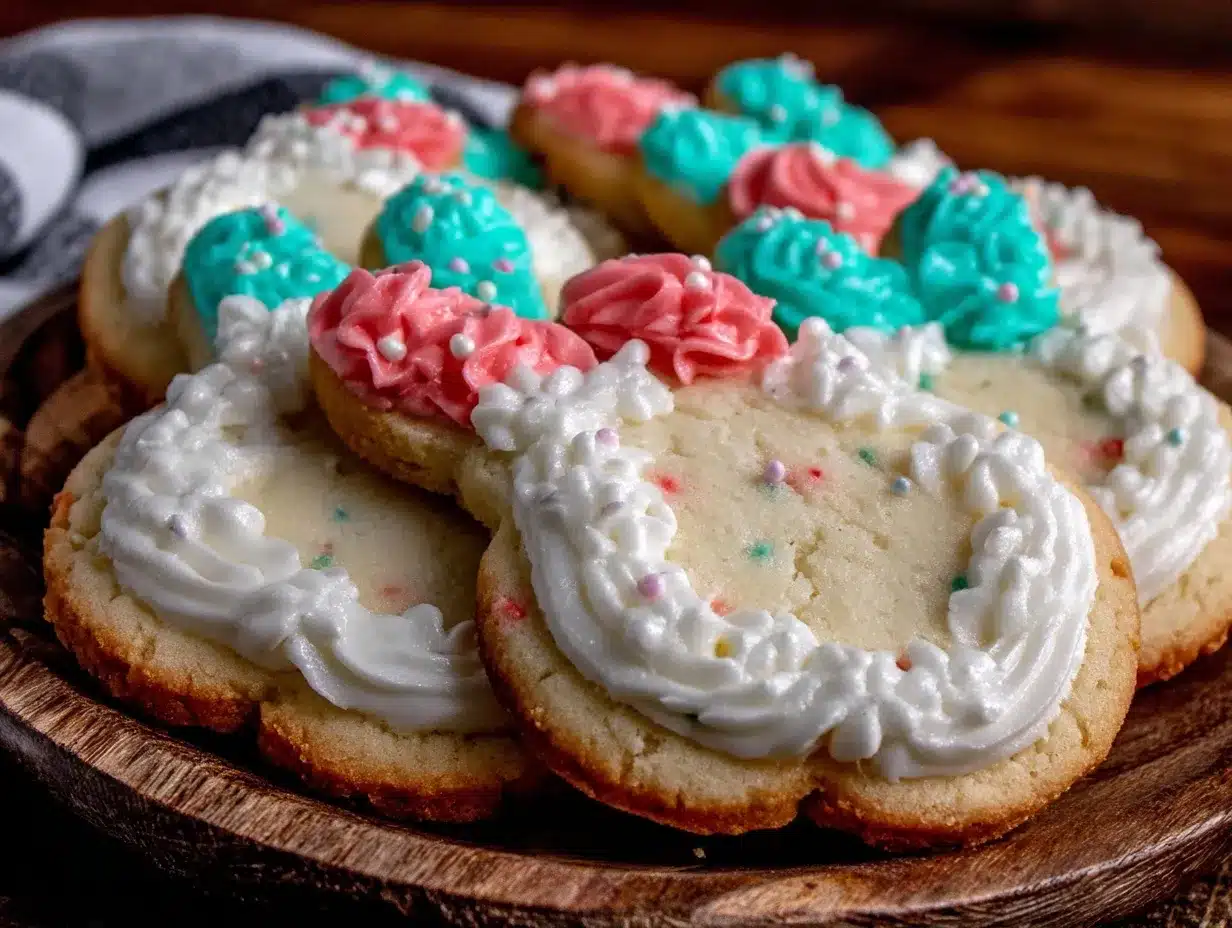
- Decorate: Outline bunny shapes first with thicker icing, then flood the inside with thinner icing. Use a damp brush or scribe tool to smooth edges or fix bubbles. Let details dry for at least 4 hours or overnight for best results.
Cooking Tips & Techniques
Mastering perfect cut-out sugar cookies with royal icing bunny shapes takes some patience, but trust me, you’ll get there with these tips:
- Don’t skip chilling the dough: I’ve learned the hard way that skipping this step leads to cookies that spread and lose their shape.
- Use room temperature ingredients: Butter and eggs mix more evenly when not cold, giving a smoother dough and better crumb.
- Roll evenly: Uneven dough means uneven baking—cookies can be burnt on edges and underdone in the middle. I use rolling pin rings to keep thickness consistent.
- Keep your royal icing covered: It dries out fast. Cover your bowls with damp towels or plastic wrap between uses.
- Practice piping on parchment: Before decorating cookies, practice outlines and flooding on scrap paper to get comfortable with the consistency and flow.
- Use gel colors: Liquid food coloring makes icing runny. Gel or paste colors give vibrant hues without changing texture.
- Patience is key: Let outlines dry before flooding inside to prevent colors bleeding. This can take 15-30 minutes depending on humidity.
- Fix mistakes quickly: If icing pools or bubbles appear, use a toothpick to pop them or smooth edges while still wet.
Variations & Adaptations
Making these cut-out sugar cookies your own is easy. Here are a few variations I’ve tried or thought you’d enjoy:
- Flavor twists: Add lemon zest or almond extract to the dough for a fresh, bright flavor. Lavender or cinnamon can also add a unique touch.
- Gluten-free version: Substitute with a gluten-free flour blend. Add a teaspoon of xanthan gum if your blend doesn’t include it to help with dough elasticity.
- Vegan adaptation: Replace butter with vegan margarine or coconut oil and use a flax egg (1 tbsp flaxseed meal + 3 tbsp water) instead of the egg. Royal icing can be swapped for a powdered sugar glaze using plant milk.
- Seasonal shapes: Beyond bunnies, try flower or egg cookie cutters for different occasions. I’ve had fun switching to pumpkin shapes for fall using the same dough.
- Decorating styles: For a rustic look, skip royal icing and dust cookies with powdered sugar or dip half in melted chocolate. Or try the ombre icing technique for a fun, colorful twist.
Serving & Storage Suggestions
These cookies are best served at room temperature once the icing is fully set. They make a delightful addition to any spring celebration or casual coffee break. For a festive spread, pair them with light teas, lemonade, or even a creamy hot chocolate for cozy afternoons.
To store, place cookies in an airtight container separated by parchment paper layers to avoid sticking. They keep well at room temperature for up to 5 days, though the texture is freshest within the first 2 days. You can refrigerate for up to a week, but bring to room temperature before serving to enjoy the full flavor and softness.
If you want to freeze them, wrap cookies individually in plastic wrap and place in a sealed freezer bag. Thaw at room temperature when ready—icing texture may soften slightly but will still taste great.
Fun fact: the flavor actually deepens a bit after resting overnight. So if you have the patience, let them sit a day before decorating. It’s a tip I discovered while prepping for a brunch where the cookies had to hold up nicely alongside a classic tuna melt lunch.
Nutritional Information & Benefits
Each cookie (depending on size) contains approximately 140-160 calories, with 6-8 grams of fat primarily from butter and cream cheese. The royal icing adds sugar but is used sparingly, so the sweetness is balanced.
Key ingredients like butter and eggs provide fat-soluble vitamins and protein, while the addition of cream cheese adds a slight tang and extra moisture without overwhelming richness. This recipe is naturally gluten-free adaptable and can be tweaked for dairy-free diets as mentioned.
While these cookies are a treat, the homemade quality means you know exactly what’s going in—no preservatives or artificial flavors. From a wellness perspective, baking at home gives you control over sugar levels, and pairing these with a balanced meal or snack (like a fresh fruit salad) makes for a satisfying indulgence without guilt.
Conclusion
Perfect cut-out sugar cookies with royal icing bunny shapes are more than just a sweet snack—they’re a little project that brings joy and creativity into your kitchen. Whether you’re baking for a holiday, a party, or just because, these cookies offer that delightful balance of buttery softness and beautifully decorated charm that wins hearts every time.
Feel free to make the recipe your own with flavors or shapes that speak to you. I love how these cookies spark conversations and smiles, especially when shared with friends or family. Honestly, it’s one of those recipes that turns baking from a chore into a moment of simple happiness.
If you give it a try, I’d love to hear about your decorating adventures or any fun twists you add. Sharing recipes and stories is what keeps the kitchen lively and full of warmth. Happy baking!
FAQs
- Can I make the cookie dough ahead of time?
Yes! You can prepare the dough, wrap it tightly, and refrigerate it for up to 3 days or freeze for up to 2 months. Thaw in the fridge before rolling. - How do I fix royal icing that’s too runny or too thick?
Add a little more powdered sugar if it’s too runny, or a few drops of warm water if it’s too thick. Adjust gradually for best results. - Why did my cookies spread too much during baking?
Likely the dough was too warm or not chilled enough. Make sure to chill the dough well and avoid overworking it. - Can I use a different shape cutter for this dough?
Absolutely! This dough holds up well for most cut-out shapes, from stars to flowers to animals. - What’s the best way to store decorated cookies?
Store them in an airtight container at room temperature, separated by parchment paper. Avoid stacking until icing is fully dry.
Pin This Recipe!
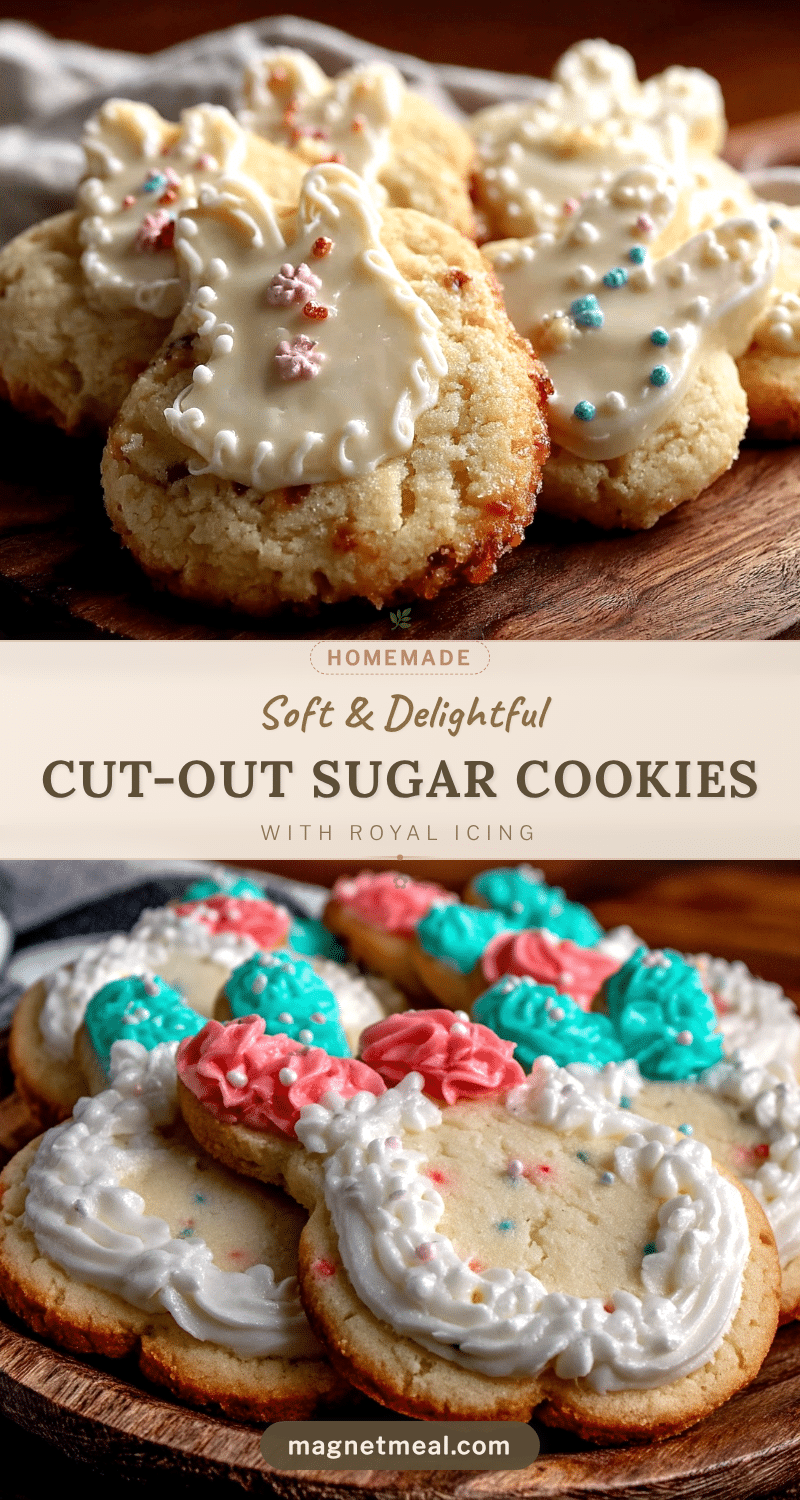
Perfect Cut-Out Sugar Cookies with Royal Icing Bunny Shapes
This recipe delivers soft, buttery cut-out sugar cookies decorated with smooth, vibrant royal icing in adorable bunny shapes, perfect for spring and Easter celebrations.
- Prep Time: 15 minutes
- Cook Time: 10 minutes
- Total Time: 55 minutes
- Yield: About 24 cookies 1x
- Category: Dessert
- Cuisine: American
Ingredients
- 1 cup (227 g) unsalted butter, softened
- 3/4 cup (150 g) granulated sugar
- 1 large egg, room temperature
- 1 tsp (5 ml) vanilla extract
- 2 tbsp (30 g) cream cheese, softened
- 2 1/2 cups (312 g) all-purpose flour
- 1/2 tsp (2 g) baking powder
- 1/4 tsp (1.5 g) salt
- 4 cups (480 g) powdered sugar, sifted
- 3 tbsp (21 g) meringue powder
- 6–8 tbsp (90–120 ml) warm water
- Gel-based food coloring (pastel shades recommended)
Instructions
- In a mixer bowl, beat 1 cup softened unsalted butter and 3/4 cup granulated sugar on medium speed until creamy and light, about 3-4 minutes.
- Add 1 large egg, 1 tsp vanilla extract, and 2 tbsp softened cream cheese; mix until fully combined.
- In a separate bowl, whisk together 2 1/2 cups all-purpose flour, 1/2 tsp baking powder, and 1/4 tsp salt.
- Slowly mix the flour mixture into the wet ingredients on low speed until the dough just comes together. Avoid overmixing.
- Shape dough into a disk, wrap tightly in plastic wrap, and refrigerate for at least 30 minutes.
- Preheat oven to 350°F (177°C). Line baking sheets with parchment paper or silicone mats.
- On a lightly floured surface, roll dough to about 1/4 inch (6 mm) thickness.
- Press bunny-shaped cookie cutters firmly into the dough and transfer shapes to baking sheets, leaving space between cookies.
- Bake for 8-10 minutes until edges start turning golden but centers remain pale.
- Cool cookies completely on wire racks before decorating.
- Prepare royal icing by combining 4 cups sifted powdered sugar, 3 tbsp meringue powder, and 6 tbsp warm water. Beat until stiff peaks form and icing is glossy, about 5-7 minutes.
- Divide icing into small bowls and tint with gel food colors for pastel bunny designs.
- Outline bunny shapes with thicker icing, then flood the inside with thinner icing. Use a damp brush or scribe tool to smooth edges or fix bubbles.
- Let decorated cookies dry for at least 4 hours or overnight for best results.
Notes
[‘Chill the dough to prevent spreading and maintain shape.’, ‘Use room temperature ingredients for smoother dough.’, ‘Roll dough evenly to ensure uniform baking.’, ‘Keep royal icing covered to prevent drying out.’, ‘Practice piping on parchment paper before decorating cookies.’, ‘Use gel food coloring for vibrant colors without changing icing texture.’, ‘Allow outlines to dry before flooding to prevent color bleeding.’, ‘Fix icing mistakes quickly while still wet using a toothpick.’]
Nutrition
- Serving Size: 1 cookie
- Calories: 150
- Sugar: 14
- Sodium: 70
- Fat: 7
- Saturated Fat: 4
- Carbohydrates: 22
- Protein: 2
Keywords: sugar cookies, royal icing, cut-out cookies, bunny cookies, Easter cookies, spring baking, cookie decorating


